Right up there with mini cocktail sausages and cheese and pineapple chunks on sticks, vol-au-vents are the epitome of 1970s retro chic when it comes to party food. Continue reading “Easy filling ideas for party vol au vents”
Family food adventures – because it's fun to play with your food

Right up there with mini cocktail sausages and cheese and pineapple chunks on sticks, vol-au-vents are the epitome of 1970s retro chic when it comes to party food. Continue reading “Easy filling ideas for party vol au vents”


Shakshuka is one of our favourite weekend brunch dishes. It’s essentially a spiced tomato and pepper stew with eggs poached on top and hails originally from North Africa. As you may have noticed, I’m a sucker for any dish that comes with an egg on top.
We play around with the ingredients of our shakshuka quite a bit – it’s one of those versatile dishes that lends itself to experimentation. This particular variation is very good and very satisfying, bringing together flavours of North Africa with elements of a Full English, namely sausage and potato. If you happen to have either or both of these leftover in your fridge, it’s the perfect way to put them to good use.

The addition of sausage is rather fitting as this week is British Sausage Week, an annual celebration of the traditional Great British Banger. We adore sausages here at Chez Bangers, as you might have guessed, but we are very fussy about the sausages we buy. Only proper bangers with a high meat content from happy pigs make it onto our table.
For this shakshuka, I used delicious Cumberland pork and honey sausages from Donald Russell, an award-winning online butcher. They are beautifully flavoured with herbs and spices and there’s a subtle sweetness from the honey, which works so well with the spicy vegetable stew. All Donald Russell sausages are made with Freedom Food pork shoulder meat as standard.
Make sure you serve this up with lots of crusty white bread for mopping up all those gorgeous spicy juices and runny egg yolk.

Serves 3 to 4
1 tsp cumin seeds
4 tbsp olive oil
2 onions, halved and sliced
1 red and 1 green pepper, sliced
2 bay leaves
handful fresh thyme, leaves picked
6 ripe tomatoes, roughly chopped
½ tsp cayenne pepper
salt and pepper
4 good quality pork sausages, grilled and chopped into bitesize chunks
3 medium potatoes, boiled and diced
3 or 4 eggs (1 per person)
Dry roast the cumin seeds in a large frying pan for a couple of minutes, before adding the oil and onions. Gently cook the onions for 5 minutes, then add the peppers, bay leaves and thyme. Continue to cook gently for 10 to 15 minutes.
Next add the chopped tomatoes, cayenne and season to taste. Turn the heat down low and cook for another 15 minutes. Then stir in the cooked sausages and potatoes.
Preheat oven to 180°C / gas mark 4.
Pour the stew into a large, flat, ovenproof dish. Using the back of a ladle or large spoon, make ‘dents’ in the stew into which you then break your eggs. Place the dish carefully in the oven and cook for 10 to 15 minutes until the eggs are just cooked – the whites should be set but the yolk still runny.
Serve immediately with lots of fresh, white bread.
Disclosure: I received a selection of complimentary sausages and sausage products from Donald Russell for review and recipe development. No money exchanged hands and all opinions expressed are my own. For details of the full range visit www.donaldrussell.com.


We all have times when we need to rustle up an easy dinner using basic, store cupboard ingredients.
You’ve been up against it at work and haven’t had time to get to the shops. It’s the end of the month and money is tight. Whatever the reason, it’s useful to have a go-to dish or two up your sleeve.
My usual store cupboard recipes tend to feature cheap ingredients like pasta, beans, pulses and whatever I find in the freezer. I make sure I always have a few bags of vegetables in the freezer for times like these. Frozen veg is just as good as the fresh stuff in certain dishes, and cheap as chips too.
Rice makes a regular appearance too. I ate a lot of rice as a little girl. For a while my mother only worked part-time while she also studied for her MA, and there wasn’t a lot to spend on food. So rice became a staple, mainly due perhaps to my mum’s Chinese roots, quite often served with just soy sauce or, if we were lucky, some stir-fried vegetables on the side.
You’d think that might put me off rice but instead it is one of my favourite foods. When I am feeling low or poorly, there’s nothing I appreciate more than a simple bowl of rice with soy sauce or perhaps some chicken stock to make a very simple rice broth.
This baked rice recipe is ever so slightly more elaborate but a real winner when it comes to store cupboard cookery. The addition of eggs turns it into a proper comfort dish.Anything topped by an egg with a runny yolk gets my vote.

It’s a very versatile and forgiving dish too. That’s the whole point of store cupboard recipes. Instead of spinach, why not throw in a few handfuls of frozen peas or sweetcorn? Instead of cannellini beans, try kidney beans or maybe a tin of tuna.
Feeds 4
1 small onion, peeled and chopped
2 garlic cloves, crushed
2 tbsp olive oil
200g basmati rice
1 x 400g can chopped tomatoes
400ml vegetable stock
1 x 400g can cannellini beans
100g frozen spinach
salt and pepper
4 large free range eggs
Preheat the oven to 180°C/gas 4.
Heat the oil in a medium-sized heavy bottomed casserole and gently cook the onion until soft and translucent. Add the garlic and cook for a minute or two, before adding the rice. Stir it all together and cook gently for another minute.
Pour in the chopped tomatoes, stock, cannellini beans and a little salt and pepper. Give it all a good stir and then place chunks of frozen spinach, nestling it in amongst the rice and beans.
Cover the casserole with a lid and bake in the oven for 20 to 30 minutes until the rice is tender. Remove the lid and, using the back of spoon, make four slight dips in the rice. Break the eggs into these wells and return the oven for another five minutes or so, until the whites are cooked but the yolks are beautifully runny.
Serve at once.
This recipe was first published in my Eat the Season column in the Wells Journal on 6 March 2014.

 As my baked rice is very easy to make and cooks in around half an hour, I’m entering it into this month’s Fab Fast Food challenge for Family Foodies, an event I run with Louisa at Eat Your Veg and it just happens to be my turn to host.
 I am also sharing this dish with Speedy Suppers, a new blog event for 30 minute meals launched by Sarah at Dinner With Crayons and Katie at Feeding Boys. I’m really rather excited about this new challenge – I just know it’s going to prove such a useful resource.


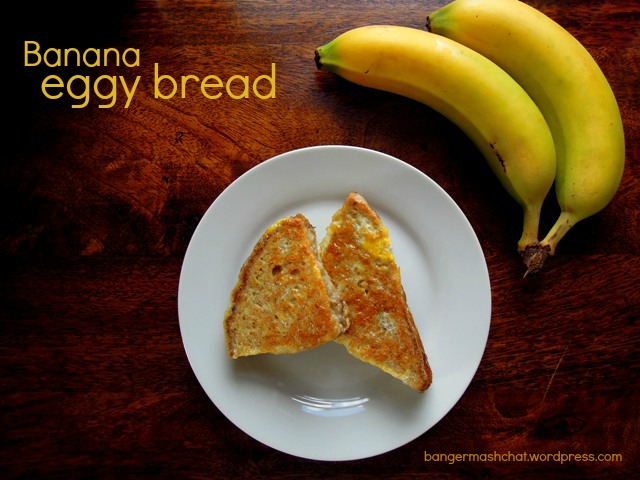
Eggy bread (otherwise known as French toast) is a popular lazy day breakfast in the Bangers & Mash house. Actually, pretty much anything to do with eggs is popular here. But eggy bread in particular takes me back to my own childhood, as I have very fond memories of my Mum making this for me, which I’d sprinkle with salt and lots of pepper and eagerly wolf down while it was still piping hot, serving after serving. And so I rather like making it now for my own daughters.
Making eggy bread with mashed banana sandwiches is perfect for anyone with a bit of a sweet tooth, and yes I’m thinking primarily of little ones here. It’s an easy way to get some extra fruit into them too.
Serves 4
2 ripe bananas
4 slices of fresh, white bread
4 eggs
2 tablespoons milk
1 tbsp sunflower oil
Peel the bananas and mash roughly with the back of a fork. Spread the mashed banana onto two of the slices of bread, cover with the remaining slices to make sandwiches, and cut each one in half.
Crack the eggs into a shallow dish, add the milk and gently whisk together with a fork. Place the banana sandwiches into the eggy mixture, and turn a few times to allow the bread to soak up egg like a sponge.
Heat the oil in a large frying pan. Carefully lift the eggy sandwiches from the dish, allowing the excess egg to run off, and pop them into the frying pan.
Fry for a couple of minutes on each side, until golden and crispy. Allow the banana to cool a little before eating. For a treat, you might like to serve with a drizzle of honey or maple syrup.

As this banana eggy bread is a delicious way to encourage your children to eat more fruit, I am entering it into this month’s Family Foodies. This is a challenge run by Eat Your Veg and Bangers & Mash, and it is my turn to host. January’s theme is Hidden Goodies.

I think it would be also rather nice to serve up this banana eggy bread at tea time, so I am also entering it into January’s Tea Time Treats, hosted by The Hedge Combers and Lavender & Lovage. The theme this months is Eggs.


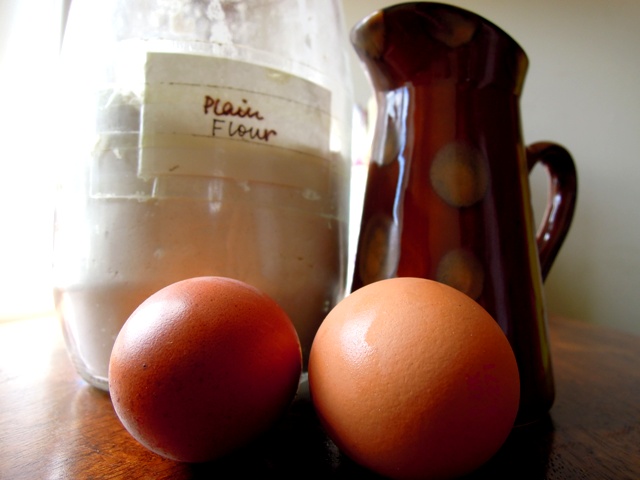
So here we are, the final month of Recipes for Life, the challenge I launched back in February with the charity SWALLOW to help its cookery club find tasty new recipes for members to make themselves.
We decided to go right back to basics for this last challenge and our final three ingredients are milk, eggs and flour. You can’t get more basic than that now, can you?
What would you make with eggs, milk and flour? The options are wide open. Sweet or savoury; breakfast, lunch or dinner (or breakfast, dinner or tea!), or even supper – the choice is yours.
As ever you can add any extra ingredients you fancy but just please make sure they are the kind of thing you’d find in most fridges or store cupboards, or else easily and cheaply available in any supermarket or grocery store. Full guidelines on how to take part are below.
The plan is to include the best recipes from the seven months of the challenge in SWALLOW’s new cookery book. SWALLOW is a Somerset-based charity, supporting adults with learning disabilities to lead more independent lives. They run a wide range of programmes for its members, empowering them with the skills and experiences to live their lives to the full, from therapeutic art courses and drama groups to domestic and work-based training.
As part of its Fit for Life programme, SWALLOW runs cookery courses, helping members learn to prepare simple, inexpensive and nutritious meals. SWALLOW is looking for new recipes for its members to cook on the course, and ultimately to include in its cookbook, that don’t require a lengthy list of ingredients and aren’t incredibly complicated to make.
We’ve had a fantastic response from the food blogging community to date, offering a diverse collection of tasty, cheap and easy dishes made from everyday ingredients. Let’s see if we can make this month the best month yet!

We really look forward to seeing your entries this month, and you never know – there might be a special prize as it’s the final challenge. You’ll just have to wait and see!
August’s entries

This is an exciting time of year for cooks; a time when so many special fruits and vegetables come into season for just a brief and tantalising spell. As with rhubarb and wild garlic, we are making the most of English asparagus and it features on our menus on almost a daily basis.
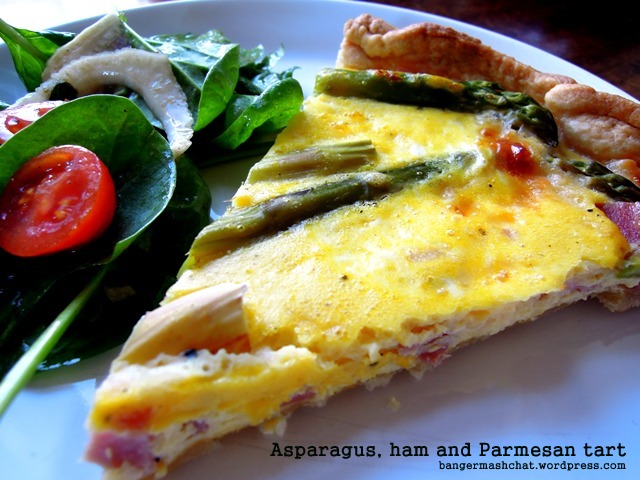
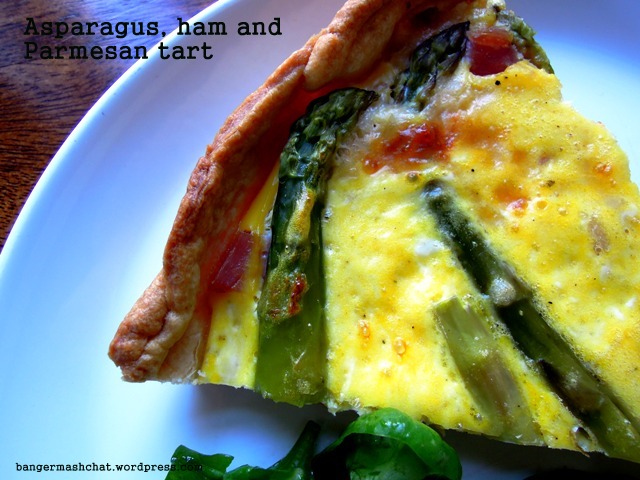
Generally I tend not to do too much to asparagus. I simply steam it and serve with a squeeze of lemon and melted butter or a soft poached egg. Our girls go crazy for it, especially when they can eat it with their fingers. But I do also enjoy asparagus in a simple tart, like this one, with ham and Parmesan. It’s incredibly easy to make, especially if you forget about making your own shortcrust pastry and buy in ready-made instead, and it’s just as good eaten cold the following day.
175g plain flour
salt
75g butter
250g asparagus
2 eggs and 2 egg yolks
200ml Greek yoghurt
50ml milk
100g Parmesan cheese
Salt and pepper
100g chopped ham
Preheat the oven to 190°C / gas mark 5.
To make the shortcrust pastry, sift the flour into a large mixing bowl with the salt. Using your finger tips, rub in the butter until it resembles soft breadcrumbs. Add enough cold water to make the mixture come together to form a firm dough. Cover with cling film and rest in the fridge for half an hour.
Lightly flour your work surface and roll out the pastry to line 9 inch well-buttered flan dish. Line the pastry with foil or baking paper and fill with baking beads or rice. Bake in the oven for about 10 minutes until the pastry just starts to turn golden. Remove the beads or rice and the foil, and brush the pastry with a little of the egg you’ll be using in the filling. Return to the oven for another 5 minutes so the egg seals the case. Allow to cool slightly while you prepare the filling.
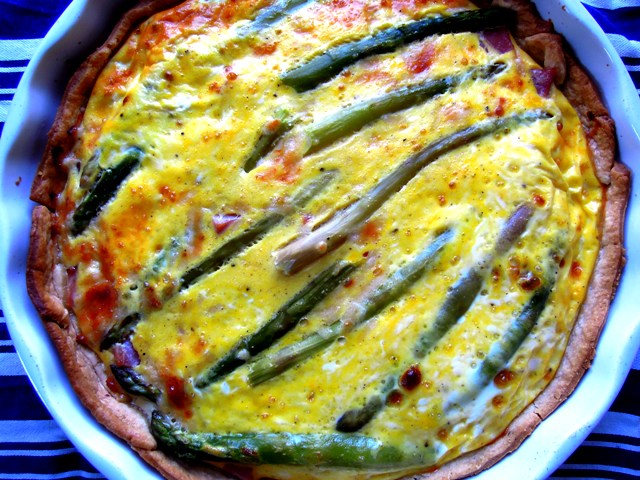
Lightly steam or boil the asparagus until only just cooked; it should still have a little bite. Refresh in ice cold water to stop further cooking and to retain that beautiful green colour. Drain well.
Gently beat the eggs and the extra yolks (which give it that lovely vibrant yellow colour) and combine with the yoghurt, milk and Parmesan cheese. Season with salt and pepper.
Arrange the chopped ham and asparagus in the pastry case and pour over the cheesy egg mixture. Bake in the oven for 15 to 20 minutes until the filling is set and golden. Leave to cool a little and serve at room temperature with a simple salad.
As this is such a seasonal tart, I’m entering it into Ren Behan’s Simple and in Season blog event, which this month celebrates its second anniversary. You’ll discover lots of tasty recipes over there using asparagus as well as the likes of rhubarb and wild garlic.


One of my many and varied jobs at the moment is editing a magazine called Manna. I’m thoroughly enjoying working on the summer issue as the theme is Food & Farming, which means I get to talk to people across Somerset who are involved in producing our food.
One of the highlights so far has been interviewing an incredibly inspiring farmer called Anita near Clevedon in North Somerset. We chatted solidly for three hours about the rewards and challenges of running a farm while bringing up a family, stopping only when her husband popped into the kitchen to let us know one of the cows was calfing and to see if I’d like to take some action photos. Of course I jumped at the chance and I very nearly blubbed when the gorgeous little heifer came into the world.
As well as the herd of dairy cows, Anita also has free-range poultry. At the end of the interview she insisted I take away with me a huge tray of eggs. I loved the fact they were all sizes and colours. These are the ‘imperfect’ ones the supermarkets won’t take.

While we do appreciate eggs in our house, we’d have been hard pushed to get through this little lot, so I shared them with my good friend Sarah. We’ve been enjoying more than our usual quota of eggy breakfasts and I’ve made a batch of lemon curd. But of course, we also had to make meringues.
I’d seen a recipe for chocolate meringues on the BBC Good Food website and have been meaning to give them a try, so here was the perfect opportunity. Mine turned out nowhere near as neat and pretty but they tasted just the ticket; light and crispy and a little bit chewy. The plain chocolate also stops them from becoming overly sweet. Which means you can easily much your way through quite a few in one sitting.
The original recipe suggests you put all the meringue mixture into a piping bag and then “make a hole in the mixture all the way to the funnel tip. Pour the chocolate into the hole.” I don’t have the most delicate of touches admittedly, but I just couldn’t pull this off, even after several attempts. So instead I simply layered the meringue and the chocolate in the bag, which worked OK. If you can get it to work, please come back and tell me how you did it!
Next time I make them, I think I might try adding some chopped nuts to the chocolate. And maybe sandwich them together with some whipped cream for an indulgent dessert…

This is a recipe I adapted for the Aga. For a conventional oven, take a look at the original recipe on BBC Good Food.
100g dark chocolate
4 egg whites
1 tbsp lemon juice
200g caster sugar
Break the chocolate into small pieces and place in a small bowl. Microwave on a low setting for a minute and then stir. Repeat again for another minute and so on, until the chocolate has just melted. Allow to cool a little while you move on to the eggs.
In a clean, large bowl add a tablespoonful of lemon juice to your egg whites and whisk until they form stiff peaks. Then add a tablespoonful of caster sugar and whisk it in, then whisk in another and repeat until you’ve worked in all the sugar. Your meringue will now be looking sumptuously thick and glossy.
Line a couple of baking sheets with greaseproof paper.
Spoon a little meringue into a piping bag and then pour in a little chocolate. Keep alternating until you’ve filled the bag. Pipe meringues onto the baking sheets about 4-5cm across, taking care to space them well. Keep going until you’ve used all your meringue mixture. Depending on how big your piping bag is, you may need to refill once or twice.
Start by baking the meringues at the top of the roasting oven for 5 minutes and then transfer to the bottom oven for 40-50 minutes. Check every now and again as you don’t want them too crunchy. I think they’re perfect when they’re still a little chewy.


I’ve been meaning to try making a lemon meringue pie for ages now. I thought they were fussy, complicated puddings to make, but I finally got around to it last weekend and it turned out to be so much easier than I was expecting.
I used a recipe from master baker Dan Lepard, and it was indeed as simple as he promised. The pastry is perfectly light and crisp, while the meringue is soft, fluffy and marshmallow-like. I made one slight change and that was to add some lime juice to the proceedings. I like a lot of contrast in my lemon meringue pie. The meringue has to be verging on sickeningly sweet and so that must be counteracted with a really tangy sharp citrus. I like super tangy. Lime as well as lemon is perfect for that.
The pie went down well with the whole family, particularly Jessie who isn’t generally much of a pudding girl. She came back for seconds. And I enjoyed the leftovers for breakfast on Easter Monday – ever so decadent.
NB instructions for Aga cooks are at the end of the recipe.

For the pastry
125g plain flour
½ tsp salt
25g icing sugar
75g butter
1 egg yolk
2 tsp cold water
For the lemon filling
100ml lemon juice
100ml lime juice
50ml orange juice
150g caster sugar
25g cornflour
3 egg yolks
25g butter
For the meringue
4 egg whites
125g caster sugar
To make the pastry, put the flour, salt and sugar in a bowl. Chop the butter into small pieces and rub into the flour. Mix in the egg yolk and water to form a soft paste. Wrap in clingfilm and chill in the fridge for half an hour.
Dan Lepard says to take a 20cm round deep tart case with a removable base but I used a cake tin. Grease your tart case or cake tin. Roll out the dough fairly thinly and line the tin’s base and sides. Press gently into the sides, trim the edges and then chill for another half an hour.
Preheat the oven to 170C or Gas Mark 3.
Line the pastry case with greaseproof paper and weigh down with baking beans. Bake the pastry case for 20 to 25 minutes. Then remove the paper and bake for another 5 to 10 minutes until the pastry is dry and golden. Leave to cool.
To make the filling, place the lemon, lime and orange juices in a saucepan with the sugar, cornflour and egg yolks and whisk until smooth. Place over a low heat and add the butter. Keep stirring while it comes to the boil. Pour the filling into the tart case, leaving a slight gap at the top. Leave to cool completely.
For the meringue, beat the egg whites in large bowl with an electric mixer until soft peaks form. Gradually add the sugar, a tablespoonful at a time, beating in well before the next lot of sugar goes in. You should end up with a thick and glossy meringue.
Spoon the meringue on top of the lemon tart. With the oven still set to 170C or Gas Mark 3, bake for roughly 25 minutes until golden and the meringue has set but is still soft. Leave to cool before serving.
If you’re using a two-door Aga like me, bake the pastry case on the floor of the roasting oven for 10 to 15 minutes, before removing the beads and baking for a further 5 minutes or so until the pastry is golden.
To cook the full pie, start it off in the middle of the roasting oven for about four minutes until the meringue turns a light brown. Then carefully move down to the top of the simmering oven for another 20 minutes until the meringue is set.

If you liked this, you might also like to try:


What is it about pancakes that makes them just so popular? Whenever I announce to my brood that pancakes are on the menu, there are always shrieks of excitement. They don’t seem to care either what the pancakes are made from, so if you’re finding it tricky to get certain foodstuffs, such as beetroot, into your youngsters, pancakes could be the ideal way to sneak it past them.
These pancakes are made from beetroot and carrot, although I’m sure if you did a blind taste test no-one would be able to guess. They simply taste good in a savoury, wholesome kind of way. I was rather hopeful the final pancakes would be pink like the batter. My girls would have loved that. But unfortunately the colour changed as the pancakes fried. Perhaps if you use only beetroot you end up with a stronger colour? I need to experiment some more, I think.

I came up with these pancakes as my entry for this month’s Recipes for Life challenge. The three set ingredients for March, you see, are beetroot, carrot and cheese. So the beetroot and carrot are in the pancakes, while the cheese comes in the form of Italian mascarpone cheese combined with Greek yoghurt, lemon juice and lots of fresh herbs for a very delicious topping.

I’m running the Recipes for Life challenge in partnership with Somerset charity SWALLOW which works with adult with learning difficulties. Over a six month period we’re challenging food bloggers to come up with a whole host of tasty, healthy and easy-to-cook dishes and the best of these will appear in a new cookbook to raise money for the charity. So if you have your own ideas of what to cook with beetroot, carrot and cheese why don’t you get involved?
But for now, back to my pancakes…
Serves 4 to 6
250g self-raising flour
50g beetroot, scrubbed and grated
50g carrot, scrubbed and grated
2 tsp bicarbonate of soda
salt and pepper
2 eggs
90g melted butter
420g milk
vegetable oil for frying
200g mascarpone cheese
200g Greek-style yoghurt
2 tbsp lemon juice
large handfuls of fresh parsley and mint (or whatever herbs you fancy), roughly chopped
For the pancake batter, put the flour, beetroot, carrot, bicarbonate of soda and a generous grind of both salt and pepper in a large bowl and mix together well.
Gently beat the eggs in a separate bowl and then add the melted butter and milk and mix. Add this to the beetroot and carrot mixture and stir until everything is well combined.
Heat a spot of oil in a heavy-based non-stick frying pan. When it’s hot, drop in spoonfuls of the batter and cook your pancakes for a minute on each side. Keep your pancakes warm in the oven until you’ve worked through all the batter.
To make the herby topping, simply put the mascarpone and yoghurt in a bowl with the lemon juice and throw in the chopped herbs. Mix it all together and season to taste.
Serve your pancakes with a good dollop of the herby mascarpone on top.

As this dish features lots of lovely fresh herbs, I’m also entering it into Lavender & Lovage’s Herbs on Saturday blog challenge, which this month is being hosted by London Busy Body. Lots of lovely recipes featuring herbs as a star ingredient have already been entered, so do take a look. I’m sure you’ll be inspired!

I’m also entering it into Turquoise Lemons’ fantastic No Waste Food Challenge where food bloggers are asked to share recipes using a particular ingredient in a bid to prevent food waste. This month the challenge is hosted by Elizabeth’s Kitchen. Do pop over and take a look. A great resource if you’ve got lots of eggs to use up!

And finally as beetroot and carrot are both in season, I’m entering the pancakes into this Fabulicious Food’s Simple and in Season challenge, which this month is being hosted by my fantastic Food Blogger Connect buddy Chez Foti.


Have you ever wanted to say “I love you” in egg-form but never quite known how? Alright, so the vast majority of people are unlikely to have felt such an urge but for those that have, this neat little Eggspress heart-shaped boiled egg mould might be just the thing!

When I was first invited to review an Eggspress on the blog, I immediately said yes. Eggs are a staple foodstuff in our house and we get through a fair few. So I’m always open to new ways to serve this most ovate of ingredients.
But on receiving my Eggspress, I realised it was actually for moulding cold, hard-boiled eggs. I’d assumed for some reason it was a mould in which to poach an egg, which actually would have been slightly more useful I think. My family doesn’t really eat all that many hard-boiled eggs. I much prefer them soft-boiled so I can dip my hot buttered soldiers into them on a lazy Sunday morning.
Anyway, on Saturday I tried the Eggspress out on my daughters. They were having a cold tea and I thought some hard-boiled eggs might make a nice addition.
The idea is you hard-boil your egg, leave it to cool, remove the shell and then place it into the Eggspress mould. Once you’ve firmly closed the mould, you then leave it for another 10 minutes immersed in cold water while the egg is squeezed into a heart-shape. To be honest, I found all this a little bit of a faff. The instructions say it should work on small to medium eggs, but I found my medium eggs were still a little too big and had to be forced into the mould – which probably explains why they came out slightly wonky!
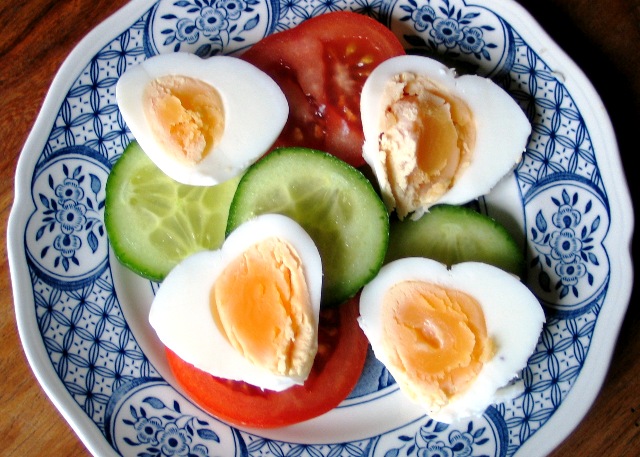 My children did remark that they thought the eggs looked lovely, so perhaps the effort was worth it. For all of those five minutes that it took the kids to wolf down their tea…
While I don’t think the Eggspress will end up getting much use in the Bangers & Mash house, maybe it’s more your cup of tea? If you’re the kind of person who prefers their eggs small, cold and hard-boiled and has a penchant for anything heart-shaped, then you really need to have one!
I have one Eggspress to give away to one of my blog readers. Simply add a comment below letting me know you’d like one before midnight on Thursday 14 February, and it could well be yours. The first name drawn from the hat after the closing date will be the lucky winner.
Please note: this competition is only open to UK residents due to shipping costs and there is no cash or other product alternative.
Disclosure: I received two complimentary Eggspress moulds for review and giveaway purposes. No money exchanged hands.
