Give us a PECK!

Be still my beating banger…

With just a couple of days to go until Valentine’s Day, here’s a tasty idea for treating your loved one to a ‘hearty’ breakfast in bed.

HECK, makers of the sarnie-friendly square sausage, have created a delicious PECK heart-shaped sausage for the season of love, complete with a cleverly designed card built into the pack to capture your own romantic message. Since we’re particularly partial to a sausage here at Chez Bangers, we simply had to give them a go ourselves. Continue reading “Give us a PECK!”

Chocolate pancakes with berries & rose-scented yoghurt

Chocolate pancakes2 web

Pancakes are always a popular weekend breakfast in our house, and then when you go and add chocolate into the mix, well, who doesn’t love chocolate? So these bad boys are always a winner.

Served with juicy berries (I always keep a stock in the freezer so we can them all-year-round) and a heavenly perfumed rosewater yoghurt and drizzled with syrup or honey, these simple pancakes are elevated to celebration status, perfect for Valentine’s Day, Shrove Tuesday and birthdays. Continue reading “Chocolate pancakes with berries & rose-scented yoghurt”

Cherry-stuffed poussin with braised lettuce

poussin

Love is in the air with Valentine’s Day just a couple of days away. This cherry-stuffed poussin is one of the most romantic meals I can think to serve my husband, but I admit it probably isn’t a first date dinner.

Devouring a whole bird can be a slightly messy affair and getting to the best bits will certainly entail eating with your fingers. Yes, you’ll end up with juice running down your chin and hands. I can’t see a problem with that at all. There’s something rather sexy about getting messy with food.

But if you’re looking to impress your new beau, you might want to think about something a little tidier.
The idea of stuffing the poussin with cherries and nuts came from a beautiful book by Bethany Kehdy, The Jewelled Kitchen; a collection of Lebanese, Moroccan and Persian recipes.

Kehdy stuffs her chicken with albaloo, barberries, pistachios and rice. I’ve adapted her recipe a little to use dried cherries, which are slightly easier to get hold of, cashew nuts, as those are what I happened to have in, and bulgur wheat because, well I can’t seem to get enough of bulgur wheat at the moment. I really like its tender, chewy texture and use it a lot in salads. It’s particularly good with feta cheese and pomegranate seeds.

poussin

There is a hint of pomegranate in this stuffing too, in the form of pomegranate molasses, which bring a heavenly sweet and sour tang to the dish. All in all, this stuffing brings a beautifully fragrant, almost exotic, element to the poussin – just perfect for wooing your lover.

The poussin is so delicious, I’ve served it very simply with braised lettuce. You’ll notice there are no stodgy carbohydrates in this meal, as I really don’t think you want to end up completely over-stuffed and unable to move at the end of Valentine’s Day.

poussin

Cherry-stuffed poussin with braised lettuce

Serves 2

60g dried morello cherries
80g bulgur wheat
½ tbsp sunflower oil
small red onion, finely chopped
2 garlic cloves, crushed
30g cashew nuts
1 tbsp pomegranate molasses
½ tsp cinnamon
salt and pepper
2 x 450g poussins
25g soft butter
olive oil
½ tsp cinnamon
4 spring onions, finely sliced
40g butter
2 little gem lettuces
150ml hot chicken stock

Preheat the oven to 220°C / gas mark 7.

Place the dried cherries in a cup of hot water and leave to soak for 10 minutes and then drain.

Place the bulgur wheat in a bowl and pour over boiling water to at least double the height. Leave for 15 minutes, then drain.

Fry the onion in the oil until soft. Add the garlic and fry gently for another minute. Remove from the heat. Add the cherries, cashew nuts, bulgur wheat, pomegranate molasses and cinnamon and give it all a good stir. Season to taste.

Place the two poussins in a small roasting tin and carefully spoon the stuffing into each of the cavities. Truss up the poussins to keep the stuffing inside.

Rub the skin with the butter and drizzle with a little olive oil. Sprinkle the skin with cinnamon, salt and pepper. Roast in the oven for around 40 minutes. Poke a skewer into the thickest part of a leg and if the juices run clear, the poussin is cooked. Leave to rest in the tin for 10 minutes.

In a saucepan, gently cook the spring onions in the butter until soft. Shred the lettuces and stir into the buttery spring onions. Cook for a minute or two until the lettuce is wilted, then pour in the hot stock. Simmer for five minutes or so until the lettuce is tender and the stock has reduced. Taste and season if needed.

Serve the poussins on a bed of braised lettuce, remembering to untie them first. You may wish to pull out a little of the stuffing to reveal the treats inside.

This recipe was first published in my Eat the Season column in the Wells Journal on Thursday 6 February 2014.

The Valentine scribble cake

Valentine Scribble Cake Collage

When I want to give my children a treat, I bake them a big chocolate cake.

When I want to show my children how much I love them, I’ll leave them in charge of decorating said chocolate cake.

valentine scribble cake

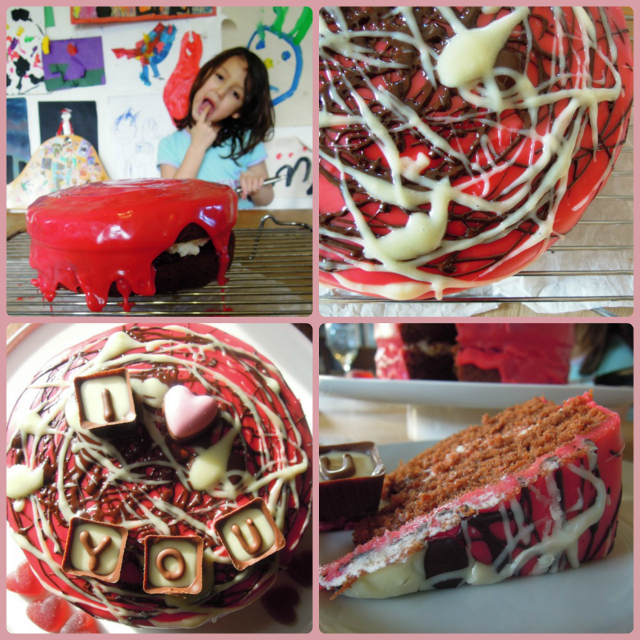
Et voila! Here you have our Scribble Valentine Cake! Mia came up with the name.

My daughters don’t think Valentine’s Day should be just for their mummy and daddy. Surely it’s a celebration for the whole family; we all love each other, don’t we? Especially when it usually means there are gifts of chocolates involved.

So this year in the run up to V Day, we decided to make a rather large family chocolate cake.

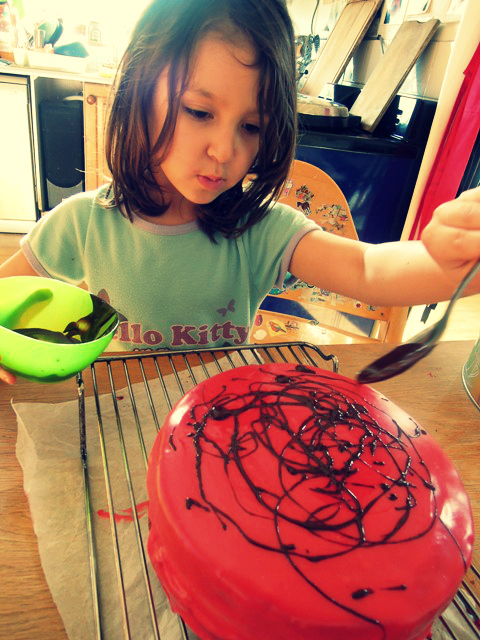
Yes, I know the end result is garish and gaudy but Mia had a blast being given (almost) free rein to decorate it, and all of us were more than happy to eat it.

scribble cake

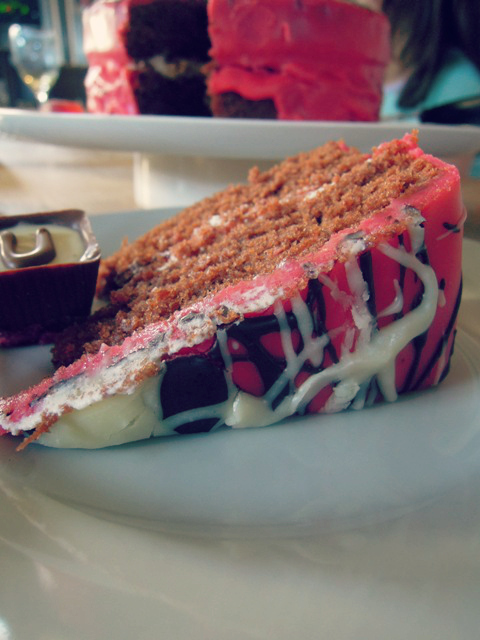
It is a simple chocolate sponge sandwich, filled with strawberry jam and whipped cream. We then covered it with a white chocolate icing, which was supposed to be coloured a tasteful shade of pink but ended up a very vibrant red. I’d like to blame the children, but to be honest it was my hand that slipped as the food colouring went in.

Mia then went to town creating her own Jackson Pollock style artwork, dribbling first melted plain and then white chocolate on top of the cake, and of course all over herself and the floor at the same time. For the final piece de resistance, Mia added some lovely Thornton’s Valentine’s chocolate truffle cups to spell out I heart you on top. We also had a bag of Thornton’s strawberry jelly hearts but Mia decided against using those as well at it might be slightly OTT. You see, she can be quite a discerning child really. Jess and Mia gobbled up the jelly hearts once they finished licking the bowl out, natch.

valentine scribble cake

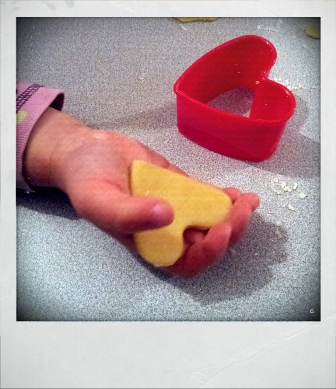
If you’d like to attempt creating your own chocolate action art masterpiece with your little ones, here’s how we made ours. It’s a slight variation on the tried and tested chocolate cake I make for most special occasions in our house.

Valentine scribble cake

3 tbsp cocoa powder
200g caster sugar
200g soft butter
3 eggs
200g self-raising flour, sifted
1 tsp baking powder
4 tbsp strawberry jam
200ml double cream

For the icing

100g butter
100g white chocolate, plus another 25g for drizzling
100g icing sugar
2 tbsp double cream
red food colouring
25g plain chocolate
plus any other decorations you care to throw on top

Preheat the oven to 180°C/gas mark 4. Grease and line the base of two 20cm cake tins with baking parchment.

In a cup mix the cocoa with 4 tablespoons of boiling water until smooth.

In a large bowl, beat the sugar and butter until light and fluffy. Take some time with this; keep beating for a good five minutes. Add the cocoa mixture, eggs, flour and baking powder and mix well.

Split the mixture between the two cake tins and bake for 20 to 25 minutes in the oven. The cakes are ready when an inserted skewer comes out clean. Allow to cool before removing the cakes from the tins.

To make the icing, place the butter, white chocolate, icing sugar and double cream into a bowl and place over gently simmering water in a pan. Stir until it’s all melted and blended together. Add a few drops of red food colouring – just one or two if you want a pretty shade of pink, or a good glug if you fancy a slightly more vivid hue like ours. If the white chocolate goes a little lumpy or grainy, as it can do sometimes (white chocolate isn’t particularly easy to work with when it’s melted), you can try stirring in a touch more double cream and/or passing the icing through a sieve into another bowl. Allow the icing to cool a little.

Whip the double cream until it forms soft peaks.

Remove the baking parchment from both cakes. Place one a wire rack, over kitchen towel or newspaper to catch the icing drips later. Firstly spread the cake with jam and then with whipped cream. Place the second sponge on top and press down.

Pour the red icing over the top and allow to set slightly. In separate bowls, melt the white chocolate and plain chocolate and then, using a teaspoon, drizzle over the cake in an ‘artistic’ manner. Finally, decorate with any other sweeties or chocolates you fancy.

valentine scribble cake

As this cake is definitely one to make for and with those you love, particularly those of the younger/smaller variety, I am entering it into February’s Family Foodies challenge hosted by Eat Your Veg and myself, and where the theme this month is LOVE.

family-foodies-valentine

Disclosure: Thorntons provided me with complimentary chocolate truffle cups and strawberry jelly hearts for review purposes.

Love bites! Chilli and ginger raw chocolates

chilli ginger chocolates

It’s no surprise that two of the biggest tags on this blog’s tag cloud are chocolate and chilli. I can’t seem to get enough of either ingredient, and I’m in seventh heaven when the two come together. So this Valentine’s Day, I’m making chilli chocolates for my man. I say I’m making them for him, but of course I’m making them for both of us. Because it would be rude of him not to share…

chilli

I could of course buy him a box of chilli chocolates, and I have done this many times in the past. It’s just that my husband and I are real chilli fiends, and we find the chocolates you buy in the shops never have a strong enough chilli kick for us. When you make them yourself, you can tailor them to your individual tastebuds and make sure they have some proper fiery oomph. I also added a little crystallised ginger to my chocolates for extra flavour and another layer of spicy warmth.

chilli ginger chocolates

I used a raw chocolate making kit from Elements for Life to make these bad boys. The kit provides all the ingredients you need, including Wiltshire grown Habanero chilli, as well as the pretty silicone moulds, and the recipe is a sinch to follow. Although I should point out the crystallised ginger and fresh chilli were my own additions.

If you fancy trying out the kit yourself, there’s a chance to win one at the end of this post.

chilli ginger choclates

Dark and spicy and divinely smooth, I’m a big fan of these chocolates. Even my girls are fond of them – only the ones containing chilli powder; the ones with fresh chilli would be way too hot for them. But then it’s no surprise that our children can cope with a little heat, given their parents penchant. Normally, I’d suggest children stay away from these chocolates. Strictly adults only.

They are dairy free, so ideal for vegans and people who are lactose intolerant, and also gluten-free, so great for coeliacs. Nor do they contain any refined sugar, so perfect for diabetics.

But why raw chocolate? Well, apparently raw chocolate is pretty good for you. With normal chocolate, the cacao beans are roasted, destroying much of its nutritional value. Plus it generally contains refined sugar and fat. Raw chocolate on the other hand is one of the richest sources of magnesium and contains higher levels of anti-oxidants than either red wine or green tea. It’s full of essential amino acids, feel good chemicals and vitamins, and is even said to be an appetite suppressant.

Chilli and ginger raw chocolates

Makes 24 chocolates

120g raw cacao butter
100g cacao powder
around ½ tsp habanero chilli powder
5-6 tbsp Sweet Freedom natural fruit sweetener
20g crystallised ginger, finely chopped
1 or 2 red chillies, sliced

Place a clean bowl over a saucepan of hot water to create a bain Marie). Ensure the bottom of the bowl does not touch the water and no water goes inside the bowl.

Add the cacao butter to the bowl and allow it to melt slowly. Don’t keep the water boiling; take it off the heat and just give it a quick blast every so often if necessary.

Next, add the cacao powder slowly and stir in thoroughly with a whisk or fork, until it starts to thicken slightly. The chocolate should be runny and  easy to pour.

Once the cacao powder is mixed into the butter, add the chilli powder and stir in. Go steady here. Start with a quarter of a teaspoonful and give it a taste. Add more if you want a little more fire.

Pour in the Sweet Freedom sweetener and stir in well. Taste and add a little more if you like it sweeter.

Add the chopped ginger and mix in.

Before pouring the chocolate into the moulds, you might like to add a little of the chopped ginger or maybe even a slice of raw chilli into the bottom of each one.

Carefully pour the chocolate into the moulds using a jug or spoon. Place it in the fridge to set for an hour or so, or in the freezer if you can’t wait that long.

Perfect served with a strong cup of coffee at the end of your Valentine’s meal. Enjoy!

chilli ginger chocolates

Win a raw chilli chocolate making kit

For the chance to win a raw chilli chocolate making kit from Elements for Life, simply leave me a comment below. The first name drawn from the ‘hat’ (or whichever receptacle comes to hand first) will be sent a complimentary kit. Closing date for entries is Wednesday 12 February 2014.

Disclosure: Elements for Life provided me with a complimentary chocolate making kit for review purpose. 

Eggspress review and giveaway for Valentine’s Day

Have you ever wanted to say “I love you” in egg-form but never quite known how? Alright, so the vast majority of people are unlikely to have felt such an urge but for those that have, this neat little Eggspress heart-shaped boiled egg mould might be just the thing!

When I was first invited to review an Eggspress on the blog, I immediately said yes. Eggs are a staple foodstuff in our house and we get through a fair few. So I’m always open to new ways to serve this most ovate of ingredients.

But on receiving my Eggspress, I realised it was actually for moulding cold, hard-boiled eggs. I’d assumed for some reason it was a mould in which to poach an egg, which actually would have been slightly more useful I think. My family doesn’t really eat all that many hard-boiled eggs. I much prefer them soft-boiled so I can dip my hot buttered soldiers into them on a lazy Sunday morning.

Anyway, on Saturday I tried the Eggspress out on my daughters. They were having a cold tea and I thought some hard-boiled eggs might make a nice addition.

The idea is you hard-boil your egg, leave it to cool, remove the shell and then place it into the Eggspress mould. Once you’ve firmly closed the mould, you then leave it for another 10 minutes immersed in cold water while the egg is squeezed into a heart-shape. To be honest, I found all this a little bit of a faff. The instructions say it should work on small to medium eggs, but I found my medium eggs were still a little too big and had to be forced into the mould – which probably explains why they came out slightly wonky!

My children did remark that they thought the eggs looked lovely, so perhaps the effort was worth it. For all of those five minutes that it took the kids to wolf down their tea…

Giveaway!

While I don’t think the Eggspress will end up getting much use in the Bangers & Mash house, maybe it’s more your cup of tea? If you’re the kind of person who prefers their eggs small, cold and hard-boiled and has a penchant for anything heart-shaped, then you really need to have one!

I have one Eggspress to give away to one of my blog readers. Simply add a comment below letting me know you’d like one before midnight on Thursday 14 February, and it could well be yours. The first name drawn from the hat after the closing date will be the lucky winner.

Please note: this competition is only open to UK residents due to shipping costs and there is no cash or other product alternative.

Disclosure: I received two complimentary Eggspress moulds for review and giveaway purposes. No money exchanged hands.

Love heart jam tarts for Daddy

I spent this afternoon in the kitchen with my two girls baking these oh-so-easy jam tarts for their Daddy for Valentine’s Day.

I offer them up to you now, at this late stage in the day, just in case you’ve failed to remember it is 14 February tomorrow and you need a very quick idea to help rustle up a little loving something for your own loved one. Chances are you’ll have all the ingredients you need in the fridge and store cupboard. Go with any flavour jams you fancy.

OK, so it’s not sophisticated baking but I’m sure you’ll receive a warm smile when you present a plate full of these lovelies to the love of your life. And if you can get any children you might have around the place involved in their preparation, so much the better.

Love heart jam tarts

230g plain flour
Pinch salt
115g butter
2-3 tbsp cold water
Strawberry or raspberry jam, lemon curd – you choose!
Icing sugar

Sieve the flour and salt into a large bowl. Rub in the butter using your fingertips until the mixture looks like fine breadcrumbs.

Many hands make light work. Apparently.

Use a knife to gradually mix in enough cold water to bring the mixture together so that you can form a ball in your hands. Wrap the pastry in cling film and place in the fridge for half an hour.

Preheat the oven to 200°C/gas 6.

Smear with butter a 12-holed tart tin.

Sprinkle the work surface and your rolling pin with flour. Roll out the pastry until about 0.25cm thick. Use a circular cutter to cut out 12 circles and place in the tart tin, pressing gently into place. Save the rest of the pasty for the heart lids. Prick the bottom of each one with a fork.

Bake the circles in the oven for six minutes until lightly golden. Remove and leave to cool for a few minutes.

You may need to use your fingers to slide the jam off the spoon. Licking of fingers may therefore be necessary.

Carefully (or not so carefully depending on your helpers) spoon a desert spoonful of your chosen jam/s into each tart.

Roll out the leftover pastry and using a heart-shaped cutter cut out your heart lids. Place these on top of each of your tarts.

I give you my heart!

Return the tarts to the oven for six to eight minutes until golden brown.

Leave to cool for a few minutes before carefully using a knife to gently slide each tart out of the tin and onto a wire rack. When completely cool, arrange on a plate and sprinkle with icing sugar.