
Shhh! The lovely Karen Burns Booth from Lavender and Lovage is off galavanting around Canada at the moment, so I’ve snuck a recipe on her blog. Take a look here! Continue reading “Blondies with pistachio and cardamom”
Family food adventures – because it's fun to play with your food

Shhh! The lovely Karen Burns Booth from Lavender and Lovage is off galavanting around Canada at the moment, so I’ve snuck a recipe on her blog. Take a look here! Continue reading “Blondies with pistachio and cardamom”


This post originally featured in the Wells Journal on Thursday 28 November 2013.
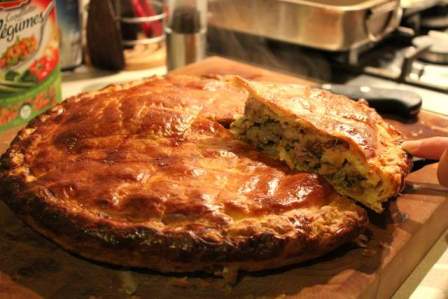
I used to be something of a purist when it came to scones. The whole scone experience was more about the indulgence of the clotted cream and jam, rather than the scone itself. If I was being slightly adventurous, I might throw a few sultanas into the scone mixture.
But since a) having children and b) becoming a food blogger, a new scone-shaped world has opened up to me, particularly the seemingly endless possibilities of the savoury scone.
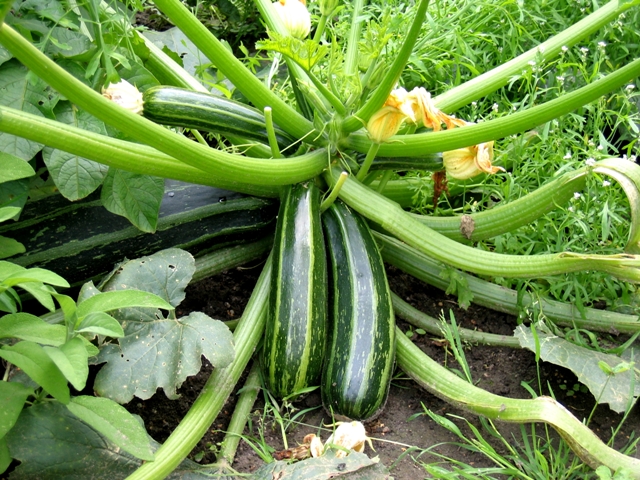
Savoury scones are a perfect standby snack for little ones (and adults) and I often make them for the children’s lunchboxes too. Courgette and cheese scones are favourites, as are butternut squash and red onion.
Think of Somerset foods and Cheddar cheese and apples will no doubt come to mind. I know, I know – the produce of Somerset is so much more varied than this ubiquitous pairing, but you have to admit our apples and cheese are world-class. If you were at the Wells Food Festival back in September, you’ll have seen the crowds around the cheese stall; all due to the fine reputation of our local cheeses.
And what better to enjoy alongside your cheese than a crisp, flavourful apple. We are so lucky to have such a wonderful variety available to us here, although we should remember that more than 50 per cent of Somerset’s orchards have disappeared over the last 50 years. This is something a number of local growers and projects are working hard to turn around.

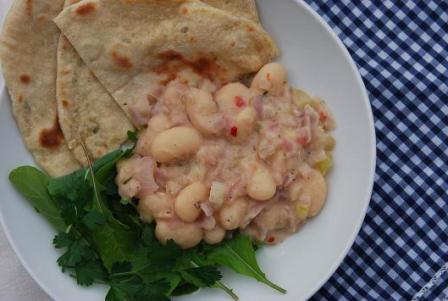
So, for a taste of Somerset in a scone, how about a tasty cheese and apple scone, using a mature local Cheddar and a generous sprinkling of fresh sage? They’re perfect cold in your packed lunch but even better served warm from the oven, with a little salted butter and some extra slices of cheese or maybe some cold meats.

Makes around 12
300g self-raising Flour
½ tsp baking powder
75g butter
125g mature Cheddar, grated
handful of fresh sage leaves, finely chopped
1 large eating apple, cored and grated
1 medium free range egg, lightly beaten
150ml milk
Preheat the oven to 200ºC / gas mark 6.
Grease a large baking sheet and cover with baking parchment.
Pour the flour and baking powder into a large bowl and mix together. Chop the butter into cubes and rub it into the flour using your finger tips until it resembles breadcrumbs.
Stir two-thirds of the cheese into the mixture, along with the sage and apple.
Make a well in the middle of the mixture and pour in the beaten egg and milk. Use a knife to bring together into a soft dough. If it is too wet, add a little more flour.
Lightly flour the work top. Roll out the dough to a 2cm thickness and use a pastry cutter to cut out your scones. Keep re-rolling the dough until it is all used up.
Place the scones on the baking sheet spaced well apart. Sprinkle the scones with the remaining grated cheese and bake for around 15 minutes until golden.
Transfer to a wire rack to cool a little before eating.

These scones are an ideal lunchbox filler and so I am entering them into this month’s Family Foodies challenge, which I just happen to be co-hosting with Lou over at Eat Your Veg. The theme this month is Lunchbox Ideas.

As the scones also feature fresh sage, I’m entering them into November’s Cooking with Herbs challenge, hosted of course by Karen at Lavender & Lovage.

And finally, as these scones feature local West Country Cheddar cheese and apples, I’m entering them into the Shop Local blogging challenge at Elizabeth’s Kitchen Diary.


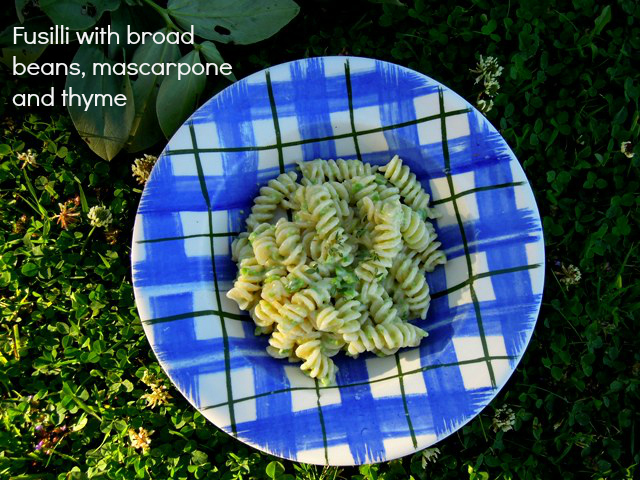
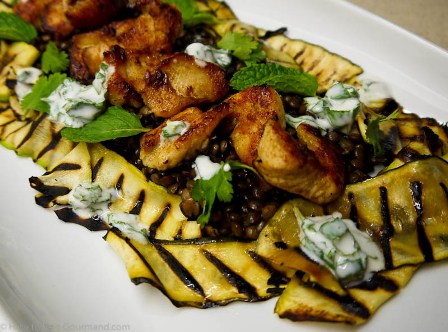
We’re getting a steady crop of broad beans from our veg patch at the moment, along with peas, sugar snaps and courgettes. The cucumbers don’t look far off from picking either; it’s the first year we’ve tried growing them from seed and they’re proving much easier than I thought they would. Those are famous last words of course. They’ll probably develop some nasty disease now I’ve said that and get completely wiped out. Let’s hope not.
The children are really enjoying all the homegrown vegetables. When they’ve been involved in the sowing and the planting, they seem so much more up for the eating too. They’re loving the broad beans in salads, particularly potato salads with big chunks of sausage, and in soups. As they’re both big pasta fans, it was only a matter of time before I tried broad beans in a pasta sauce. I mashed some up with mascarpone cheese, thyme and lemon juice to coat fusilli and the girls gobbled it up greedily. My husband Jason was rather keen too and even ate the leftover cheesy-beany mash cold from the fridge! Note to self: try it as a sandwich filling next time…
Serves 4
1kg broad beans, podded
250g mascarpone cheese
juice of half a lemon
handful of fresh thyme, picked
salt and pepper
olive oil
500g dried fusilli
Quickly boil the broad beans in salted water for two to three minutes until just tender. Run under cold water to stop them cooking further and to cool them down a little before double-podding. Yes, it’s a bit of a faff but it’s well worth it. Then mash the beans roughly, using either a fork or a potato masher.
In a bowl, mix the mashed beans with the mascarpone, lemon juice, most of the thyme, a good amount of salt and pepper and a drizzle of olive oil.
Cook the fusilli in a large pan of salted water according to the packet instructions. Drain and mix with the broad bean and mascarpone mixture. Add a little olive oil if it seems a little too dry or thick.
Serve with a little more thyme sprinkled on top. Summer on a plate – delicious.

And as this dish features lovely fresh thyme, I’m entering it into this month’s Cooking with Herbs event hosted by Karen over at Lavender & Lovage.


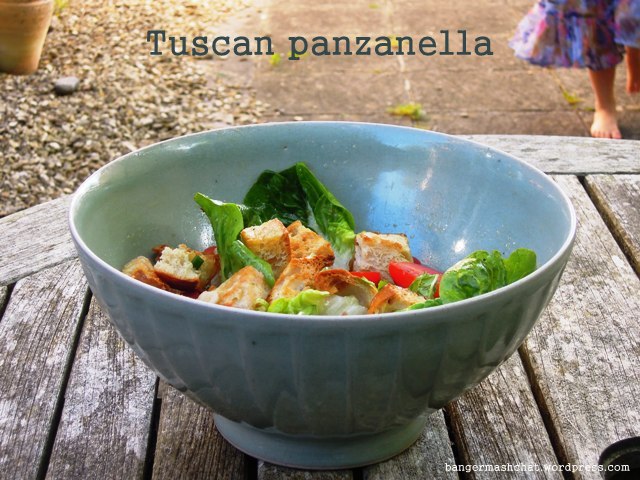
Panzanella is a tasty and satisfying Italian summer salad, perfect for picnics and eating al fresco. We enjoyed it last weekend when the sun was shining and it felt like we were on holiday in our own garden. The weather has sadly turned greyer and damper, but I am hopeful the blue skies will return. Hope, hope!
I took this recipe from a cookery book called Yolanda’s Kitchen, written by Yolanda Pearson who was born in Normandy to a French mother and an Italian father. With that kind of a background, it’s not surprising Yolanda can cook. Yolanda is a good friend of my husband’s family. As a boy, Jason used to play with Yolanda’s son Simon whenever they visited their holiday cottage up in Shropshire and he has very good memories of eating well at their house.
According to Yolanda…
This traditional Tuscan snack gets its name from the ‘Zanella’, the ditches by the side of the fields where the farm labourers used to sit to eat their lunch, and ‘Pane’ (Italian for bread). Thus they mixed leftover and dried-up chunks of bread with whatever salad ingredients their vegetable patch had in season, hastily dressed with wine vinegar and olive oil and enjoyed in the open air as a one-course meal.
I find the salad is enough on its own for a good lunch. I’ve been taking it to work this week in my lunchbox, and it’s surprising how crispy the ciabatta stays even when it has soaked up some of that tasty dressing. I do have to apologise though when I open it up, as it rather reeks of garlic! It’s also good as part of a picnic or served as a side dish with a barbecue.
Serves 4
1 ciabatta loaf
200 cucumber
3 spring onions
2 celery sticks
1 garlic clove, crushed
250g small plum tomatoes
2 Little Gem lettuces, leaves torn
handful of basil leaves
150ml extra virgin olive oil
50ml red wine vinegar
1 tsp white sugar
salt and pepper
Preheat the oven to 160°C / gas mark 2-3.
Cut the ciabatta into bitesize cubes, place them on a baking tray and bake in the oven for 5 to 10 minutes, until it gains just a little colour. Leave to cool.
Peel, deseed and slice the cucumber. Finely slice the spring onion. Dice the celery. Mix together with the crushed garlic.
Cut the plum tomatoes in half. Yolanda says here to remove the seeds, but I must admit I didn’t bother with this bit.
In a large salad bowl, mix together the bread, tomatoes, lettuce leaves, chopped vegetables and torn leaves of basil.
In a small bowl, mix together the oil, vinegar, sugar and salt and pepper.
Pour the dressing over the salad and toss well before serving.

As this is salad is perfect for picnics and outdoor dining, I’m entering into Four Seasons Food, a wonderful new challenge hosted by Chez Foti and Delicieux. The theme for the start of summer is Picnic Food & Outdoor Nibbles.

And as it contains lots of fresh basil, I’m also entering it into Lavender & Lovage‘s ever-popular Herbs on Saturday challenge.


What is it about pancakes that makes them just so popular? Whenever I announce to my brood that pancakes are on the menu, there are always shrieks of excitement. They don’t seem to care either what the pancakes are made from, so if you’re finding it tricky to get certain foodstuffs, such as beetroot, into your youngsters, pancakes could be the ideal way to sneak it past them.
These pancakes are made from beetroot and carrot, although I’m sure if you did a blind taste test no-one would be able to guess. They simply taste good in a savoury, wholesome kind of way. I was rather hopeful the final pancakes would be pink like the batter. My girls would have loved that. But unfortunately the colour changed as the pancakes fried. Perhaps if you use only beetroot you end up with a stronger colour? I need to experiment some more, I think.

I came up with these pancakes as my entry for this month’s Recipes for Life challenge. The three set ingredients for March, you see, are beetroot, carrot and cheese. So the beetroot and carrot are in the pancakes, while the cheese comes in the form of Italian mascarpone cheese combined with Greek yoghurt, lemon juice and lots of fresh herbs for a very delicious topping.

I’m running the Recipes for Life challenge in partnership with Somerset charity SWALLOW which works with adult with learning difficulties. Over a six month period we’re challenging food bloggers to come up with a whole host of tasty, healthy and easy-to-cook dishes and the best of these will appear in a new cookbook to raise money for the charity. So if you have your own ideas of what to cook with beetroot, carrot and cheese why don’t you get involved?
But for now, back to my pancakes…
Serves 4 to 6
250g self-raising flour
50g beetroot, scrubbed and grated
50g carrot, scrubbed and grated
2 tsp bicarbonate of soda
salt and pepper
2 eggs
90g melted butter
420g milk
vegetable oil for frying
200g mascarpone cheese
200g Greek-style yoghurt
2 tbsp lemon juice
large handfuls of fresh parsley and mint (or whatever herbs you fancy), roughly chopped
For the pancake batter, put the flour, beetroot, carrot, bicarbonate of soda and a generous grind of both salt and pepper in a large bowl and mix together well.
Gently beat the eggs in a separate bowl and then add the melted butter and milk and mix. Add this to the beetroot and carrot mixture and stir until everything is well combined.
Heat a spot of oil in a heavy-based non-stick frying pan. When it’s hot, drop in spoonfuls of the batter and cook your pancakes for a minute on each side. Keep your pancakes warm in the oven until you’ve worked through all the batter.
To make the herby topping, simply put the mascarpone and yoghurt in a bowl with the lemon juice and throw in the chopped herbs. Mix it all together and season to taste.
Serve your pancakes with a good dollop of the herby mascarpone on top.

As this dish features lots of lovely fresh herbs, I’m also entering it into Lavender & Lovage’s Herbs on Saturday blog challenge, which this month is being hosted by London Busy Body. Lots of lovely recipes featuring herbs as a star ingredient have already been entered, so do take a look. I’m sure you’ll be inspired!

I’m also entering it into Turquoise Lemons’ fantastic No Waste Food Challenge where food bloggers are asked to share recipes using a particular ingredient in a bid to prevent food waste. This month the challenge is hosted by Elizabeth’s Kitchen. Do pop over and take a look. A great resource if you’ve got lots of eggs to use up!

And finally as beetroot and carrot are both in season, I’m entering the pancakes into this Fabulicious Food’s Simple and in Season challenge, which this month is being hosted by my fantastic Food Blogger Connect buddy Chez Foti.


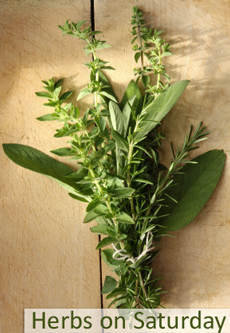
When I first guest-hosted the Herbs on Saturday blog challenge for Karen at Lavender & Lovage back in July, I found the experience such good fun, particularly discovering so many talented bloggers and a whole heap of tasty new recipes to try. But I was rather surprised at just how many entries were submitted; 30 in total. Putting off writing the round-up to the last-minute was a bit of a silly move. I vowed if I were ever to host Herbs on Saturday again, I’d compile the round-up as I went along to save myself from a last-minute panic.
Hosting Herbs on Saturday second time round has been a real blast and I’ve loved the steady flow of emails arriving in my inbox offering a diverse array of tasty and tempting dishes. But guess what? Yes, you’re right. I failed to learn my lesson and so last night I had another last-minute panic on my hands. This month Herbs on Saturday attracted a whopping 43 entries – you lot are incredible! And each and every one is a wonderfully delicious celebration of cooking with herbs.
Since we’ve got a lot to get through, and I have a slight tendency to waffle on a bit, I’ve decided to be extremely strict and limit myself to just three words to describe each entry. So let’s get this show on the road…


Now how’s that for an impressive selection of recipes, providing a veritable wealth of culinary inspiration? I look forward to working my way through the list. I’m starting the 5:2 diet next week and will be trying out the Lemon Chicken with Cannellini Beans and Rosemary from Lavender and Lovage, and I’ve also got my eye on the Croustade de Canarde from Delicieux, as I have some duck breast in the freezer. Which dishes have caught your fancy?
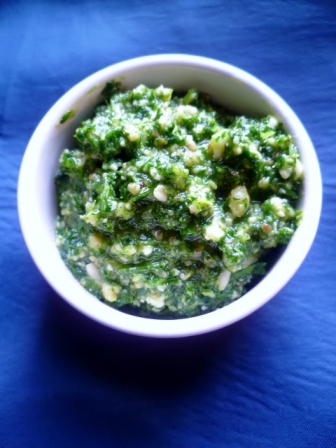
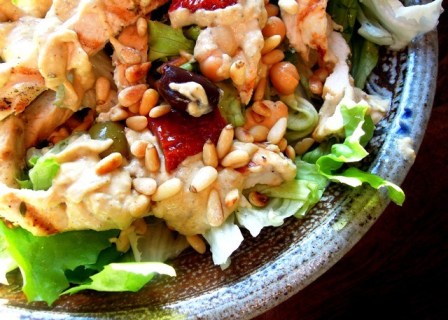
“But who won the prize this month?” I hear you cry. Well, the lucky winner of Your Kitchen Garden: Month-by-Month, by the renowned gardening author Andi Clevely, is none other than Rachel from Marmaduke Scarlet for her fashionably green pesto made with English parsley, walnuts and Stilton. Karen’s mystery judge this month is a professional herb grower based in North Yorkshire, who we’ll call The Herb Lady.
The Herb Lady said: “It took me a long time to select the winner but I chose Marmaduke Scarlet’s pesto as it is so fresh and innovative and a good use of parsley, which is so often relegated to garnishes and sauces. Using walnuts instead of pine nuts makes this a thoroughly British pesto.”
Congratulations to Rachel and we hope you have lots of fun devising new ideas for your kitchen garden with inspiration from your new book!
Before I sign off, I’d just like to say a huge thank you to Karen at Lavender & Lovage for once again entrusting her Herbs on Saturday challenge to me. I’d love to host again some time – once I’ve fully recovered from compiling this round-up! And now I think I need a little lie down…


Well, here we are in 2013 already. How on earth did that happen? I know I say it every year but 2012 really did feel like it was over in a flash. I hope you enjoyed a delicious Christmas and had a wonderful time seeing in the new year. Ours was lovely. Christmas was a whirlwind of visits from family and friends, while we spent New Year’s Eve very quietly, enjoying steak and chips, good red wine and Jools Holland on the telly. Splendid.

I’m extremely pleased to be welcoming in the new year here on Bangers & Mash by hosting the Herbs on Saturday blog challenge for Karen at Lavender & Lovage.
I first hosted Herbs on Saturday back in July and thoroughly enjoyed the experience. The challenge is a fabulous way to share delicious recipes that celebrate cooking with herbs, and I was fortunate enough to meet so many new and talented food bloggers as a result of hosting it last time. I can’t wait to see what comes in this month, particularly after seeing the recipes submitted last month.
To take part in the challenge, simply submit any recipe using fresh or dried herbs by emailing me with the URL for your post. And they don’t only need to be recipes made on a Saturday. At the end of each month, a ‘special blogger’ will choose their favourite recipe from all the entries, and the winning blogger will receive a fantastic cookbook as their prize. The full entry guidelines are below.
January’s prize is Your Kitchen Garden: Month-by-Month by renowned gardening author Andi Clevely.

Highly practical and easy-to-use, with clear illustrations and seasonal charts, Andi Clevely’s book is invaluable for creating a well-managed kitchen garden providing a plentiful supply of vegetables, fruit, salad crops, herbs and flowers throughout the year. Each chapter focuses on one calendar month, setting out the tasks to be done and featuring crops that will be ripe for harvesting.
If you have any questions, please feel free to drop me a line. I’m really looking forward to receiving your entries for Herbs on Saturday!
January’s entries:

If you’re a regular reader of this blog, you’ll know I’ve only discovered my cooking mojo in the last few years. I spent a long time feeling out-0f-place in the kitchen. But I do believe I’ve arrived and earned my right to wear a pinny (although I generally forget to until it’s too late). Don’t get me wrong, I’ll never be a great cook and I won’t be entering Masterchef anytime soon, but I think I might be turning into a good cook. Indeed, in a restaurant the other evening, my husband told me he thought my cooking was better. I was ever so slightly on the chuffed side.
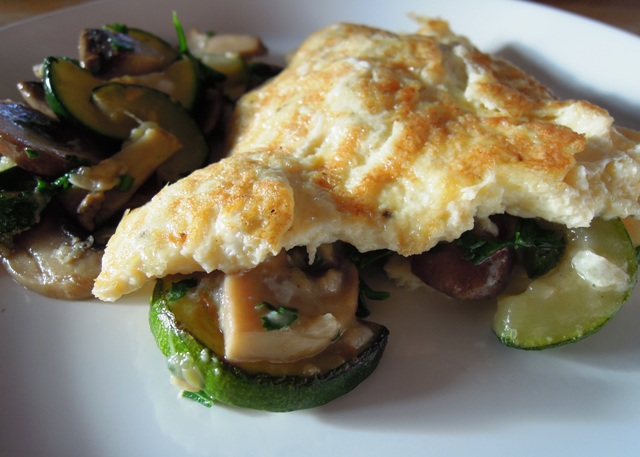
Omelettes were always one of those dishes I had trouble with. Well, rather I assumed I would if I actually plucked up the courage to try making one. Yes I know they’re quick and simple, but only if you’re a proper cook. Or so I thought. In recent months, I’ve made myself learn how to make a good omelette because I realise they are the ultimate fast food. After one or two duds along the way, I’ve worked out they’re not all that difficult after all. It’s all about trial and error and not being afraid to make a few mistakes. If you don’t make mistakes, how can you find out what works and what doesn’t?
We now eat a fair few omelettes in our house. Our life can get pretty manic, what with school and work and all the various out-of-school clubs and activities, not to mention some attempt at a social life; so it’s good to have a speedy and adaptable supper up your sleeve. They also make the perfect brunch dish, when you fancy something warm and tasty but don’t want to go to too much effort.
Now that I’m turning into a bit of an omelette fanatic, I was rather pleased when Littlewoods sent me a set of Russell Hobbs pans to test out – a frying pan and an omelette pan*. After many years, the non-stick coating on our old pan had given up the ghost, and omelettes aren’t so great when you don’t have a non-stick pan. At just £27 for the pair, they do seem a bit of a bargain. At first, when the pans arrived, I thought they were a little on the lightweight side, but having used them a few times now, I can confirm they are pretty decent pans. How long they’ll remain non-stick with the amount of wear and tear they’ll get in my kitchen remains to be seen, but for now they certainly turn out a good omelette.

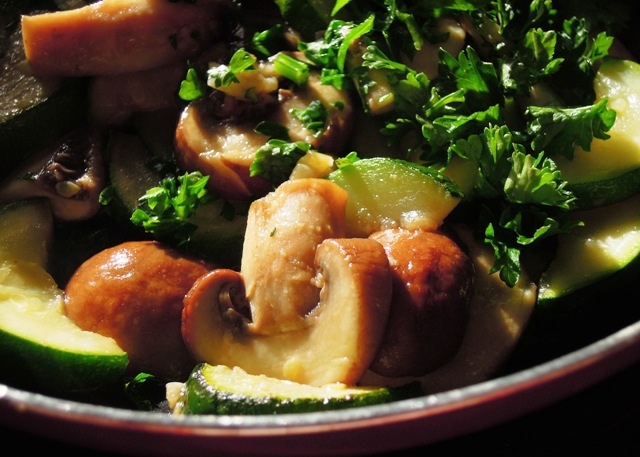
I enjoy trying out new fillings for my omelettes. This latest concoction was simply a way of using up a few bits and bobs in the fridge. It worked out rather well so I think I’ll be adding it to my tried-and-test list.
Serves 2
olive oil, a couple of glugs
1 courgette, halved lengthways and sliced
handful of chestnut mushrooms, sliced
2 cloves of garlic, peeled and crushed
handful of fresh parsley, roughly chopped
knob of butter
4 eggs, lightly beaten and seasoned with pepper
Heat a glug of olive oil in a frying pan over a medium heat and gently fry the courgette until softened. Throw in the mushrooms and soften these too before adding in the garlic and parsley. When the garlic is golden, take off the heat and keep warm to one side.
In your omelette pan, heat another glug of olive oil with the knob of butter over a fairly high heat. Pour in the beaten egg and leave for a few seconds to give it time to ‘catch’.
Then using an implement that won’t scratch your lovely non-stick pan (my weapon of choice is a rubber spatula!), start dragging the edges of the eggy mixture into the middle, going round and round, and letting the runny egg fill in the gaps you are leaving. As the omelette starts to firm up, tilt the pan to encourage the uncooked egg to flow into the spaces.

When the only runny egg left is on the surface, leave it for 30 seconds or so to continue cooking, and then it’s time to add your filling.
Pour the mushroom and courgette mixture over one half of the omelette and carefully fold over the other half. Cut in half and slide out onto warmed plates. Enjoy!
![]()


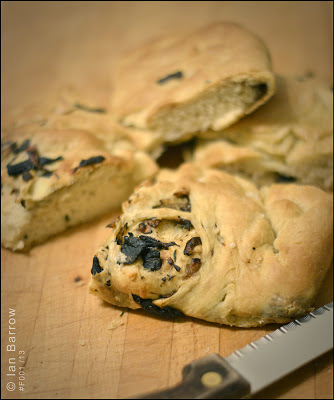
Whenever I bake bread I always find myself marvelling at just how easy it is to make something that tastes and looks so good for such remarkably little effort.
While it might take a little time and is therefore not the kind of foodstuff I fancy making after a long day at work, baking bread is definitely my idea of a perfect weekend activity. And home-baked bread makes for a perfect weekend lunch, served still slightly warm from the oven with a spread of tasty cheeses, cold meats, olives and salad.
Baking often makes me a little nervous as the end result is usually meant to look neat and tidy. But thankfully bread is different and focaccia in particular should look a little rustic and rough around the edges. Which is obviously another reason why this is my kind of bread.
You can top your focaccia with whatever you fancy really – a light scattering of your favourite herbs, cheese, olives, or maybe someone caramelised onions and sun-dried tomatoes. But here I use my all-time favourite: basil and garlic.

Basil and garlic focaccia
500g strong white bread flour
15g salt
15g sugar
10.5g dried yeast (one and a half 7g sachets)
300ml lukewarm water
Semolina
2 cloves of garlic, finely chopped
Large bunch of basil, finely chopped
3 tbsp olive oil
Half a lemon
Salt and pepper
Put the flour, salt, sugar and yeast in a large bowl and mix together. Make a well in the middle and pour in the water. Gradually work the dry ingredients into the liquid to form a soft dough. If it’s still a little dry, add a drop more water; if it’s too sticky, add a little more flour.
Flour the work surface and tip out the dough onto it. Knead the dough for five to ten minutes until it is elastic and smooth. Return the dough to the bowl, cover with a clean tea towel and leave to rise in a warm, draught-free place for around an hour, until it has doubled in size.
Remove the dough from the bowl and give it a punch to knock the air out of it. Knead for another minute or so.
Split the dough into half. Roll each half into a rough circular shape about half an inch thick. Place the dough on a baking tray dusted with semolina.
In a small bowl, mix together the chopped basil, garlic, olive oil, lemon juice, salt and pepper. Smear generously over the top of each piece of dough. Then push your fingers deep into the surface of the dough to make those little holes you always see on focaccia, allowing the flavours to get down deep inside the bread. Leave in a warm spot for another 45 minutes.
Preheat the oven to 200°C/Gas Mark 6.
When the dough has risen again to just over an inch thick, bake in the oven for about 15 minutes until the top is a beautiful golden colour. Drizzle the bread with a little more olive oil and sprinkle sea salt over the top. Leave to cool slightly but try to eat while still warm if you can.
As my focaccia features lots of lovely fragrant basil, I’m linking up with September’s Herbs on Saturday blog challenge, hosted by Karen at Lavender & Lovage. I’m looking forward to working my way through the delicious looking recipes that have been submitted so far, including Recipe Junkie’s rosemary focaccia!
![]()
When I put out a call a month or so ago for people to send in their favourite family recipes for the Care to Cook recipe challenge I had absolutely no idea what kind of response to expect. Care to Cook is a challenge I set up with a fostering and adoption charity I work with called TACT in order to promote their cookbook, which they’re selling to support adopted children and their families.
But I had nothing to worry about. You lot rose to the challenge splendidly, supplying a fantastic assortment of family favourites, both savoury and sweet. The task set was to suggest a dish you would cook to welcome someone into your family home. For many children in care, family meals are simply something they are not used to. Each and every dish submitted into the challenge is one I know would make a vulnerable child or young person feel special, valued and welcomed.
Before I announce the winner, here are each of those delicious entries in turn. Warning – this list is guaranteed to make you hungry!
First in was this tasty little number from Under The Blue Gum Tree, which looks far superior to its McDonald’s namesake: Homemade Fillet O’ Fish and “Chips”. The fillet is served in lovingly prepared carrot and cumin bread rolls, with potato skins covered in paprika and cayenne pepper, and some salsa and soured cream on the side. Now, who could resist that?

Next we have French Madeleines from Crêpes Suzettes. These pretty little cakes look so tempting and perfect for goûter, the snack French kids have at around 4pm. I think my children must be a bit French as they are always starving when they come home from school too!

For Reluctant Housedad, what to cook for this challenge was a bit of a no-brainer. It had to be his Peanut Butter and Salted Caramel Chocolate Cheesecake. Doesn’t it look incredible? I love puddings that combine sweet and salty and absolutely anything that contains peanut butter, so this is going straight to the top of my must-bake list.

My fabulous mother Cheryl suggested this next dish Hokkien Mee, which she remembers eating as a girl growing up on the Malaysian island of Penang. It’s a hot and spicy noodle dish, featuring both meat and seafood, common in many South East Asian dishes. It’s a little different to the Singapore version but, as my Mum would tell you, much more delicious!

Karen from Lavender & Lovage offers up these ‘frugal but comforting’ Stuffed Tomatoes with Herbs and Oats, which I think look incredibly tasty and very satisfying. It’s a real family-favourite in Karen’s house; her daughter loved eating this when she was little, and still does now she is all grown up!

My little sister Elly surprised me with her cooking skills with this next entry, her Nonya Chicken Curry from Malaysia. I just assumed she would submit a recipe for something sweet and sticky – she’s a great baker you see. But no, this is her curry dish that got a big thumbs up from her boyfriend’s dad. He’s from Malaysia himself and apparently not an easy man to impress!

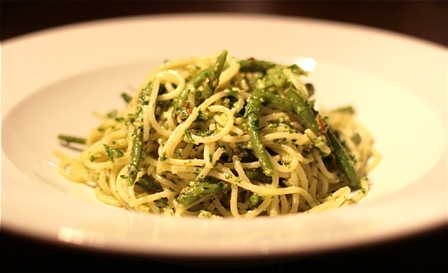
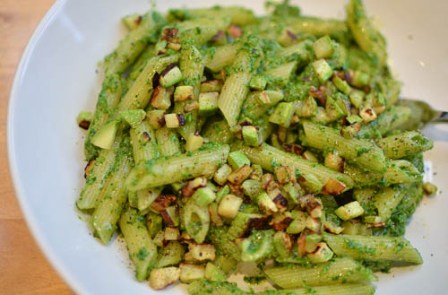
Pasta and Pesto Sauce is our next entry which comes from A Trifle Rushed. Pesto is always a favourite in our house but I must admit it’s normally a meal-in-a-hurry using dried pasta and jarred sauce. Here Jude and her daughter lovingly make fresh pasta by hand and blend their own pesto in a pestle and mortar. I bet it tastes incredible; it certainly looks wonderful.

Louisa at Chez Foti now lives in the French Pyrenees and likes to cook classic French dishes whenever friends and family come to visit. This Boeuf en Daube is a particular favourite and I can see why; it looks so sumptuously satisfying! It’s one of those meals you can prepare in advance and leave to slow cook in the oven, so that your visitors arrive to the most glorious aromas emanating from the kitchen. Yum!

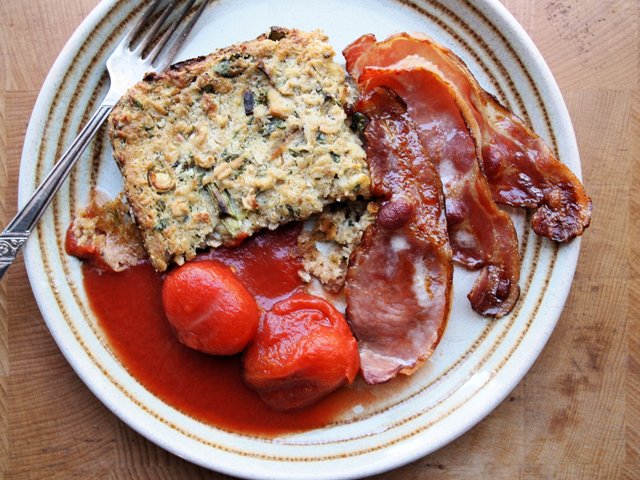
When I received this next entry from Lavender & Lovage for Yorkshire Season Pudding with Herbs I had to try it straight away. We had it for brunch one Sunday morning, and it was perfect with our bacon, eggs and beans. I like the fact this is a traditional family recipe, and one that Karen’s grandmother used to make. I think it might just become a tradition for our family too.
Spinach and Bacon Macaroni Cheese from Sian at Fishfingers for Tea is next up. Macaroni cheese is the ultimate in satisfying comfort food and I do love this version, beefed up with tasty bacon and spinach and finished with slices of tomato and crunchy cheesy breadcrumbs on top. Another great dish for preparing in advance and popping in the oven just before your visitors arrive.

My Nana Barbara sent in two dishes for her entry: Courgette Bake followed by Vanilla Cream Terrine. She says the courgette bake works well both as a starter and as main course served with large hunks of crusty bread. My Nana is fantastic in the kitchen and as a kid I would love staying with her and Grandad as it always meant getting to eat lots of lovely cakes and pies.
Chicken Basquaise is the delicious entry from Helene at French Foodie Baby. She warns that it might differ from traditional recipes but that’s what she likes so much about her mother’s cooking; she cooks from the gut. I love the way Helene relives her food memories through her blog and brings them into the present day as she cooks for her little boy Pablo.

This Strawberries and Cream Birthday Cake comes from my step-mum Sue and is the cake she bakes every June to celebrate my twin sisters’ birthday. I’ve always been very jealous of them having a summer birthday when strawberries are in season! Now wouldn’t you like this for your birthday cake each year?

The final entry is one of mine: Hainanese Chicken Rice. It’s a dish I loved to eat when I was a little girl on trips to Penang with my mum and little sister. I had no idea how to make it so I turned to members of my Chinese-Malaysian family for a helping hand, and my Aunty Lorene and Cousin Sisi did the honours by providing this recipe. How would I ever survive without Facebook?!

There you have it – a fine collection of family recipes if ever I saw one! But there can only be one winner in the Care to Cook challenge, and the unenviable task of selecting a winner was given to 15-year-old Josh, who lives with one of TACT’s foster carers in the South West of England.
Josh says it was a very difficult decision to make and he sat deliberating – and salivating! – over the list for quite some time and really struggled to choose just one winner. He really liked the look of both the Penang Hokkien Mee and the Strawberries and Cream Birthday Cake, but in the end it was the Peanut Butter and Salted Caramel Chocolate Cheesecake from the Reluctant Housedad that won his vote.
So a huge congratulations to Keith at the Reluctant Housedad for your fabulous entry, which Josh found he simply couldn’t resist! As winner of the Care to Cook family recipe challenge he will receive a copy of TACT’s Care to Cook recipe book, signed by the charity’s celebrity patron Lorraine Pascale.

And thank you to everyone who has taken the time to share their favourite family recipes, helping to raise awareness of this very worthwhile charity, which is working so hard to improve the lives of children and young people across the UK who haven’t had the best starts in life. More information of the work of TACT is available on their website.
