
Shhh! The lovely Karen Burns Booth from Lavender and Lovage is off galavanting around Canada at the moment, so I’ve snuck a recipe on her blog. Take a look here! Continue reading “Blondies with pistachio and cardamom”
Family food adventures – because it's fun to play with your food

Shhh! The lovely Karen Burns Booth from Lavender and Lovage is off galavanting around Canada at the moment, so I’ve snuck a recipe on her blog. Take a look here! Continue reading “Blondies with pistachio and cardamom”

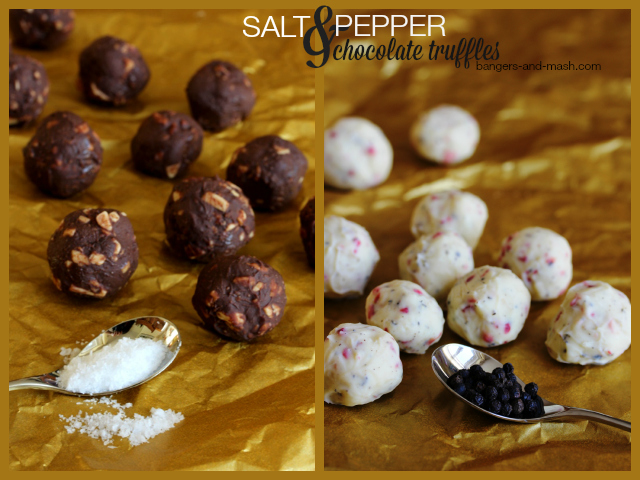
Now these truffles really won’t be everybody’s cup of tea, but I personally rather liked the result of my latest exploits with chocolate. Continue reading “Salt and pepper chocolate truffles”

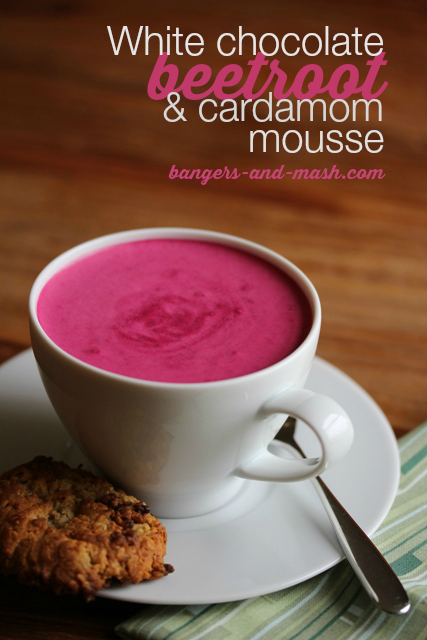
Look away now if you’re on a diet. While this mousse might contain a generous helping of roast beetroot, I can make no claims for it being at all healthy. It’s rich, indulgent and highly calorific. Which is why it tastes so darn good.
Isn’t it the most amazing colour? You can imagine the look on my girls’ faces when they first saw it. Continue reading “White chocolate, beetroot and cardamom mousse”

This post originally featured in the Wells Journal on Thursday 12 December 2013.
This can be a very expensive time of year. Like most people I am looking for ways to stretch my budget that little bit further. But I have been thinking a lot about why we put so much pressure on ourselves each year to create the ‘perfect’ Christmas. Why does perfect need to equate to expensive?
The Archbishop of Canterbury, Justin Welby has been vocal on this subject recently. Whether or not you’re religious, there is a lot of sense in his comments and we should heed his reminder that being generous at Christmas should be in a way that demonstrates our love and affection, rather than by trying to buy that love and affection.
So this year, please don’t break the bank simply to let people know what they mean to you. In my eyes, a homemade gift, particularly if it is something you can eat, is so much more special and meaningful than a hastily bought piece of tat.

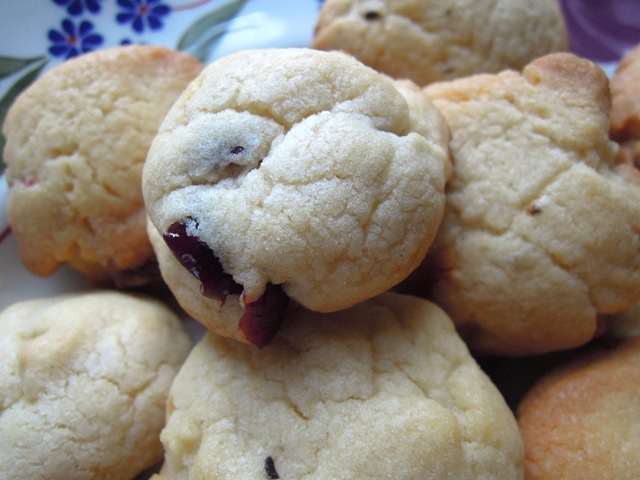
These simple cookies are a perfect Christmas present. They are easy to make and beautifully festive, featuring that tried and tested combination of cranberries and white chocolate. While cardamom might make you think of Asian cookery, it is also very popular in Norwegian baking and so the Scandinavian theme I started last week with my baked ham and Finnish mustard continues…
100g soft butter
200g caster sugar
1 tsp vanilla extract
1 large egg
150g plain flour
1 tsp bicarbonate of soda
100g ground almonds
2 tsp ground cardamom (or 1 tsp cardamom seeds crushed in a pestle and mortar)
125g dried cranberries
125g white chocolate chopped
Preheat the oven to 180°C/gas mark 4.
In a mixing bowl, cream together the butter and sugar until light and fluffy. Add the vanilla and egg and beat again, before mixing in the flour, bicarbonate of soda, ground almonds and cardamom.
When the dough is smooth and thick, stir in the cranberries and chocolate.
Roll pieces of the dough into walnut-sized balls and place onto baking trays lined with baking parchment. Make sure they are well spaced out.
Bake for around 10 minutes until they are a pale golden colour.
Leave to cool on the tray for a few minutes and then transfer to a wire rack to cool completely.
As these cookies are super easy to make, they’re ideal for baking with children to give as gifts at Christmas, I’m entering them into December’s Family Foodies challenge at Eat Your Veg, where the theme is Kids Christmas.
 I’m also entering them into Victoria at A Kick At The Pantry Door‘s Feel Good Food challenge, hosted by JibberJabberUK. The theme this month is Cranberries.

December’s theme at Tea Time Treats is Festive Gifts and Treats, so I’ve got to enter these cookies there too. This is Kate from What Kate Baked‘s last month hosting this brilliant challenge, and Karen from Lavender & Lovage will be announcing her new co-host in the new year.
![]()
Deena Kakaya is running a new challenge called Fabulous Fusion Foods and so I thought these cookies might make a good entry, as they bring together a spice I associate with Asia, cardamom, with white chocolate and cranberries, which I connect with a very Western Christmas.

And finally, I’m entering these cookies into the AlphaBakes challenge hosted by The More than Occasional Baker and Caroline Makes, where the theme for December is the letter X – perfect for all things Xmas…
![]()


Cake pops are very cute. After all, who doesn’t love food on a stick? I made some simple ones recently for a school cake sale and they sold out instantly. In fact, the school caretaker got in there first and bought some while we were still setting up.
I’ve seen lots of beautifully decorated cake pops on websites and blogs recently and for some strange reason I’ve felt an overwhelming urge to create some special cake pops for Halloween. Now this just isn’t the kind of thing I do normally. My interest in baking has increased massively over the last couple of years but creating cleverly crafted cakes and daintily decorated delights is way out of my comfort zone.
Admittedly, these little pumpkin pops are not an example of patisserie perfection I’m afraid, but they are a bit of fun and most importantly my children can’t get enough of them.

It took me a couple of attempts to get these Halloween cake pops right, mainly because white chocolate isn’t particularly easy to work with as a cake coating.
The first time it took me ages to get the colouring right. I was adding a drop or two of red liquid food colour, then a drop of yellow, and a bit more red, and a bit more yellow, ad nauseum. Eventually the chocolate just split and went all grainy and horrible because I’d over-worked it. I added a little vegetable oil to loosen it again, which seemed to work but then the coating refused to set properly on the cakes and they ended up looking a complete and utter state.
The second attempt was better. I used white chocolate again but went for a concentrate paste colouring and took lots more care not to overwork it. The end result, as you can see, is OK but I still haven’t ended up with the lovely smooth finish you get with normal chocolate. Next time – if there is a next time – I might try a white cake covering or ‘candy melts’ – it might taste ghastly but does that matter as long as it looks the part?

There are various ways to make the cake pops themselves. I have seen a cake pop machine on the market but that seems a little excessive to me. I bought a special cake pops baking pan, which works fairly well but I don’t think it’s completely necessary. I’ve since found a few pop cake recipes online using ready-made cake; you simply mix with chocolate and roll into balls. No baking necessary.
But if you do fancy going down the baking pan route, here’s what I did…

Halloween pumpkin cake pops
Makes 12
50g plain chocolate
60g butter
80g caster sugar
1½ tbsp cocoa powder
1 egg
50g plain flour
¼ tsp baking powder
pinch of salt
200g white chocolate
12 lollipop sticks
orange food colouring concentrate paste
2 tbsp jam
green ready-made icing
black writing icing
Preheat oven to 180°C / gas mark 4.
Grease the baking pan liberally with vegetable oil and dust with cocoa powder.
Put the plain chocolate and butter in a large mixing bowl and heat gently in a microwave or over a large pan of hot water until melted. Mix in the caster sugar and cocoa, and then stir in the egg. Finally add in the flour, baking powder and salt and combine well.
Spoon the mixture into a twelve-pop baking pan, filling each well so it creates a slight mound over the top. Put the lid on and secure.
Bake for 20 minutes until a toothpick inserted into one of the holes comes out almost clean. Leave to cool for five minutes in the pan before removing and leaving to cool completely.
Melt a couple of the pieces of white chocolate and dip the lollipop sticks in before inserting into the cake pops. Put in the fridge for half an hour to allow the sticks to set into place.
Line a plate or board with greaseproof paper.
Melt the remainder of the white chocolate in a large bowl. Using a skewer, gradually add in a little of the orange colour paste at a time, stirring gently after each addition, until you get the shade of orange you want.
Dip each cake pop into the orange chocolate using a metal spoon to pour over the chocolate and fully cover each one. Spin the cake to let the excess chocolate drip off. Place on the greaseproof paper and leave in a cool place or in the fridge for a few hours to set.
Heat the jam gently in the microwave and leave to cool a little.
Roll out the green icing and cut out leaf / star shapes. Stick the icing onto the cake pops using a little smear of jam.
Lastly draw on the faces using the black icing – triangles for eyes and noses and zig-zag mouths. Leave again in a cool place to allow everything to set into place. Preferably somewhere up high and out of sight, as when the little ones spot them, they won’t be around for long. Happy Halloween!

