Beetroot and carrot pancakes with herby mascarpone

What is it about pancakes that makes them just so popular? Whenever I announce to my brood that pancakes are on the menu, there are always shrieks of excitement. They don’t seem to care either what the pancakes are made from, so if you’re finding it tricky to get certain foodstuffs, such as beetroot, into your youngsters, pancakes could be the ideal way to sneak it past them.

These pancakes are made from beetroot and carrot, although I’m sure if you did a blind taste test no-one would be able to guess. They simply taste good in a savoury, wholesome kind of way. I was rather hopeful the final pancakes would be pink like the batter. My girls would have loved that. But unfortunately the colour changed as the pancakes fried. Perhaps if you use only beetroot you end up with a stronger colour? I need to experiment some more, I think.

I came up with these pancakes as my entry for this month’s Recipes for Life challenge. The three set ingredients for March, you see, are beetroot, carrot and cheese. So the beetroot and carrot are in the pancakes, while the cheese comes in the form of Italian mascarpone cheese combined with Greek yoghurt, lemon juice and lots of fresh herbs for a very delicious topping.

I’m running the Recipes for Life challenge in partnership with Somerset charity SWALLOW which works with adult with learning difficulties. Over a six month period we’re challenging food bloggers to come up with a whole host of tasty, healthy and easy-to-cook dishes and the best of these will appear in a new cookbook to raise money for the charity. So if you have your own ideas of what to cook with beetroot, carrot and cheese why don’t you get involved?

But for now, back to my pancakes…

Beetroot and carrot pancakes with herby mascarpone

Serves 4 to 6

250g self-raising flour
50g beetroot, scrubbed and grated
50g carrot, scrubbed and grated
2 tsp bicarbonate of soda
salt and pepper
2 eggs
90g melted butter
420g milk
vegetable oil for frying
200g mascarpone cheese
200g Greek-style yoghurt
2 tbsp lemon juice
large handfuls of fresh parsley and mint (or whatever herbs you fancy), roughly chopped

For the pancake batter, put the flour, beetroot, carrot, bicarbonate of soda and a generous grind of both salt and pepper in a large bowl and mix together well.

Gently beat the eggs in a separate bowl and then add the melted butter and milk and mix. Add this to the beetroot and carrot mixture and stir until everything is well combined.

Heat a spot of oil in a heavy-based non-stick frying pan. When it’s hot, drop in spoonfuls of the batter and cook your pancakes for a minute on each side. Keep your pancakes warm in the oven until you’ve worked through all the batter.

To make the herby topping, simply put the mascarpone and yoghurt in a bowl with the lemon juice and throw in the chopped herbs. Mix it all together and season to taste.

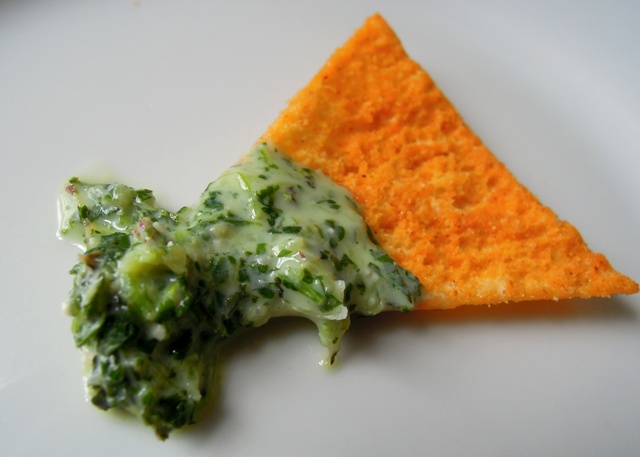
Serve your pancakes with a good dollop of the herby mascarpone on top.

As this dish features lots of lovely fresh herbs, I’m also entering it into Lavender & Lovage’s Herbs on Saturday blog challenge, which this month is being hosted by London Busy Body. Lots of lovely recipes featuring herbs as a star ingredient have already been entered, so do take a look. I’m sure you’ll be inspired!

I’m also entering it into Turquoise Lemons’ fantastic No Waste Food Challenge where food bloggers are asked to share recipes using a particular ingredient in a bid to prevent food waste. This month the challenge is hosted by Elizabeth’s Kitchen. Do pop over and take a look. A great resource if you’ve got lots of eggs to use up!

And finally as beetroot and carrot are both in season, I’m entering the pancakes into this Fabulicious Food’s Simple and in Season challenge, which this month is being hosted by my fantastic Food Blogger Connect buddy Chez Foti.

simple2012large11

Apple porridge

I often feel a bit of a hypocrite in the mornings as I make my daughters their porridge for breakfast. I’ve never been able to eat the stuff you see.

I love the idea of it; a big steaming bowl of hot porridge sounds the ideal way to set you up on a chilly day. And it’s just so good for you. You digest porridge slowly, so it fills you up for longer. High in fibre, oats are proven to prevent heart disease, lower cholesterol and boost serotonin.

My problem is the hot milk. I’m not good with hot, milky things and have never been able eat rice pudding or semolina. Even with hot chocolate I have to be in just the right mood, and it must be really good quality chocolate to distract me from the milk. And if there’s any skin on top – urrrgghh!

Lots of people have suggested ditching the milk and making porridge with water instead. But that’s always sounded rather mean and stingy to me. Then I came across an item in Runners World (can’t believe I mentioning that particular publication again!) which suggested using apple juice. Why had I never thought of that myself?

Porridge made with apple juice is my new favourite breakfast. It’s absolutely delicious and I feel just so virtuous eating it. I add currants, giving it a lovely crunchy fruitiness and mix in a little cinnamon, which of course goes so well with apple. Then I serve it with a decent dollop of yoghurt and a squeeze of runny honey. Perfect! The children like it too. But my husband’s a traditionalist and is sticking with his milk.

Apple porridge

Makes one large bowl

4og porridge oats
200ml apple juice
1/2 tsp cinnamon
Handful of currants
2 tbsp natural yoghurt
Honey

I don’t have that much time in the mornings, so I make my porridge in the microwave. Simply put the oats, juice, cinnamon and currants into a microwaveable bowl, give it a good mix and place in the microwave. Cook on medium power for a couple of minutes and then stir. Cook again for another two, maybe two and a half minutes, until you’ve got the porridgy consistency you’re after. I like mine pretty thick. Serve with a generous spoonful of yoghurt and lots of lovely honey. Yum!

Simple banana smoothie

Normally my children have pretty healthy appetites, so when they tell me they’re not hungry that’s a sure-fire sign they must be poorly.

Over the past couple of weeks both my girls have been a bit ill – and my husband too – and so I’ve turned to the good old smoothie to make sure I get some sustenance into them. Even when they’re feeling pretty grotty, they can generally manage a glass or two of smoothie.

Of course these smoothies are too good only to have when illness strikes and they’re a brilliant way to use up those over-ripe bananas. You can also add any soft fruit you happen to have in. We keep a bag of berries in the freezer and I like to chuck in a handful or two of those. But here’s the basic banana recipe.

Simple banana smoothie

Serves 4

3 or 4 bananas
4 tbsp plain or Greek yoghurt
2 tbsp runny honey
½ tsp vanilla extract
2 pints of cold milk

Chop the banana into a blender or smoothie maker and add the rest of the ingredients. Simply whizz up until smooth and serve to your patients.

Courgette and mushroom omelette with garlic and parsley

If you’re a regular reader of this blog, you’ll know I’ve only discovered my cooking mojo in the last few years. I spent a long time feeling out-0f-place in the kitchen. But I do believe I’ve arrived and earned my right to wear a pinny (although I generally forget to until it’s too late). Don’t get me wrong, I’ll never be a great cook and I won’t be entering Masterchef anytime soon, but I think I might be turning into a good cook. Indeed, in a restaurant the other evening, my husband told me he thought my cooking was better. I was ever so slightly on the chuffed side.

Omelettes were always one of those dishes I had trouble with. Well, rather I assumed I would if I actually plucked up the courage to try making one. Yes I know they’re quick and simple, but only if you’re a proper cook. Or so I thought. In recent months, I’ve made myself learn how to make a good omelette because I realise they are the ultimate fast food. After one or two duds along the way, I’ve worked out they’re not all that difficult after all. It’s all about trial and error and not being afraid to make a few mistakes. If you don’t make mistakes, how can you find out what works and what doesn’t?

We now eat a fair few omelettes in our house. Our life can get pretty manic, what with school and work and all the various out-of-school clubs and activities, not to mention some attempt at a social life; so it’s good to have a speedy and adaptable supper up your sleeve. They also make the perfect brunch dish, when you fancy something warm and tasty but don’t want to go to too much effort.

Now that I’m turning into a bit of an omelette fanatic, I was rather pleased when Littlewoods sent me a set of Russell Hobbs pans to test out – a frying pan and an omelette pan*. After many years, the non-stick coating on our old pan had given up the ghost, and omelettes aren’t so great when you don’t have a non-stick pan. At just £27 for the pair, they do seem a bit of a bargain. At first, when the pans arrived, I thought they were a little on the lightweight side, but having used them a few times now, I can confirm they are pretty decent pans. How long they’ll remain non-stick with the amount of wear and tear they’ll get in my kitchen remains to be seen, but for now they certainly turn out a good omelette.

I enjoy trying out new fillings for my omelettes. This latest concoction was simply a way of using up a few bits and bobs in the fridge. It worked out rather well so I think I’ll be adding it to my tried-and-test list.

Courgette and mushroom omelette with garlic and parsley

Serves 2

olive oil, a couple of glugs
1 courgette, halved lengthways and sliced
handful of chestnut mushrooms, sliced
2 cloves of garlic, peeled and crushed
handful of fresh parsley, roughly chopped
knob of butter
4 eggs, lightly beaten and seasoned with pepper

Heat a glug of olive oil in a frying pan over a medium heat and gently fry the courgette until softened. Throw in the mushrooms and soften these too before adding in the garlic and parsley. When the garlic is golden, take off the heat and keep warm to one side.

In your omelette pan, heat another glug of olive oil with the knob of butter over a fairly high heat. Pour in the beaten egg and leave for a few seconds to give it time to ‘catch’.

Then using an implement that won’t scratch your lovely non-stick pan (my weapon of choice is a rubber spatula!), start dragging the edges of the eggy mixture into the middle, going round and round, and letting the runny egg fill in the gaps you are leaving. As the omelette starts to firm up, tilt the pan to encourage the uncooked egg to flow into the spaces.

When the only runny egg left is on the surface, leave it for 30 seconds or so to continue cooking, and then it’s time to add your filling.

Pour the mushroom and courgette mixture over one half of the omelette and carefully fold over the other half. Cut in half and slide out onto warmed plates. Enjoy!

As a good omelette is a perfect lazy brunch dish, I’m entering this recipe into December’s Breakfast Club, a blogger challenge created by Fuss Free Flavours and which this month is being hosted by – oh yes, it’s me! If you’d like to enter a dish you can find out more here.
And because it features lots of lovely fresh parsley, I’m also linking up with Herbs on Saturday hosted by Lavender & Lovage.
* Disclosure: I was provided with two complimentary Russell Hobbs pans for review purposes and no money exchanged hands.

Spicy Indian-style dips

We love dips in our house. Whether they’re shop-bought or homemade, we always have a supply of dippy things in pots in our fridge – hummus, babaganoush, taramasalata, tzatsiki – perfect with a few breadsticks or carrot chunks for an impromptu snack when the children are peckish.

And we’re rather keen on our Indian food too. I reckon our girls developed a taste for Asian spices when they were in the womb. I craved curries during both pregnancies and in the final weeks, in particular, I consumed a vast quantity of particularly hot curries in a vain attempt to bring  on labour.

So when Warburtons recently got in touch to see if I’d like to test out some recipes created by TV chef Monisha Bharadwaj for a range of Indian-style dips to complement their new baked naan chips, I thought why the heck not?

As well as directing me to Monisha’s selections of recipes on Facebook, Warburtons kindly sent me some packets of their baked naan chips in ‘classic tikka’ and ‘fiery hot’ flavours to try with them.

I decided to test out two of the dip recipes. The two that appealed most were the manuka tamater ki chutney, made with tomatoes, raisins and spices, and a mint and sunflower seed chutney.

I found the mint and sunflower seed chutney a little too flavoursome, verging on pungent. So I mixed in some Greek yoghurt which calmed it down perfectly and made for a very tasty, creamy and refreshing dip. As well as mint, it contains lots of coriander, which I think always work so well together. The recipe also calls for a couple of chillies, but since I was trying this out on the kids I only used one so it wasn’t too hot for them.

The manuka tamater ki chutney was very good, although a tad on the sweet side. It features raisins, so I probably wouldn’t bother with the sugar as well next time. This was the dip the children liked best, although my husband and I preferred the mint and sunflower seed one.

While we rather liked the dips, I have to admit the baked naan chips weren’t really our cup of chai. Our eldest, Miss Mash didn’t think they were spicy enough but Miss Bangers, the four-year-old refused to eat them because they were too spicy. My husband and I could take them or leave them really. I also took a couple of packs into work to share with colleagues, and the response was similar – although during the course of a day they did all get eaten, so they can’t have been that bad!

Have you tried any of the Warburton dip recipes? If so, what did you think? And what do you reckon to the baked naan chips? How do you think they compare to their pitta chips?

Disclosure: I was provided with four complimentary packets of Warburton baked naan chips for the purposes of this review.

Kale, red pepper and potato pithivier

I’d never really bothered with the Great British Bake Off before, but this series I felt compelled to watch it. I’ve spent quite a bit of time on Twitter over the last year, and there had been so much talk about #GBBO I just had to see what all the fuss was about. And of course I was hooked from the first show.

In the final, John, Brendan and James tried their hands, rather successfully, at baking pithivier. Until then I had never even heard of pithivier. It turns out it’s a classic French pastry, sometimes sweet with fillings like frangipane and fruit but in this case savoury.

I rather liked the look of the pithivier so decided to give it a go myself. Mine is a much simplified version of Brendan’s recipe. You could probably go so far as to say it’s a cheat’s version, particularly since it uses ready-made puff pastry. For my filling, I opted for curly kale, red peppers, red onion, garlic and new potatoes, with lots of mature Cheddar cheese.

I was rather pleased with the end result and it went down with the family too. It’s like a big posh pasty. It didn’t have a soggy bottom, so Paul and Mary would have been happy. Although saying that, since I didn’t make my own pastry I guess they wouldn’t have been all that impressed. But I was. It’s lovely served warm and it’s also great cold the next day. And the next. It’s a bit of a monster, and kept us going for a while.

Kale, red pepper and potato pithivier

450g new potatoes
knob of butter
1 tbsp olive oil
1 red onion, peeled and chopped
2 red peppers, chopped
2 cloves of garlic, peeled and crushed
1 tbsp balsamic vinegar
bunch of fresh thyme, picked
230g curly kale, washed and shredded
100g cream cheese
2 eggs
salt and pepper
2 x 500g packets of ready-made puff pastry
180g mature Cheddar cheese, grated

Preheat the oven to 200ºC / gas mark 6

Boil the potatoes in salted water until tender. Drain and set aside to cool. When cool enough to handle, slice the potatoes into half centimetre thick slices. Season with salt and pepper.

Heat the butter and olive oil in a large pan and gently fry the red onion for about five minutes until translucent, then add the red peppers and continue to fry until they are softened. Add the garlic and stir fry for a couple of minutes, before stirring in the balsamic vinegar and thyme. Next throw in the kale, stir well and then cover with a lid. Allow the kale to cook down for a few minutes until al dente and set aside to cool a little.

In a small bowl, combine the cream cheese with one of the eggs and season with salt and pepper to taste. Stir this into the kale and red pepper mixture.

Flour the work surface and roll out one lot of dough until it is around 3mm thick, and cut out a disc 32cm across for the base. Roll out the second amount and this time cut out a disc 35cm across for the top. Place the base onto a baking tray lined with greaseproof paper or a non-stick sheet.

Layer the sliced potatoes on to the base, leaving a 4cm border all around. Next pile on the kale and red pepper mixture on top of the potatoes and finally sprinkle the cheese over the top, using your hands to press the cheese down to form a tidy mound. Brush the pastry border with the remaining egg.

Carefully place the larger disc over the top, pushing down around the mound to seal the pastry and cutting off the excess. Cut around the pastry border to form a sunshine shape and using the back of a knife, decorate the top with a sunbeam pattern and score the base. Be careful not to cut all the way through. Make a small hole in the top to allow steam to escape. Brush it all over with more egg.

Bake in the oven for 25 to 30 minutes until golden brown. Cool for 10 minutes or so on a wire rack and serve at room temperature or leave it to cool completely. You’ll get around 10 slices out of this, so perfect buffet or picnic food.

Afghan-style aubergine and yoghurt

As soon as I came across this recipe for Afghan-style aubergine and yoghurt in a recent edition of Delicious magazine, I knew I had to make it. I adore aubergine dishes and the Middle Eastern flavours in this one simply called out to me.

The recipe comes from Sally Butcher, a British-born cook who married into an Iranian family, and it is taken from Veggiestan: a Vegetable Lover’s Tour of the Middle East. I don’t own this book yet but I plan to get hold of a copy very soon.

It’s an incredible dish. The herbs and spices, lemon, garlic and chilli give it a beautifully fragrant zinginess, which works so well with the creaminess of the Greek yoghurt and the soft, sumptuous texture of the smoky aubergine.

I did worry it might be a little grown up for the children and so I made a version without the chilli for them. Miss Bangers, the four-year-old, did have to be persuaded a little to get through it. But Miss Mash, the seven-year-old, wolfed it down happily.

Afghan-style aubergine and yoghurt (burani bonjon)

3 large aubergines
salt
vegetable oil
1 onion, peeled and chopped
4 green chillies, chopped (optional)
1 tsp ground turmeric
400g tin chopped tomatoes
1 small bunch of fresh coriander, roughly chopped

For the yoghurt

450ml Greek yoghurt
2 tbsp lemon juice
6 garlic cloves, peeled and crushed
handful of fresh mint, chopped, plus extra sprigs for the garnish
salt and pepper

Cut the aubergine into half centimetre slices and sprinkle salt on both sides. Leave for half an hour, then rinse in cold water and dry with kitchen towel.

Heat a little oil in a large frying pan and saute the onion and chillies (if using) until soft. Remove and keep to one side.

Add some more oil to the pan and fry the aubergine in batches until slightly browned on each side. Sprinkle the aubergine with a little turmeric and return the slices to the pan with the chopped tomato, coriander, onion and chillies. Pour in enough water to just cover the ingredients, cover with a lid, turn down the heat and simmer gently for about half an hour. Add a little more liquid if it starts to look too dry.

While this is cooking, prepare the yoghurt. Simply mix the yoghurt and lemon juice in a bowl, stir in the crushed garlic and mint, and season to taste. Place in the fridge.

When the aubergine mixture is ready, spread half the yoghurt across a large serving plate, and then place half the aubergine on top. Cover with more yoghurt, the remaining aubergine and finishing with a last dollop of yoghurt and a sprig or two of mint.

Serve straight away with warm pitta or flatbread. Heavenly.

As this dish features lots of tasty mint and coriander, I’m entering it into October’s Herbs on Saturday blog challenge hosted by Karen at Lavender & Lovage. If you enjoy cooking with herbs, do head over there and take a look at the other recipes submitted as you’re sure to find plenty of new inspiration.

Kiwi and blueberry surprise

I am handing over the Bangers & Mash reigns today to my good friend Trish Tucker-May, who runs an awesome juice bar company called Passion 4 Juice, which you may well have come across at one of this summer’s festivals.

I first met Trish a decade or so ago, when we were both pre-kids. I was in the throes of launching my own PR business and she was just setting up Passion 4 Juice. In fact she was one of my first clients. Trish was a real inspiration. I haven’t met many people with the same level of energy and zest for life as her, and it is quite infectious. So while I’ve never invited someone to do a guest post on here before, with Trish I know you will be in safe hands. And so without further ado, here is the lovely Trish and her extremely clever recipe for Kiwi and Blueberry Surprise

How to make a guilt free and tasty pudding

Hi, I am Trish Tucker-May, an Aussie from Forster. You can’t get much more Aussie than that!

I have a pretty crazy life that some people dream about and others may think is just way too hard and crazy. I spend half the year working at summer festivals in the UK and half the year at festivals in Australia. I love travelling and the great outdoors and am passionate about bringing fresh juice and good health to people.

In 2003 I founded Passion 4 Juice Ltd an award winning juice bar company. I have written a small book about redesigning your life to live your passion and I have also self-published a recipe book called ‘Juice and Smoothie Recipes From Around the World’.  Currently I am studying a Diploma in Nutritional Healing – and loving it! I am married to a professional clown and mum to 4-year-old Jack-Patrick (AKA Jackpot) and 2-year-old Roary.

Trish with Roary, Jackpot and Joe

I became a little concerned this week when I thought back over the last three suppers and realised that perhaps they weren’t as nutritious as they should be for my developing 2 and 4-year-old boys. Okay, lasagne is good wholesome food and so is spaghetti  bolognaise, especially when I sneak in a handful of peas,  grated carrots and whatever other veg I can put my hands on at the time.

I know these easy Italian favourites are perfect for my boys. But given my slight aversion (rather than intolerance) to wheat, dairy and meat, I was left craving something green, fresh, and raw.  It was while I was pondering this dilemma that I came up with a fantastic idea. What if I could make something that satisfied my boy’s desire for sweet gooey pudding while also giving myself a treat packed with nutritional goodness? The Kiwi and Blueberry Surprise was born.

Firstly I put 2½ cups of nuts in the blender.  I mixed what I had which was almonds, brazils and cashews – so that was 2½ cups in total, not of each nut.  I blended until all the ingredients crumbled. Next I added ¾ cup of pitted dates and a pinch of salt.  That was the base done.

Next came the slightly sneaky bit. My son Jackpot is very used to me sneaking all sorts of weird and wonderful ingredients into my super green smoothies in the morning so I had to be careful not to be too obvious or I would get the “Mum it’s a bit too green for me, no thanks” treatment.

I peeled and cut a courgette, placed it in the blender with an avocado, a handful of mung bean sprouts, a handful of cashews,  a splash of yoghurt , a cup of frozen passionfruit puree and a tablespoon of agave syrup. I love making raw food so I have all these ingredients to hand. If you don’t have agave syrup, honey will work just as well.

Blend until smooth and pour into the tin.

Next step is to decorate with whatever you have to hand. In this case I used kiwi and blueberries. The kiwi worked well so I called it Kiwi Blueberry Surprise.  It seemed to go well with the green colour. Now the kids didn’t think it was green because of some crazy green vegetables.

Did I successfully satisfy both camps? We ate over half immediately and the boys were delighted. I was truly satisfied with the knowledge of raw sprouts, courgette and avocado for pudding. The following day my husband was home after working away.  I served it with a question – “Bet you can’t guess what is in this?” He is accustomed to me making weird and wonderful creations out of fruit and veg so he had a head start. He got the avocado right but that was all.

I have since shared this idea with a few contacts on a Facebook juice group. They have taken the idea to inspiring new heights and added variations such as chocolate, strawberries, lemon juice, cacao powder, vanilla bean paste, a handful of cashews, flaked almonds, shredded coconut and cacao nibs. To be honest I think my first attempt needed a little extra something and I couldn’t quite put my finger on it – I think a squeeze of fresh lemon and an extra handful of cashews would have done the trick.

So if you are tempted to try this one at home, be daring and always taste as you go. Make sure it has just the right level of sweet, sour, salty or bitter to suit your taste buds. This is a truly guilt free tasty pudding that satisfies the entire family.

Kiwi and Blueberry Surprise

Base
Blend the following and press into a flan tin and store in the fridge while mixing the filling:

2½ cups mixed nuts, such as almonds, cashews, brazils
¾ cup dates
pinch of salt

Filling
Blend the following and pour onto base:

1 avocado
1 peeled raw courgette
1 handful of raw cashews
1 handful of mung bean sprouts
2 tbsp natural yoghurt
¾ cup frozen passionfruit puree
2 tbsp raw agave syrup or honey

optional extra ingredients to taste
cashews, lemon juice, shredded coconut, raw cacao

Decoration
Your choice of fresh fruit – I used sliced kiwi fruit and blueberries.

So what do you think? If you try this out on your family, we’d love to hear how it went down.

You can find Trish on Twitter and Facebook and her website is www.passion4juice.com.

Courgette and cheese scones

With both of my girls now at school and with me working away from home most of the week, keeping the contents of our lunch boxes vaguely interesting is an ongoing challenge. Normally I go for set staples like rolls, pasta or rice salads, pitta bread and hummus – that kind of thing. From time to time though I do like to bake something a little bit different, but something which isn’t too much of a departure from the norm that the kids leave it untouched.

These courgette and cheese scones fit the bill perfectly. Tasty and moist, they are the ideal finger food and are packed full of goodness. Ideal served cold from a lunch box or warm straight from the oven. And they aren’t too much of a faff to make. A definite winner in my book.

Courgette and cheese scones

Makes 12

225g self raising flour
1 tsp baking powder
45g soft butter
115g Cheddar cheese, grated
1 courgette, grated
1 carrot, grated
2 spring onions, finely chopped
handful of fresh herbs, chopped (I used thyme and oregano)
salt and pepper
2 tbsp creme fraiche
60ml milk

Preheat the oven to 200°C / gas mark 6 and grease a baking sheet with a little butter.

Sieve the flour and baking powder into a large mixing bowl. Rub the butter in the flour until it looks like fine breadcrumbs.

Add the cheese, carrot, courgette, spring onion, herbs, salt and pepper. Combine and form a well in the middle. Pour in the creme fraiche and milk and mix together to create a sticky dough.

Lightly knead the dough on a floured surface and then form into 12 scone shapes and place on the baking sheet.

Bake in the oven for 15 to 20 minutes until golden brown. Cool a little on a wire rack before serving.

These scones can be frozen, or can be kept  in an airtight container for up to five days.

Easy ratatouille

Along with my tasty chicken rice, this easy ratatouille is my go-to meal when I’m stocking the freezer with quick weekday meals for the kids.

Now that I’m working over in Wells four days a week, ratatouille appears regularly on my meal plans. It’s particularly good for those days when I’m not back home til late and my husband has little time to get the girls back from school and fed before taking them off out again to their various clubs and activities.

My girls have been eating ratatouille since they were very little, when I’d mash it up for them a bit. They still love it today, served either on its own with a hunk of bread to mop up the juices, with rice, pasta or a baked potato and sprinkled with cheese, or as a veggie accompaniment to sausages or chops.

This is one of those recipes you can play around with. If you’ve got herbs to hand, throw in some of those. If you don’t like cumin, leave that out. The quantities of aubergine, courgette and pepper vary each time I make it, but this should give you the general idea.

Easy ratatouille

Makes 8-10 servings

2tbsp olive oil
½tsp cumin seeds
1 large onion, peeled and chopped
2 cloves garlic, peeled and crushed
1 red bell pepper, deseeded and chopped
1 yellow bell pepper, deseeded and chopped
3 courgettes, chopped
2 aubergines, chopped
1 bay leaf
2 400g tins of chopped tomatoes
Salt and pepper

Preheat the oven to 200ºC / gas mark 6.

Heat the oil in a large ovenproof casserole dish and fry the cumin seeds for a minute or so.

Add the onions and fry gently until golden, then add the garlic and fry for another minute before throwing in the red and yellow peppers.

Saute the peppers until they have slightly softened and then add the courgettes. Continue to saute for a couple of minutes and then add the aubergine. You may need to add a little more oil to the pan at this stage. Keep stirring the vegetables until they’ve started to colour, and then add the bay leaf, tomatoes and season to taste.

Put the lid on your pan and pop in the oven for 20-30 minutes. If it’s a little too liquid for your liking, remove the lid and cook for another 5 to 10 minutes. Leave to cool before dividing into freezer bags.