Warm pea and chilli salad

warm pea and chilli salad

It is Open Farm Sunday this coming Sunday (9 June) and as I mentioned in an earlier post, we’re looking forward to spending the day at Wookey Farm, meeting the goats, enjoying tractor rides and wanging a few wellies!

In the run up to Open Farm Sunday, many of the initiative’s sponsors have created recipes to celebrate British farming by showcasing British produce. I was invited to try out this warm pea and chilli salad, courtesy of Asda magazine.

It’s a lovely summery dish, also  featuring new potatoes, spring onions and green beans in a tasty mustard dressing. We ate ours with some simple chicken satay, but it would be equally good on its own with some crusty bread to mop up the dressing, or as an accompaniment for a barbecue.

warm pea and chilli salad

Warm pea & chilli salad

Serves 4

350g new potatoes
350g peas (frozen or fresh)
200g fine green beans, trimmed
3tbsp olive oil
4 spring onions, trimmed and sliced
1 or 2 red chillies, deseeded and finely chopped
1tbsp cider vinegar
1tsp clear honey
1tsp Dijon mustard

Boil the new potatoes until just tender, then drain. When cool enough to handle, halve or quarter them, depending on size. Put in a bowl.

Add the peas and beans to the pan with enough boiling water to just cover them. Bring back to the boil and simmer covered, for 4 minutes. Drain and add to the potatoes.

Heat 1tbsp oil and cook the spring onions and chillies over a low heat for 2 minutes. Remove from the heat. Add the rest of the oil, the vinegar, honey and mustard. Season.

Add the warm dressing to the potatoes, peas and green beans and toss together before serving.

Open Farm Sunday

The eighth annual Open Farm Sunday on 9 June 2013 provides a great opportunity for the public to truly get to know how their food is produced and how the countryside around them is cared for.

For more information and to find a farm near you that’s taking part visit www.farmsunday.org

May’s Recipes for Life challenge: cooking with rhubarb, lemon and spice

rhubarbCollage

Take part in the Recipes for Life challenge and you could see your dish featured in SWALLOW’s new charity cookbook!

We are now well and truly into rhubarb season, as Sarah who works for SWALLOW knows only too well. She has a huge patch of rhubarb in her garden and she doesn’t know what to do with it. So this month we are using the Recipes for Life challenge to help Sarah out by providing her with lots of delicious ideas on how she can put her rhubarb to good use.

Of course, the rules of the Recipes for Life call for a trio of ingredients, and so we’re teaming the rhubarb with lemon and spice – ginger, cinnamon, nutmeg, chilli, cardamom, star anise – whichever spices take your fancy and tickle your taste buds. All you have to do to enter the challenge is to combine these three ingredients to make a tasty, simple and wholesome dish and post it on your blog. Make sure any other ingredients you include are easy to come by.

We’re using Recipes for Life to come up with a stock of easy recipes for members of SWALLOW’s cookery club to make in their sessions. SWALLOW is a fab charity based in Midsomer Norton in South West England, supporting adults with learning disabilities to lead more independent lives. The challenge is running for six months and at the end, the best recipes will be included in SWALLOW’s new cookery book to help raise much-needed funds for the charity.

recipes for life

Recipes for Life: how to enter

  1. Display the Recipes for Life badge (shown above) on your recipe post, and link back to this challenge post.
  2. You may enter as many recipe links as you like, so long as they are based on the three main ingredients selected for this month and accompanied only by everyday items.
  3. Send your recipe URL to me at vanesther-at-reescommunications-dot-co-dot-uk, including your own email address and the title of your recipe or post. The closing date this month is Tuesday 28 May 2013.
  4. If you tweet your post, please mention #RecipesforLife@BangerMashChat and@SWALLOWcharity in your tweet and we will retweet everyone we see.
  5. Feel free to republish old recipe posts, but please add the information about this challenge and the Recipes for Life badge.
  6. As entries come in, links to these will be added to this page and at the end of the month there will be a round-up of all entries received.
  7. SWALLOW staff and members will choose their favourite recipe at the end of each month, and the winner will receive a small prize.
  8. A selection of recipes entered each month will be featured in the SWALLOW cookbook to be published later this year, helping the charity to raise much-needed funds for its ongoing work.

As my first entry, here’s a very simple rhubarb compote. It’s lovely served with roast duck, pork or lamb, and I’m also rather partial to it in a big thick cheese sandwich.

rhubarb compote

Rhubarb compote

knob of butter
small onion, chopped
1 tsp chopped ginger
½ tsp mixed spice
150g rhubarb, chopped
handful of sultanas or raisins
2 tbsp apple juice
2 tbsp lemon juice

Melt the butter in a pan and gently cook the onion and ginger until soft and golden. Stir in the mixed spice and cook for a couple of minutes.

Add the rhubarb and dried fruit and mix well to coat the fruit in the spicy butter. Cook for a few minutes before adding the apple and lemon juice. Stir and allow to stew gently for around ten minutes until the rhubarb is soft and mushy but still holds its shape. Serve at room temperature.

rhubarb compote with roast duck

May’s entries

  1. Rhubarb, Ginger and Lemon Fool from Under The Blue Gum Tree
  2. Rhubarb and Lemon Scones from The Garden Deli
  3. Rhubarb, Lemon and a Spice from Fun as a Gran
  4. Rhubarb and Vanilla Jam from Utterly Scrummy Food for Families
  5. Rhubarb Crumble Muffins from Chez Foti
  6. Spiced Rhubarb and Lemon Sorbet with Cinnamon Cookies from Bangers & Mash
  7. Rhubarb Ripple Ice Cream with Hazelnut Oat Clusters from Elizabeth’s Kitchen
  8. Rhubarb, Lemon and Ginger Friands from JibberJabberUK
  9. Spiced Lemon & Rhubarb Cheesecake from Rich In Flavour
  10. Spiced Rhubarb & Lemon Muffins from Farmersgirl Kitchen
  11. Rhubarb Syllabub from Fun as a Gran
  12. Lavender Poached Rhubarb with Ginger Custard Cream from How to Cook Good Food
  13. Fennel Rhubarb Foolish from Edible Things
  14. Rhubarb Ripple Ice Cream with Mini Spiced Lemon Cookies from The Crazy Kitchen
  15. Pork and Rhubarb Curry with Lemon Pilau Rice from Spurs Cook
  16. Moroccan Lamb & Rhubarb with Lemon & Coriander Cous Cous from The Crazy Kitchen
  17. Rhubarb, Lemon and Ginger Cake from JibberJabberUK
  18. Rhubarb and Custard Crumble Pizza from The Crazy Kitchen
  19. Lemon and Rhubarb Pudding from The Crazy Kitchen
  20. Cheese and Rhubarb Chutney Tart from The Crazy Kitchen
  21. Rhubarb Ice Cream with Lemon Spiced Biscuits from The Grumbling Tummy
  22. Poached Rhubarb Spaghetti from The Good Stuff
  23. Rhubarb Cinnamon Cake from Bangers & Mash

Megadarra with roasted broccoli for Live Below the Line

megadarra

Here’s my final frugal recipe offering for Save the Children and the Live Below the Line challenge, which will see thousands of people this week attempting to spend just £1 a day on food and drink – the equivalent to the extreme poverty line. My previous creations have been a Virgin Bloody Mary soup made from tinned tomatoes and red pepper, and Spicy Bean Burgers made from tinned kidney beans.

Admittedly it might not look all that appetizing, but it is tasty and cheap and filling. And at less than 40p a portion, that’s no mean feat.

Also known as mujaddara, this is a peasant dish made from lentils and rice, popular across the Arab world. It’s supposed to be made with brown or green lentils. I made mine with red lentils, which is possibly why mine went a little mushy but my family weren’t to know and ate it without complaint for lunch today. Well, except Mia the youngest, who complains about everything the first time she tries it. She got into it two after a few mouthfuls. I was lucky enough to use fresh broccoli from our vegetable patch, but you’ll see I’ve costed frozen broccoli in the recipe below as this, I’ve discovered, is the cheapest way to buy vegetables.

Megadarra with roasted broccoli

Serves 4 

250g red split lentils, rinsed and drained
East End red split lentils from ASDA £3.50 for 2kg = 43.75p

800ml vegetable stock (made from one stock cube)
ASDA Chosen By You vegetable stock cubes 12 for 78p = 6.5p

250g brown basmati rice, rinsed and drained
ASDA brown basmati rice £1.68 for 1kg = 42p

1 tsp (2g) ground cumin
ASDA 57p for 41g = 2.78p

2 tbsp vegetable oil (60ml)
ASDA sunflower oil £3 for 3 litres = 3p

1 onion (80g), finely sliced
ASDA Smartprice brown onions £1.16 for 2kg = 4.64p

2 cloves garlic, crushed
ASDA loose garlic 30p for approx. 8 cloves = 7.5p

300g frozen broccoli, defrosted
ASDA Smartprice broccoli £1 for 1kg = 30p

1 tsp (2g) mild chilli powder
ASDA mild chilli powder 80p for 44g = 3.63p

100g plain yoghurt
ASDA Smartprice low fat natural yoghurt 45p for 500g = 9p

Total cost = £1.53. Cost per serving = 38.25p

Preheat the oven to 200°C/Gas Mark 6.

Put the lentils and stock in a large pan and bring to the boil. Simmer for around ten minutes before adding the rice and cumin. Simmer for another 15 to 20 minutes until the lentils and rice are cooked and the stock has been absorbed. You may need to add a little more liquid if it starts to dry out before they are cooked.

While the lentils and rice are cooking, you can get on with preparing the onions and the broccoli.

Fry the onions in a tablespoonful of oil over a low heat. Cook gently for around half an hour until soft and golden. Add the crushed garlic and fry for another couple of minutes before removing from the heat.

To roast the broccoli, place in an ovenproof dish and toss with a tablespoonful of oil and sprinkle with the chilli powder. Roast for around 25 minutes until just tender and darkening.

To serve, stir two-thirds of the onions into the lentils and rice, and serve in bowls with the rest of the onion and broccoli on top with some yoghurt on the side.  Dig in!

megadarra

And as with all my Live Below the Line dishes, I’m entering this into April’s Credit Crunch Munch co-hosted by Helen from Fuss Free Flavours and Camilla from Fab Food 4 All.

Credit-Crunch-Munch-Just-Pic

Spicy bean burgers for Live Below the Line

Spicy bean burger

This is my second dish for Save the Children and the Live Below the Line challenge.

From 29 April, thousands of people will be getting sponsored to live below the extreme poverty line for five days, with just £1 a day to spend on all their food and drink. I’m not sure I could do it. But I’m playing my part, in a very tiny way, by trying to come up with some vaguely tasty dishes that cost less than 40p a serving to prepare from scratch. My first offering was a Virgin Bloody Mary soup made from cheap tinned tomatoes and a red pepper, costing less than 34p a bowl.

I’ve managed to save an extra halfpenny (not that they exist anymore) with these spicy bean burgers. Based on cheap tinned kidney beans pimped with garlic, cumin and paprika, this recipe creates four burgers costing just 33.5p each. You could probably even allow yourself a dollop of mustard or tomato ketchup. What luxury! But no skinny fries on the side I’m afraid.

spicy bean burger

Spicy bean burgers

2 tbsp vegetable oil (30ml)
ASDA sunflower oil £3 for 3 litres = 3p

1 small onion (80g), chopped
ASDA Smartprice brown onions £1.16 for 2kg = 4.64p

1 tsp (2g) ground cumin
ASDA 57p for 41g = 2.78p

1 tsp (2g) paprika
ASDA 58p for 46g = 2.52p

4 cloves garlic, crushed
ASDA loose garlic 30p for approx. 8 cloves = 15p

1 x 400g tin kidney beans
ASDA Smartprice kidney beans 400g = 27p

Breadcrumbs made from 1 slice of white bread
ASDA Smartprice medium sliced white bread 50p for 22 slices = 2.27p

Pinch of salt (1g)
ASDA Table Salt 29p for 750g = 0.04p

Grind of pepper (1g)
ASDA Smartprice Ground Black Pepper 25g for 20p = 0.8p

1 tomato, sliced
ASDA salad tomatoes £1 for 6 = 16.66p

Lettuce leaves (40g)
Sainsbury’s Basics young lettuce leaves £1 for 75g = 13.33p

4 soft bread buns
Sainsbury’s sesame seed burger buns 70p for 6 = 46.66p

Total cost = £1.34. Cost per serving = 33.5p

Heat 1 tablespoon of the oil in a frying pan and gently fry the onion until soft and golden. Add the cumin, paprika and garlic and fry for a couple more minutes but don’t let the garlic brown.

Remove from the heat and leave the onion, garlic and spices to cool a little before you add them to a food processor. Next add the drained kidney beans, breadcrumbs, salt and pepper. Blitz but not for too long – you want a fairly chunky texture. Shape by hand into four patties.

Heat the remaining oil in the frying pan and fry the burgers over a medium heat until cooked through and crispy on the outside. Turn them over gently to prevent crumbling.

Serve in toasted buns with a slice or two of tomato and some lettuce leaves.

Spicy bean burger

As with my last Live Below the Line dish, I’m also entering this into April’s Credit Crunch Munch co-hosted by Helen from Fuss Free Flavours and Camilla from Fab Food 4 All. If you’re looking for frugal food ideas, this is a very good place to start.

Credit-Crunch-Munch-Just-Pic

Virgin Bloody Mary soup – a recipe for Live Below the Line

virgin bloody mary soup

When Save the Children first invited me to contribute some frugal recipes for the Live Below the Line challenge, I knew immediately I had to get involved. Trying to eat good food on a budget is what I’m all about after all. But as soon as I started pulling together possible recipe ideas, it dawned on me this was going to be really rather difficult.

People taking part in Live Below the Line are getting sponsored to live below the poverty line on a measly £1 a day for five days from Monday 29 April to Friday 3 May. That’s just £1 for all their food and drink. No foraging or gifts allowed. £1 wouldn’t buy you a cup of coffee in your average cafe. It’s harsh, but it’s also the reality 1.4 billion people around the world wake up to each and every day.

Everyone taking part in Live Below the Line for Save the Children will be doing their bit to raise awareness of the plight of people facing extreme food poverty, while raising vital funds to help change the lives of vulnerable children everywhere.

Save the Children has challenged food bloggers to devise dishes that cost less than 40p to make from scratch. Every single ingredient has to be costed; every grind of salt and every splash of oil.

As I was thinking up ideas, it quickly became painfully clear just how difficult it is to eat well on such a low budget. Fresh vegetables and meat are practically out of reach, making tinned and frozen foods so much more attractive. While sliced, white bread might offer virtually no nutritional value, it does has the advantage of being cheap, and fills you up for a short time at least.

If you’re going to try to eat anything vaguely tasty or interesting while on the Live Below the Line challenge, as opposed to surviving solely on beans on toast, it pays to cook in bulk to get your money’s worth. Team up with others as it’s pretty much impossible to cook cheaply for one. And plan your meals. For instance, to get the cheapest onions you need to buy a big bag of them. So then you need to plan a whole list of meals to make sure you get your money’s worth. That’s why the three dishes I’ve come up with for Live Below the Line all revolve around onions, oil, garlic and spices to make sure I made the most of them.

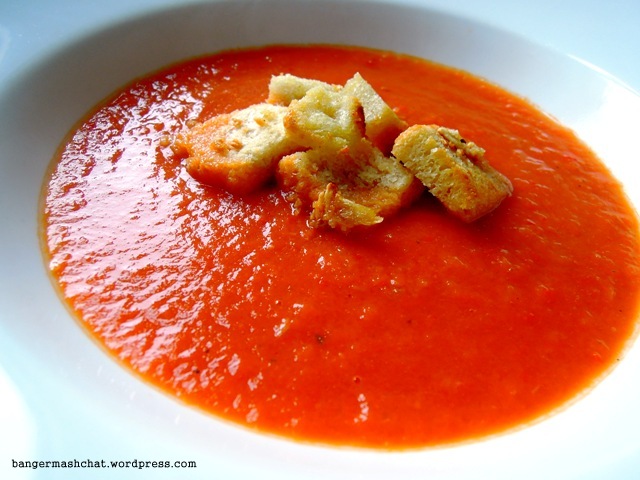
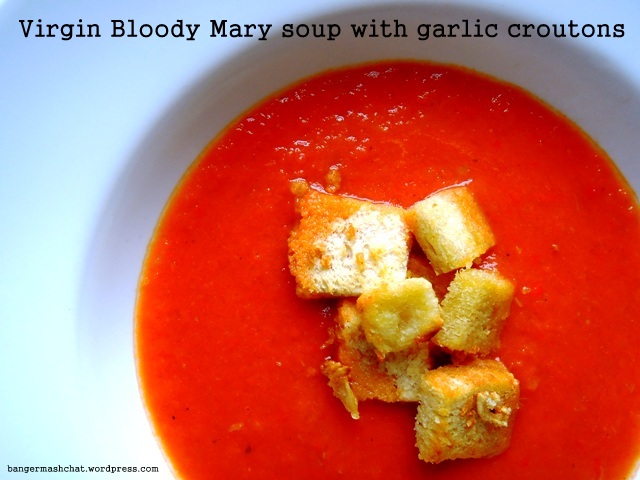
Coming in at just under 34p a serving, the first of my dishes is a spicy tomato and red pepper soup, flavoured with celery, Worcester sauce and hot pepper sauce rather like a Bloody Mary, but alas without the Vodka. You really couldn’t sneak that in on this budget! I did intend to use Tabasco but found I couldn’t afford that either, so had to find a cheaper alternative. The soup is served with crispy garlic croutons, which I reckon is a pretty good use of cheap white bread, and helps bulk it out.

virgin bloody mary soup

Virgin Bloody Mary soup with garlic croutons

Serves 4

1 tbsp vegetable oil (15ml)
ASDA sunflower oil £3 for 3 litres = 1.5p

1 onion, chopped (around 100g)
ASDA Smartprice brown onions £1.16 for 2kg = 5.8p

1 celery stick, sliced (around 35g)
ASDA celery sticks £1 for 350g = 10p

1 red pepper, chopped
ASDA red pepper = 40p

1 400g tin chopped tomatoes
ASDA Smartprice chopped tomatoes 400g = 31p

500ml vegetable stock (made from one stock cube)
ASDA Chosen By You vegetable stock cubes 12 for 78p = 6.5p

Dash Worcester sauce (5ml)
ASDA Lea & Perrins £2.16 for 290ml = 3.72p

Dash hot pepper sauce (5ml)
Tesco Frank’s Red Hot Cayenne Pepper Sauce Original 148ml for £1.00 = 3.37p

Salt (2g)
ASDA Table Salt 29p for 750g = 0.07p

Pepper (1g)
ASDA Smartprice Ground Black Pepper 25g for 20p = 0.8p

2 tbsp olive / vegetable oil (30ml)
ASDA olive oil £1.98 for 500ml = 11.88p

4 slices white bread, cubed
ASDA Smartprice medium sliced white bread 50p for 22 slices = 9.09p

3 cloves garlic, crushed
ASDA loose garlic 30p for approx. 8 cloves = 11.25p

Total cost = £1.35. Cost per serving = 34p.

Preheat the oven to 200°C/Gas Mark 6.

Heat the vegetable oil in a large pan and cook the onion, celery and red pepper until soft. Stir in the chopped tomatoes and vegetable stock. Add a dash of Worcester sauce and hot pepper sauce and season with salt and pepper to taste. Leave to simmer gently for 10 to 15 minutes while you get on with the croutons.

Heat 2 tablespoons of olive or vegetable oil in a frying pan and gently fry the garlic until it has just turned golden. Throw in the cubed bread and stir well so all the pieces are coated in oil. Turn the bread out onto a baking tray and cook in the oven for 10 to 15 minutes. When the croutons are looking crispy on the top, use a spatula to turn them over and cook for another 5 to 10 minutes depending on how just how dry and crunchy you like them.

When the soup is cooked, blend in a liquidiser until you achieve a fairly smooth consistency but not completely – it’s good to have a little texture. Serve in bowls and sprinkle a handful of garlic croutons on each. Grub’s up!

virgin bloody mary soup

As this dish is so utterly cheap and cheerful, I’m entering it into April’s Credit Crunch Munch, a wonderful blog challenge celebrating the very best in fantastically frugal food. This month it is co-hosted by Helen from Fuss Free Flavours and Camilla from Fab Food 4 All.

Credit-Crunch-Munch-Just-Pic

Drop scones

drop scones

One of the best things about owning an Aga is being able to cook drop scones at the drop of a hat. Of course you don’t need an Aga to make drop scones, a frying pan will do, but there is something so very satisfying about making them direct on the hot plate itself, which of course is always hot and ready to go.

These drop scones are incredibly easy and take literally minutes to prepare. They’re just as good for a teatime treat as they are a weekend breakfast, and the children adore them.

The recipe I use here is from The Aga Book by Aga supremo Mary Berry, although she calls hers Scotch pancakes.

Aga drop scones

Drop scones

Makes around 20

100g self-raising flour
25g caster sugar
1 egg, beaten
150ml milk
Sunflower or vegetable oil for greasing.

Place the flour and sugar in a large bowl. Make a well in the middle and pour in the egg and half the milk. Mix well until it forms a thick batter and then mix in the rest of the milk.

Lightly grease the Aga simmering plate with a little oil, or grease a frying pan and place over a medium heat. When the fat is hot, use a tablespoon to carefully spoon the batter onto the plate or pan, spacing well apart. Cook for only around 30 seconds until tiny bubbles form on the surface, then use a spatula to turn them over. Cook again on the other side for another 30 seconds until golden brown.

Keep the drop scones warm until you’ve worked through all the batter and serve with whatever takes your fancy. We like ours with berries and either honey or golden syrup, or you might prefer a little butter and jam.

drop scones

Watercress and pistachio pesto

spaghetti with watercress and pistachio pesto

I was recently given a new hand mixer and so, naturally, the first thing I had to try it out on was homemade pesto.

Normally I’m a bit of a purist when it comes to pesto. I could eat basil and pine nut pesto every day and never tire of it. It brings back very fond memories of inter-railing around Europe with my best friend after our A-levels. The only food we could really cook in our basic hostel kitchens was pasta and pesto from a jar. Washed down with a cheap bottle of plonk, we couldn’t have been happier. And then we ate fresh pesto in Italy and we were happier still.

But as my husband isn’t much of  a pesto fan, I have started to experiment with different variations. Wild garlic pesto was a big hit last year and I look forward to picking some again from the local hedgerows when spring finally decides to turn up here in Somerset.

One of my favourite food bloggers is Louisa at Chez Foti who happens to be a bit of a pesto aficionado. I love the look of her stilton, walnut and parsley pesto and will be trying it soon. In this same blog post Louisa helpfully listed a whole menu of ideas for anyone wanting to dabble in a little pesto experimentation.

One of her suggestions was watercress, which is a particular favourite ingredient of mine. And so I came up with this recipe for watercress and pistachio pesto. I thought it might be a little peppery for the children but that wasn’t an issue at all. They wolfed it down and came back for more. A definite success. Bear in mind that if you do add the Ricotta at the end, you’ll need to use the pesto within a couple of days. If you leave it out, the pesto will keep in a glass jar in the fridge for a couple of weeks.

making watercress pistachio pesto

Watercress and pistachio pesto

Serves 6 to 8

80g watercress
1tsp rock salt
3 cloves of garlic, peeled
60g Parmesan, grated
60g shelled pistachio nuts
150 ml olive oil – the best quality you can afford
2 tbsp Ricotta cheese

In a blender, process the watercress, salt, and garlic until well chopped. Add the Parmesan, pistachio nuts and olive oil and blend until fairly smooth and creamy.

Scrape into a bowl and fold in the Ricotta cheese. Serve with pasta of your choice. Personally I always go for spaghetti with pesto.

spaghetti with watercress and pistachio pesto

If you have featured a pesto recipe on your blog, please feel free to include a URL in the comments below and I’ll be more than happy to  link up to it!

I am entering this recipe in the #TuscanyNowCookOff. It might not be the most authentically Italian pesto, but it might possibly get through on creativity!

Egyptian dukkah spice mix

Dukkah with bread oil and vinegar

I discovered the delights of dukkah not so long ago at a great little pop-up restaurant in Frome called The High Pavement Evening Cafe, which I was rather excited to see will re-open later this year. Also written duqqa or dukka, this spicy Egyptian side dish consists of nuts, seeds, herbs and spices, toasted and then crushed up together to create something so simple and yet so incredibly delicious. I’m amazed I haven’t come across it before.

It was served to us at the start of our meal at The High Pavement as an accompaniment to bread alongside oil and vinegar. I was instantly hooked. When I tried making it myself at the weekend, I served it the same way. Homemade bread dipped in oil, then vinegar and then dukkah is just so, so good.

bread with dukkah

Admittedly I made it a little too spicy for the children and they weren’t impressed at all. Next time I’ll go a little easier on the paprika and perhaps they’ll get into it too. It is perfect finger food after all. But my husband and I got well and truly stuck in.

I found a hundred and one different ways to make dukkah on the internet; it seems to be the kind of dish you can play around with – lots. According to Wikipedia it’s typically made with hazelnuts but I didn’t happen to have any of those, so I went with almonds and walnuts. But you could use pistachio or just about any other type of nut you fancy really.

dukkah

Similarly there are a hundred and one different ways to use dukkah. Sprinkle it onto salads and soups, over hummus and soured cream, use it as a crust for fish or a rub for meat, or as a topping for flat breads. I took some to work in my packed lunch the other day, bringing to life an otherwise boring cheese roll. It is very versatile.

Dukkah

40g chopped almonds
40g walnut pieces
2 tbsp sunflower seeds
1 tsp fennel seeds
1 tbsp cumin seeds
1 tbsp white mustard seeds
3 tbsp coriander seeds
1½ tbsp sesame seeds
1 tsp caraway seeds
½ tsp sea salt
1 tsp paprika (you may wish to adjust if serving to children)

Dry fry the almonds, walnuts and sunflower seeds in a hot frying pan until they just begin to turn a darker, golden colour. Remove from the heat and allow to cool.

In the same pan, toast the fennel seeds for half a minute, then add the cumin seeds and toast for a further 30 seconds. Pour these into a bowl, separate from the nuts and sunflower seeds.

Next add the mustard and coriander seeds to the pan and toast for a minute or so, before tipping into another bowl.

Reduce the heat a little and toast the sesame and caraway seeds until the sesame starts to change colour. Place in yet another bowl.

Crush the fennel and cumin seeds in a pestle and mortar, before placing in an electric grinder along with the almonds, walnuts and sunflower seeds. Give them a quick whizz until you achieve a rough crumb texture and then pour into a bowl.

Lightly crush the mustard and coriander seeds in the pestle and mortar and add these to the dukkah bowl, followed by the sesame and caraway. Season with the salt and paprika (go easy if you have kids) and mix well.

There it is – you’re done. So, how will you eat yours?

I served mine in my gorgeous Brabantia dip servers, part of the fantastic prize I won last year at the MAD Blog Awards.

dukkah

If you liked this, you might also like…

Haricot bean and garlic dip
dips
Spicy Indian-style dips
Middle Eastern chicken salad with hummus dressing

Beetroot, carrot and feta cheese salad

Today is the last day to enter the March Recipes for Life challenge. So if you’re sitting on a delicious dish featuring beetroot, carrot and cheese – well, I hope not literally as that could get a little messy – then today is the day to let me know about it! Details of how to enter this month’s challenge are here.

For my last-minute entry, I bring you a fresh and zingy salad – one that we eat regularly in the Bangers & Mash house, or variations of it at least. It’s a surprisingly summery salad considering its winter root vegetable ingredients. This version uses of course beetroot and carrot, but you could also try it with turnip, swede, celeriac or any kind of red or green cabbage. It’s based on an Ottolenghi recipe and I love it for its versatility and its slightly sweet and sour dressing which is just mouth-wateringly tasty.

As I made it at the weekend for Recipes for Life, I tried it with some feta cheese this time. It worked extremely well – the soft tanginess of the feta is a perfect contrast to the earthiness of the beetroot and parsley. You can use whichever herbs take your fancy. The original recipe used parsley and dill but I went with parsley and coriander, simply because those are what I had in the fridge. It also features capers but you could leave these out if you don’t have or like them, or perhaps use olives or chopped gherkins instead. I left out the dried sour cherries from Ottolenghi’s version; sometimes I’ll use another dried fruit instead or chopped apple. But not this time, as I thought there was probably enough going on. Go experiment!

By the way, I use organic vegetables so I don’t bother to peel them for salads like these. But if you’re not sure what your veggies have been grown in, it might be best to peel them first.

Beetroot, carrot and feta cheese salad

Serves 4 to 6

3-4 medium beetroots, scrubbed and grated
3 large carrots, scrubbed and grated
large handful of fresh coriander, roughly chopped
large handful of fresh parsley, roughly chopped
200g feta cheese, cut into small cubes
30g capers
2 tbsp lemon juice
1 tsp cider vinegar
2 tbsp sunflower oil
2 tbsp olive oil
2 tsp wholegrain mustard
1 tsp sugar
1 clove garlic, crushed
salt and pepper to taste

This is so simple. Place the grated beetroot and carrot in a large mixing bowl with all the other ingredients (keep back a few pieces of cheese to place on top at the end) and mix together well using your hands. Ottolenghi describes it as ‘massaging’ the ingredients, so that the vegetables get the chance to absorb all the delicious flavours.

Leave the salad in the fridge for at least an hour before serving, when you can throw in the last few pieces of brilliantly white feta, which I think look fabulous alongside the pink pieces.

This salad will keep in the fridge for a couple of days. I think it tastes even better the next day. I like to eat mine in a tortilla wrap with hummus and cold meats. How will you eat yours?

Celeriac soup with Shropshire Blue and a hint of chilli

Celeriac isn’t the prettiest of vegetables but you should never judge a book by its cover as they say. Despite it looking like a close-up of an insect under a microscope (as someone described it recently over on my Facebook page), I tend to get very excited when I discover one in our weekly veg box.

It’s wonderful simply boiled and mashed with a little butter, in a gratin with potatoes and lots of cream and garlic, or grated raw in an Ottolenghi-style root vegetable salad. I reckon it’s one of the most versatile vegetables around.

But my personal favourite is to partner celeriac with some kind of blue cheese in a soup. The mellow earthy, nutty flavour works so well with the tang of a good blue cheese. Stilton is always popular but I prefer a Shropshire Blue, which isn’t quite so in-your-face and gives the soup a wonderful orangey colour.

For a little extra kick, I do rather like to add a little chilli too, although I generally leave this out when I’m making it for the children. But as I cooked this last week for just me and my husband, the chilli was most definitely in, helping to boost the central heating on a wet, chilly day.

Celeriac soup with Shropshire Blue and a hint of chilli

2 tbsp olive oil
knob of butter
1 onion, peeled, and chopped
500g celeriac, peeled and diced
1 small red chilli, finely chopped
1 litre hot vegetable stock
120g Blue Shropshire cheese

Heat the oil and butter in a large pan and gently sweat the onion until soft.

Add the celeriac and cook a little, making sure the pieces get a good coating of butter and oil.

Throw in the chopped chilli and fry for a couple more minutes before adding the hot stock. Allow to simmer for around 15 minutes until the celeriac is tender. Cool a little before liquidising to a smooth consistency.

Return the soup to the heat while you crumble in the Blue Shropshire cheese and warm through gently until the cheese has melted. Serve with big hunks of crusty bread. Heaven in a bowl…