Food is a wonderful talking point, isn’t it? No matter what company I find myself in, as soon as I start talking about food, a proper conversation has started. You don’t even have to be face-to-face. Social media provides so many platforms for foodies to talk and share ideas about their favourite subject.
One of the aspects I like so much about writing this food blog is the way it has helped revive connections with family members across the world, through a shared passion for food. Take my mum’s sister for instance, my Aunty Lorene. I haven’t seen her since I was 14 years old and had pretty much lost all contact with her. But through this blog and Facebook we have got to know each other again.
And increasingly Lorene has taken on the role of one of my ‘culinary advisors’. In particular she was a great help last Chinese New Year, providing recipes and tips for all kind of authentic dishes she remembers from growing up in Malaysia.
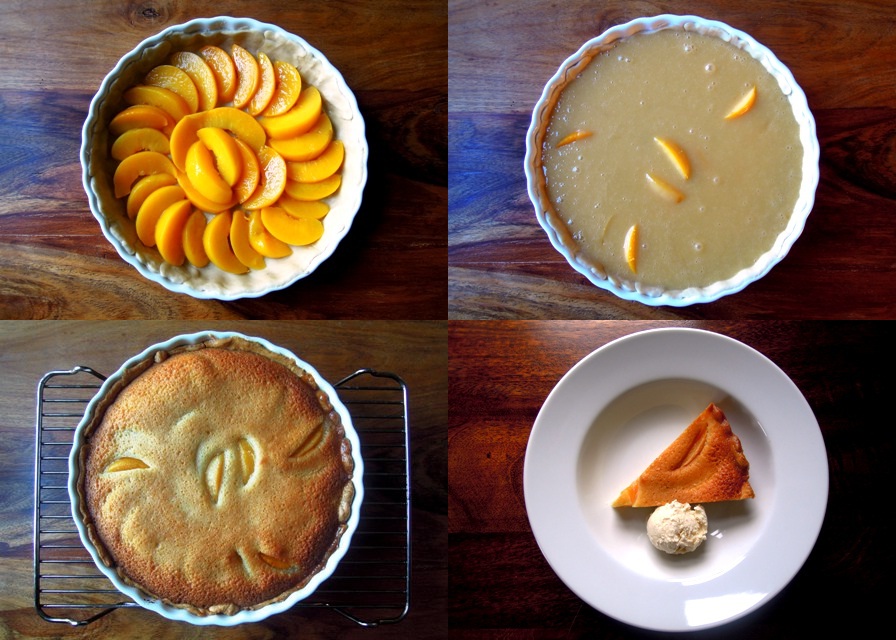
Lorene sent me her own recipe for peach pie recently, as she thought it would go down well with the children. Indeed it did, and the grown ups too. It’s a beautifully simple pie, using many store cupboard ingredients, and is delicious served with a generous scoop of vanilla ice cream.
Peach pie
320g readymade sheet of shortcrust pastry
2 x 400g tins of sliced peaches
85g butter
2 eggs
170g caster sugar
1 tsp vanilla extract
50g plain flour
Preheat the oven to 190°C/gas mark 5.
Grease a 20cm flan dish and line with the readymade shortcrust pastry, pressing firmly into the edges.
Drain the peaches and arrange in the pastry case – you’ll probably end up with a few leftover.
Melt the butter and allow to cool slightly.
In a jug, beat the eggs and mix in the sugar, butter and vanilla. Then add the flour and combine well. Pour this mixture over the peaches.
Bake in the oven for around 45 minutes until the filling is set and a lovely light golden brown colour. Allow to cool just a little before slicing and serve with ice cream or whipped cream. This pie is also good served cold the next day.
This is my last festive recipe before I take a short break from blogging for the Christmas holidays. It’s such a quick and easy recipe – quite frankly, it barely qualifies as a recipe at all – and is a great way to use up any left over Christmas pudding.
It isn’t the first time this recipe has featured on Bangers & Mash. It first appeared back in January, but those were very early days for the blog; days when I still thought I could get away with my own doodles instead of photography! But it is such a genius dessert, I think it’s well worth repeating.
I like the idea of Christmas pudding much more than the pudding itself. I love the flavours but the actual pudding is just too dense and stodgy. Mix it with ice cream and alcohol though, and hey presto! You have yourself a much lighter but equally festive dessert. You can use whatever spirit or liquer takes your fancy really. I went with a delicious apple brandy made here in my home county of Somerset. I also made an alcohol-free batch for the kids.
As this pudding features that timeless combination of booze and ice cream, I’m entering it into Kavey Eats’ Bloggers Scream for Ice Cream challenge for December, the theme of which is, of course, booze – well, what else could it be this time of year?
1 small Christmas pudding 2 litres good vanilla ice cream Slug of brandy (or whatever festive liquer or spirit you have around)
Cook your pud according to the packet instructions and allow to cool. Leave the ice cream at room temperature to soften a little before adding chopped up pieces of the pudding and brandy. Mix well.
Then simply pour into your container of choice and freeze for at least a couple of hours. Enjoy!
Here’s to a merrily delicious Christmas everyone. Peace and love to you and yours.
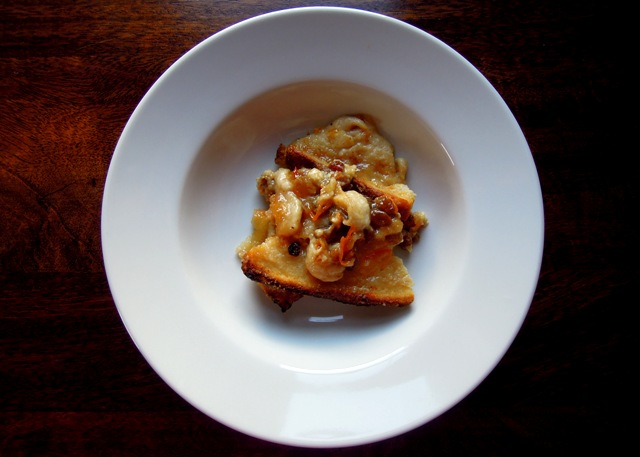
Here’s my slightly seasonal take on the humble but very delicious bread and butter pudding. What could be a more festive combination than oranges and spices? The orange in this pud comes in the form of marmalade and zest, while the spices are ginger, cinnamon and mixed spice.
I wish I could share with you fond memories of eating this as a child but, to be honest, the first time I ate bread and butter pudding was only a few years ago when I tried Nigella Lawson’s ginger-jam version from her Nigella Bites cookery book. It was a pudding that never really appealed to me when I was younger. It sounds, well, a bit boring really. I mean, bread? In a pudding? And butter. Who’s going to get excited about that?
But oh! Now I’ve tried it, I can safely say it is delicious and now one of my favourites. Crunchy and slightly chewy on top, soft and gooey underneath. It might not have been one of my nursery food memories, but it will be one of my children’s. Plus it’s so simple to make and comes with its own ready-made custard. What’s not to like?
This recipe is loosely based on the one in Nigella Bites.
Spiced orange bread and butter pudding
75g butter
75g sultanas
3 tbsp apple juice
1 tsp ground ginger
10 slices thick white bread
half a jar of orange marmalade
4 egg yolks
1 egg
5 tbsp demerara sugar
1 tsp mixed spice
500ml double cream
200ml milk
1 tsp ground cinnamon
2 tbsp runny honey
Preheat the oven to 190°C/gas mark 5.
Grease a medium-sized pudding dish with some of the butter.
Put the sultanas in a small bowl and mix with the apple juice and ginger. Pop in the microwave and heat on medium power for a minute and then leave to stand. This is Nigella’s trick for plumping up the sultanas. She uses rum but I didn’t think the kids would be too keen on that.
Make up sandwiches with the white bread, spreading the butter and marmalade generously. Cut in quarters into triangles and then arrange in your dish, some pointing up and some pointing downwards. Sprinkle over the sultanas and pour over any remaining gingery apple juice.
Lightly whisk the egg yolks and egg in small bowl and mix in 3 tablespoons of the demerara sugar and mixed spice. Then add the cream and milk and combine. Pour over the marmalade sandwiches and leave for 10 minutes or so to give the custard a chance to soak into the bread.
Dot some butter onto the visible bread. Mix the ground cinnamon with 2 tablespoons of demerara sugar and sprinkle over the top. Finally drizzle the honey over the top too.
Place the dish on a baking tray and cook in the oven for around half an hour until the custard has set and the crusts poking out are browned and caramelised. Leave for 10 minutes before serving. It will be agony waiting that long as it smells so good!
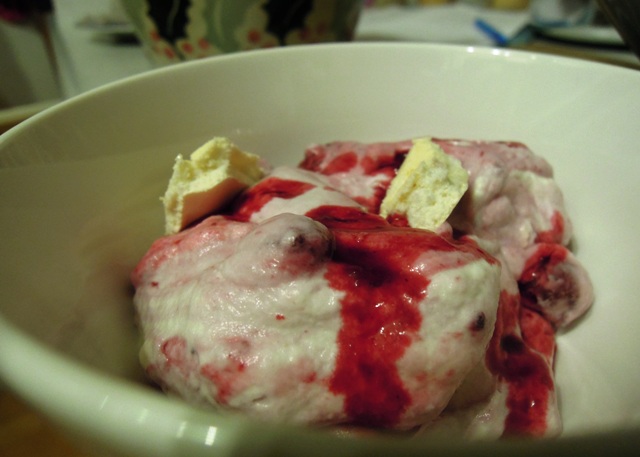
The aroma of mulled wine is so evocative of Christmas. When I was thinking of ideas for a festive pud recently, it occurred to me that mulled wine would be the perfect way to transform an otherwise rather summery dessert into something a little more Christmassy.
Eton mess does really have summer written all over it, doesn’t it? Usually a mixture of strawberries, cream and pieces of meringue, it has traditionally been served at Eton College’s annual cricket game against Harrow since the 19th century.
In this version I have used a mixture of frozen ‘winter berries’ from the supermarket – in this case blackberries, blackcurrants, cherries and grapes – and cooked them gently in a thick mulled wine syrup before combining with the cream and homemade meringue, flavoured with a little ginger. Take it from me, it tastes and smells divine. I was a little worried it might be a bit ‘grown up’ for my two daughters but they both chomped their way through it gleefully, and the oldest even had seconds.
Festive mess with mulled wine berries
For the meringue:
3 egg whites
pinch of salt
175g caster sugar
1tsp corn flour
1tsp ground ginger
½tsp vanilla extract
NB This recipe makes about double the amount of meringue you’ll need for the dish, but I’m sure you’ll find another way to use up the leftover!
For the mulled red wine berries:
150ml red wine
½ stick cinnamon
5 cloves
zest of 1 orange
100g caster sugar
¼ teaspoon grated nutmeg
300g frozen mixed winter berries
250g whipping cream
2tbsp icing sugar
First of all, make the meringue. If you don’t have an Aga, preheat the oven to 150ºC / gas mark 2.
In a large bowl, beat the egg whites and salt until stiff. Gradually whisk in the caster sugar a teaspoonful at a time, and finally whisk in the corn flour, ground ginger and vanilla. Lay a sheet of silicone paper on a baking tray and spread the meringue mixture out onto the sheet to create a large rectangle.
If you have an Aga, put the baking tray on the floor of the roasting oven for three to four minutes, until the meringue is ever so slightly coloured. Then move down to the floor of the simmering oven for about an hour until the meringue is firm on the outside but gooey in the middle.
If you’re using a conventional oven, bake for an hour and then turn the oven off. Open the door halfway and allow the meringue to cool to remove to room temperature before removing.
Now it’s time to move on to the mulled wine syrup.
Pour the wine into a saucepan and place over a medium heat. Add the cinnamon, cloves, orange, sugar and nutmeg and stir well. Allow to simmer for around 10 to 15 minutes until the wine has reduced a little and has more of a sticky syrup consistency. The smell in your kitchen by now will be amazing!
Next add in the frozen fruit, stirring gently, and cook on a low heat until the fruit has defrosted and cooked down a little. But don’t cook so long it turns into a mush; it’s good to have some texture and bite in the fruit. Once the fruit is cooked, leave to one side to cool.
In a large bowl, whip the cream until it forms soft peaks and gently stir in the icing sugar.
When the mulled wine berries have cooled, stir these into the whipped cream (reserving a little of the syrup), along with broken pieces of meringue. Serve immediately and finish off with a little drizzle of the mulled wine syrup. Enjoy your delicious bowlful of festive cheer!
One day when I’m properly grown up I will buy myself an ice cream maker. Probably when I’m grown up enough to have a kitchen big enough to store an ice cream maker in.
But for now I feed my hunger for home-made ice creams with recipes like this, for semifreddos and frozen yoghurts, that don’t actually require a machine.
This is such an easy and delicious dessert; one you can rustle up with largely store cupboard ingredients. Although do bear in mind you’ll need to take it out the freezer every half an hour and whisk until it’s frozen, so don’t plan to go out anywhere until it’s done. Obviously we generally prefer our fruit fresh, but we always have some of the tinned variety (peaches, mandarins and in this case black cherries) lurking at the back of the cupboard for those ‘just in case’ pudding needs.
I like a little fruity texture to my frozen yoghurt so I puree the cherries in two batches. Feel free to puree all in one go if you prefer yours smooth.
Black cherry frozen yoghurt
2 x 400g tins of black cherries (pitted)
500g low fat Greek yoghurt
3tbsp caster sugar
juice and zest of half a lemon
Put two-thirds of the cherries in the food processor, along with the yoghurt, sugar, lemon juice and zest and puree until fairly smooth. Add the remaining cherries and whiz a smidge longer, just long enough to slightly break up the last lot of cherries.
Pour the mixture into a plastic container, cover and place in the freezer. Whisk the mixture well every half an hour until it is just frozen. This will take about two to three hours.
The frozen yoghurt is ready to eat when you can’t whisk it any more, and is best consumed within two to three weeks.
If you like this, you might also like…
Raspberry, lemon and mint semifreddoChristmas pudding ice cream
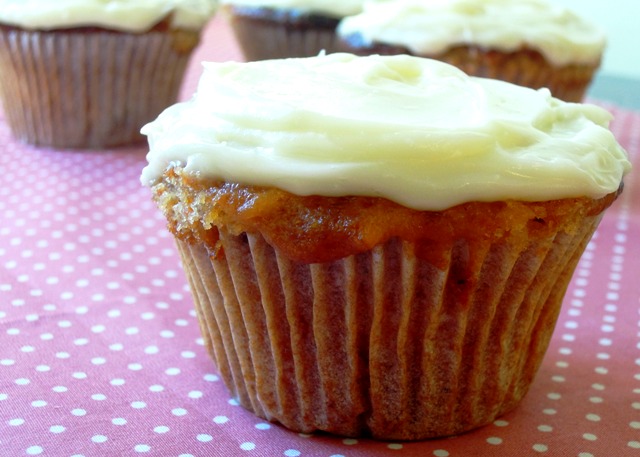
While it might be unlikely you’ve arrived at this page if you dislike parsnips, these cakes actually happen to be perfect for anyone who isn’t a member of the parsnip fan club as you would never guess they contained any if you hadn’t been told first.
Beautifully moist and incredibly moreish, they’re a great way to use up unwanted parsnips, particularly when they become a slightly too frequent inclusion in the veg box this time of year.
Personally, I rather like parsnips. They’re delicious roasted, when they take on that sweet caramelised flavour, with a slightly crunchy, slightly chewy texture. My other half however strongly disagrees and groans if he sees them in the fridge. Despite that he gobbled up these parsnip cakes more than happily.
Without the cream cheese topping, they are very tasty and ideal for the children’s packed lunch boxes or an after school treat. But with the topping, they are elevated to a decadent and indulgent level of scrumminess you’d simply never believe a root vegetable could reach.
Put the butter, sugar and honey in a large pan and melt over a gentle heat, and allow to cool slightly. Mix in the eggs, and then the flour, baking powder and mixed spice. Then stir in the parsnip, carrot and sultanas.
Spoon the mixture into paper muffin cases in a 12-hole muffin tray and bake for 20-25 minutes until golden brown and the top is springy to the touch.
Cool the cakes for five minutes in the tin before turning out onto a wire rack to cool completely.
To make the topping, cut up the butter and then cream together with the cheese. Gradually add the icing sugar and beat in until there are no lumps. Smear generously and lovingly over your cakes.
Best eaten with a fork in polite company. But if you’re like me, you’ll find yourself devouring these late at night, straight from the tin and with such gusto you end up with topping all over your face. Bliss!
Cake pops are very cute. After all, who doesn’t love food on a stick? I made some simple ones recently for a school cake sale and they sold out instantly. In fact, the school caretaker got in there first and bought some while we were still setting up.
I’ve seen lots of beautifully decorated cake pops on websites and blogs recently and for some strange reason I’ve felt an overwhelming urge to create some special cake pops for Halloween. Now this just isn’t the kind of thing I do normally. My interest in baking has increased massively over the last couple of years but creating cleverly crafted cakes and daintily decorated delights is way out of my comfort zone.
Admittedly, these little pumpkin pops are not an example of patisserie perfection I’m afraid, but they are a bit of fun and most importantly my children can’t get enough of them.
It took me a couple of attempts to get these Halloween cake pops right, mainly because white chocolate isn’t particularly easy to work with as a cake coating.
The first time it took me ages to get the colouring right. I was adding a drop or two of red liquid food colour, then a drop of yellow, and a bit more red, and a bit more yellow, ad nauseum. Eventually the chocolate just split and went all grainy and horrible because I’d over-worked it. I added a little vegetable oil to loosen it again, which seemed to work but then the coating refused to set properly on the cakes and they ended up looking a complete and utter state.
The second attempt was better. I used white chocolate again but went for a concentrate paste colouring and took lots more care not to overwork it. The end result, as you can see, is OK but I still haven’t ended up with the lovely smooth finish you get with normal chocolate. Next time – if there is a next time – I might try a white cake covering or ‘candy melts’ – it might taste ghastly but does that matter as long as it looks the part?
There are various ways to make the cake pops themselves. I have seen a cake pop machine on the market but that seems a little excessive to me. I bought a special cake pops baking pan, which works fairly well but I don’t think it’s completely necessary. I’ve since found a few pop cake recipes online using ready-made cake; you simply mix with chocolate and roll into balls. No baking necessary.
But if you do fancy going down the baking pan route, here’s what I did…
Halloween pumpkin cake pops
Makes 12
50g plain chocolate
60g butter
80g caster sugar
1½ tbsp cocoa powder
1 egg
50g plain flour
¼ tsp baking powder
pinch of salt
200g white chocolate
12 lollipop sticks
orange food colouring concentrate paste
2 tbsp jam
green ready-made icing
black writing icing
Preheat oven to 180°C / gas mark 4.
Grease the baking pan liberally with vegetable oil and dust with cocoa powder.
Put the plain chocolate and butter in a large mixing bowl and heat gently in a microwave or over a large pan of hot water until melted. Mix in the caster sugar and cocoa, and then stir in the egg. Finally add in the flour, baking powder and salt and combine well.
Spoon the mixture into a twelve-pop baking pan, filling each well so it creates a slight mound over the top. Put the lid on and secure.
Bake for 20 minutes until a toothpick inserted into one of the holes comes out almost clean. Leave to cool for five minutes in the pan before removing and leaving to cool completely.
Melt a couple of the pieces of white chocolate and dip the lollipop sticks in before inserting into the cake pops. Put in the fridge for half an hour to allow the sticks to set into place.
Line a plate or board with greaseproof paper.
Melt the remainder of the white chocolate in a large bowl. Using a skewer, gradually add in a little of the orange colour paste at a time, stirring gently after each addition, until you get the shade of orange you want.
Dip each cake pop into the orange chocolate using a metal spoon to pour over the chocolate and fully cover each one. Spin the cake to let the excess chocolate drip off. Place on the greaseproof paper and leave in a cool place or in the fridge for a few hours to set.
Heat the jam gently in the microwave and leave to cool a little.
Roll out the green icing and cut out leaf / star shapes. Stick the icing onto the cake pops using a little smear of jam.
Lastly draw on the faces using the black icing – triangles for eyes and noses and zig-zag mouths. Leave again in a cool place to allow everything to set into place. Preferably somewhere up high and out of sight, as when the little ones spot them, they won’t be around for long. Happy Halloween!
I am handing over the Bangers & Mash reigns today to my good friend Trish Tucker-May, who runs an awesome juice bar company called Passion 4 Juice, which you may well have come across at one of this summer’s festivals.
I first met Trish a decade or so ago, when we were both pre-kids. I was in the throes of launching my own PR business and she was just setting up Passion 4 Juice. In fact she was one of my first clients. Trish was a real inspiration. I haven’t met many people with the same level of energy and zest for life as her, and it is quite infectious. So while I’ve never invited someone to do a guest post on here before, with Trish I know you will be in safe hands. And so without further ado, here is the lovely Trish and her extremely clever recipe for Kiwi and Blueberry Surprise…
How to make a guilt free and tasty pudding
Hi, I am Trish Tucker-May, an Aussie from Forster. You can’t get much more Aussie than that!
I have a pretty crazy life that some people dream about and others may think is just way too hard and crazy. I spend half the year working at summer festivals in the UK and half the year at festivals in Australia. I love travelling and the great outdoors and am passionate about bringing fresh juice and good health to people.
In 2003 I founded Passion 4 Juice Ltd an award winning juice bar company. I have written a small book about redesigning your life to live your passion and I have also self-published a recipe book called ‘Juice and Smoothie Recipes From Around the World’. Currently I am studying a Diploma in Nutritional Healing – and loving it! I am married to a professional clown and mum to 4-year-old Jack-Patrick (AKA Jackpot) and 2-year-old Roary.
Trish with Roary, Jackpot and Joe
I became a little concerned this week when I thought back over the last three suppers and realised that perhaps they weren’t as nutritious as they should be for my developing 2 and 4-year-old boys. Okay, lasagne is good wholesome food and so is spaghetti bolognaise, especially when I sneak in a handful of peas, grated carrots and whatever other veg I can put my hands on at the time.
I know these easy Italian favourites are perfect for my boys. But given my slight aversion (rather than intolerance) to wheat, dairy and meat, I was left craving something green, fresh, and raw. It was while I was pondering this dilemma that I came up with a fantastic idea. What if I could make something that satisfied my boy’s desire for sweet gooey pudding while also giving myself a treat packed with nutritional goodness? The Kiwi and Blueberry Surprise was born.
Firstly I put 2½ cups of nuts in the blender. I mixed what I had which was almonds, brazils and cashews – so that was 2½ cups in total, not of each nut. I blended until all the ingredients crumbled. Next I added ¾ cup of pitted dates and a pinch of salt. That was the base done.
Next came the slightly sneaky bit. My son Jackpot is very used to me sneaking all sorts of weird and wonderful ingredients into my super green smoothies in the morning so I had to be careful not to be too obvious or I would get the “Mum it’s a bit too green for me, no thanks” treatment.
I peeled and cut a courgette, placed it in the blender with an avocado, a handful of mung bean sprouts, a handful of cashews, a splash of yoghurt , a cup of frozen passionfruit puree and a tablespoon of agave syrup. I love making raw food so I have all these ingredients to hand. If you don’t have agave syrup, honey will work just as well.
Blend until smooth and pour into the tin.
Next step is to decorate with whatever you have to hand. In this case I used kiwi and blueberries. The kiwi worked well so I called it Kiwi Blueberry Surprise. It seemed to go well with the green colour. Now the kids didn’t think it was green because of some crazy green vegetables.
Did I successfully satisfy both camps? We ate over half immediately and the boys were delighted. I was truly satisfied with the knowledge of raw sprouts, courgette and avocado for pudding. The following day my husband was home after working away. I served it with a question – “Bet you can’t guess what is in this?” He is accustomed to me making weird and wonderful creations out of fruit and veg so he had a head start. He got the avocado right but that was all.
I have since shared this idea with a few contacts on a Facebook juice group. They have taken the idea to inspiring new heights and added variations such as chocolate, strawberries, lemon juice, cacao powder, vanilla bean paste, a handful of cashews, flaked almonds, shredded coconut and cacao nibs. To be honest I think my first attempt needed a little extra something and I couldn’t quite put my finger on it – I think a squeeze of fresh lemon and an extra handful of cashews would have done the trick.
So if you are tempted to try this one at home, be daring and always taste as you go. Make sure it has just the right level of sweet, sour, salty or bitter to suit your taste buds. This is a truly guilt free tasty pudding that satisfies the entire family.
Kiwi and Blueberry Surprise
Base
Blend the following and press into a flan tin and store in the fridge while mixing the filling:
2½ cups mixed nuts, such as almonds, cashews, brazils
¾ cup dates
pinch of salt
Filling
Blend the following and pour onto base:
1 avocado
1 peeled raw courgette
1 handful of raw cashews
1 handful of mung bean sprouts
2 tbsp natural yoghurt
¾ cup frozen passionfruit puree
2 tbsp raw agave syrup or honey
optional extra ingredients to taste
cashews, lemon juice, shredded coconut, raw cacao
Decoration
Your choice of fresh fruit – I used sliced kiwi fruit and blueberries.
So what do you think? If you try this out on your family, we’d love to hear how it went down.
I’m spending much less time in the kitchen these days. At the beginning of September I started working in-house four days a week covering someone’s maternity leave, which means evening meals need to be quick and easy as I really don’t want to be slaving over a hot stove for hours when I get home.
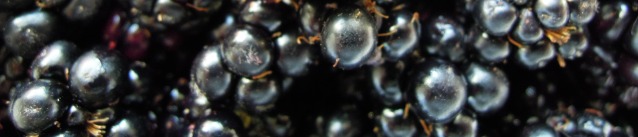
So more leisurely, experimental cooking has been relegated to the weekends for now. It’s tricky though, as obviously weekends are also now my main family time. However, this beautiful blackberry and cardamom pavlova was the perfect way to bring family and cooking time together.
We all spent a splendid Sunday afternoon traipsing over the fields near our home in Somerset, hunting for blackberries and sloes (they’re still sat in the fridge waiting to be added to gin) and trying not to get stung as inevitably the plumpest, juiciest berries are always the ones obscured behind a clump of nettles. When Jess and Mia tired of picking blackberries, they ran around pretending to be galloping horses while Jason and I finished the job.
Normally the first thing I make with blackberries would be a blackberry and apple crumble. But since we only had a disappointing six apples off our tree this year I decided to try something new. I’ve been meaning to have a go at making meringue for ages – I know how embarrassing is that, a food blogger who’s never baked a meringue? Particularly because we have an Aga and as all Aga owners will tell you, they are perfect for baking meringues. So the idea of a blackberry pavlova came to mind.
I found a recipe for a blackberry cardamom pavlova from Adventures in Cooking and came up with my own a slightly simplified version. The combination of blackberries and cardamom is absolutely inspired. The spicy, perfumed flavour works incredibly well with the sticky, juicy fruit, cutting through the richness of the cream so the end result doesn’t end up being too heavy. Which of course means it’s absolutely fine to have a second helping.
I was so surprised at just how easy meringues are to make, especially with a little help from Aga Queen, Mary Berry. As with most baking, it’s more about setting aside enough time to do it properly, than about the recipe being all that complicated to make. I baked my meringue the evening before, so all I had to do on Sunday after we’d picked the blackberries was to whip up the cream and make the blackberry sauce.
Blackberry and cardamom pavlova
For the meringue:
3 egg whites
pinch of salt
175g caster sugar
1tsp corn flour
1tsp ground cardamom
½tsp vanilla extract
For the blackberry topping:
450g blackberries
120g sugar
2tbsp honey
juice and zest of half a lemon
½tsp ground cinnamon
If you don’t have an Aga, preheat the oven to 150ºC / gas mark 2.
In a large bowl, beat the egg whites and salt until stiff. Gradually whisk in the caster sugar a teaspoonful at a time, and finally whisk in the corn flour, ground cardamom and vanilla. Lay a sheet of silicone paper on a baking tray and spread the meringue mixture onto the sheet, forming a circular shape. Build up the sides of the circle to create a well in the middle to hold the cream and fruit later.
If you have an Aga, put the baking tray on the floor of the roasting oven for three to four minutes, until the meringue is ever so slightly coloured. Then move down to the floor of the simmering oven for about an hour until the meringue is firm on the outside but gooey in the middle.
If you’re using a conventional oven, bake for an hour and then turn the oven off. Open the door halfway and allow the meringue to cool to remove to room temperature before removing.
To make the blackberry topping, place the berries, sugar and honey in a saucepan over a medium heat and simmer gently for 15 minutes. Scoop out a large spoonful of blackberries and set aside for later. Continue to simmer gently for about 45 minutes, stirring regularly. Remove from the heat and stir in the lemon juice, zest and cinnamon. Allow to cool before chilling in the fridge.
And then to make the blackberry and cardamom whipped cream, pour the cream into a large bowl and add the icing sugar and cardamom. Whip until it forms soft peaks. Gently fold in the spoonful of blackberry topping set aside earlier, along with the lemon zest and vanilla extract. Chill in the fridge until you are ready to assemble.
Place the meringue on a serving plate and pile the blackberry and cardamom whipped cream in the well. Cover this with the blackberry topping and arrange some fresh blackberries around the edge. Serve at once. Enjoy!
PS Tomorrow I’m off to the MAD Blog Awards ceremony in London. I’m a finalist in the MADs Best Food Blog category and I’m really rather excited. I don’t have a chance of winning as I’m up against some splendid food bloggers who’ve been doing this much longer than me, but I’m just so chuffed at making the finals. If you voted for me – then thank you! And I’ll let you know next week how I got on…
When I put out a call a month or so ago for people to send in their favourite family recipes for the Care to Cook recipe challenge I had absolutely no idea what kind of response to expect. Care to Cook is a challenge I set up with a fostering and adoption charity I work with called TACT in order to promote their cookbook, which they’re selling to support adopted children and their families.
But I had nothing to worry about. You lot rose to the challenge splendidly, supplying a fantastic assortment of family favourites, both savoury and sweet. The task set was to suggest a dish you would cook to welcome someone into your family home. For many children in care, family meals are simply something they are not used to. Each and every dish submitted into the challenge is one I know would make a vulnerable child or young person feel special, valued and welcomed.
Before I announce the winner, here are each of those delicious entries in turn. Warning – this list is guaranteed to make you hungry!
First in was this tasty little number from Under The Blue Gum Tree, which looks far superior to its McDonald’s namesake: Homemade Fillet O’ Fish and “Chips”. The fillet is served in lovingly prepared carrot and cumin bread rolls, with potato skins covered in paprika and cayenne pepper, and some salsa and soured cream on the side. Now, who could resist that?
Homemade Fillet O’ Fish and “Chips” from Under The Blue Gum Tree
Next we have French Madeleinesfrom Crêpes Suzettes. These pretty little cakes look so tempting and perfect for goûter, the snack French kids have at around 4pm. I think my children must be a bit French as they are always starving when they come home from school too!
French Madeleines from Crepes Suzette
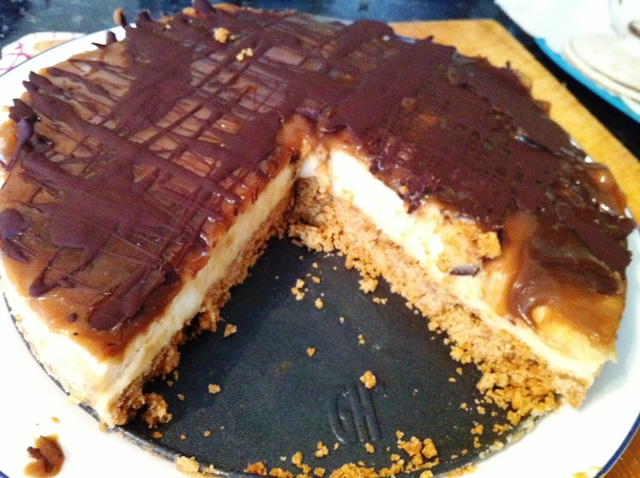
For Reluctant Housedad, what to cook for this challenge was a bit of a no-brainer. It had to be his Peanut Butter and Salted Caramel Chocolate Cheesecake. Doesn’t it look incredible? I love puddings that combine sweet and salty and absolutely anything that contains peanut butter, so this is going straight to the top of my must-bake list.
Peanut Butter and Salted Caramel Chocolate Cheesecake from Reluctant Housedad
My fabulous mother Cheryl suggested this next dish Hokkien Mee, which she remembers eating as a girl growing up on the Malaysian island of Penang. It’s a hot and spicy noodle dish, featuring both meat and seafood, common in many South East Asian dishes. It’s a little different to the Singapore version but, as my Mum would tell you, much more delicious!
Penang Hokkien Mee from Cheryl Leembruggen (photo via vkeon.com)
Karen from Lavender & Lovage offers up these ‘frugal but comforting’ Stuffed Tomatoes with Herbs and Oats, which I think look incredibly tasty and very satisfying. It’s a real family-favourite in Karen’s house; her daughter loved eating this when she was little, and still does now she is all grown up!
Stuffed Tomatoes with Herbs and Oats from Lavender & Lovage
My little sister Elly surprised me with her cooking skills with this next entry, her Nonya Chicken Curry from Malaysia. I just assumed she would submit a recipe for something sweet and sticky – she’s a great baker you see. But no, this is her curry dish that got a big thumbs up from her boyfriend’s dad. He’s from Malaysia himself and apparently not an easy man to impress!
Nonya Chicken Curry from Elly Rowe
Pasta and Pesto Sauce is our next entry which comes from A Trifle Rushed. Pesto is always a favourite in our house but I must admit it’s normally a meal-in-a-hurry using dried pasta and jarred sauce. Here Jude and her daughter lovingly make fresh pasta by hand and blend their own pesto in a pestle and mortar. I bet it tastes incredible; it certainly looks wonderful.
Pasta and Pesto Sauce from A Trifle Rushed
Louisa at Chez Foti now lives in the French Pyrenees and likes to cook classic French dishes whenever friends and family come to visit. This Boeuf en Daube is a particular favourite and I can see why; it looks so sumptuously satisfying! It’s one of those meals you can prepare in advance and leave to slow cook in the oven, so that your visitors arrive to the most glorious aromas emanating from the kitchen. Yum!
Boeuf en Daube from Chez Foti
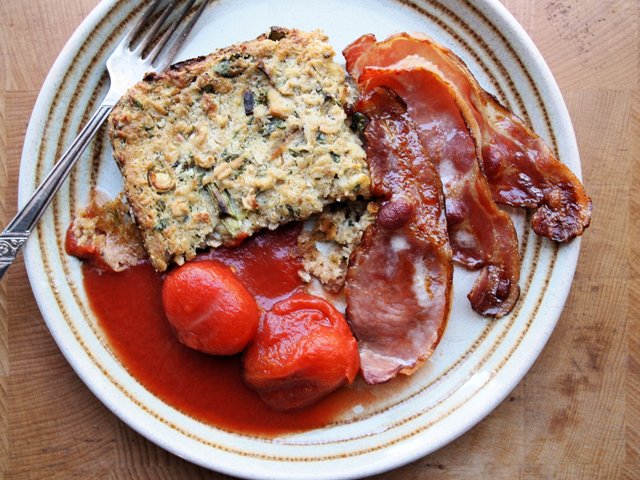
When I received this next entry from Lavender & Lovage for Yorkshire Season Pudding with Herbs I had to try it straight away. We had it for brunch one Sunday morning, and it was perfect with our bacon, eggs and beans. I like the fact this is a traditional family recipe, and one that Karen’s grandmother used to make. I think it might just become a tradition for our family too.
Yorkshire Season Pudding with Herbs from Lavender & Lovage
Spinach and Bacon Macaroni Cheesefrom Sian at Fishfingers for Tea is next up. Macaroni cheese is the ultimate in satisfying comfort food and I do love this version, beefed up with tasty bacon and spinach and finished with slices of tomato and crunchy cheesy breadcrumbs on top. Another great dish for preparing in advance and popping in the oven just before your visitors arrive.
Spinach and Bacon Macaroni Cheese from Fishfingers for Tea
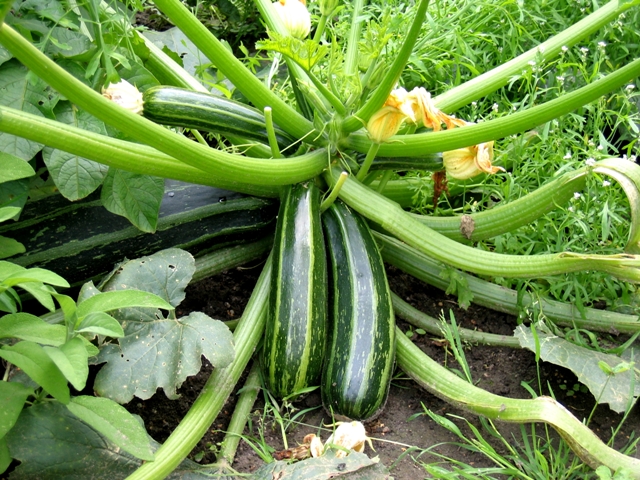
My Nana Barbara sent in two dishes for her entry: Courgette Bake followed by Vanilla Cream Terrine. She says the courgette bake works well both as a starter and as main course served with large hunks of crusty bread. My Nana is fantastic in the kitchen and as a kid I would love staying with her and Grandad as it always meant getting to eat lots of lovely cakes and pies.
Barbara’s Courgette Bake – perfect for anyone with a glut of courgettes on their hands
Chicken Basquaise is the delicious entry from Helene at French Foodie Baby. She warns that it might differ from traditional recipes but that’s what she likes so much about her mother’s cooking; she cooks from the gut. I love the way Helene relives her food memories through her blog and brings them into the present day as she cooks for her little boy Pablo.
Chicken Basquaise from French Foodie Baby
ThisStrawberries and Cream Birthday Cakecomesfrom my step-mum Sue and is the cake she bakes every June to celebrate my twin sisters’ birthday. I’ve always been very jealous of them having a summer birthday when strawberries are in season! Now wouldn’t you like this for your birthday cake each year?
Strawberries and Cream Birthday Cake from Sue Hamer
The final entry is one of mine: Hainanese Chicken Rice. It’s a dish I loved to eat when I was a little girl on trips to Penang with my mum and little sister. I had no idea how to make it so I turned to members of my Chinese-Malaysian family for a helping hand, and my Aunty Lorene and Cousin Sisi did the honours by providing this recipe. How would I ever survive without Facebook?!
Hainanese Chicken Rice from Bangers & Mash
There you have it – a fine collection of family recipes if ever I saw one! But there can only be one winner in the Care to Cook challenge, and the unenviable task of selecting a winner was given to 15-year-old Josh, who lives with one of TACT’s foster carers in the South West of England.
So a huge congratulations to Keith at the Reluctant Housedad for your fabulous entry, which Josh found he simply couldn’t resist! As winner of the Care to Cook family recipe challenge he will receive a copy of TACT’s Care to Cook recipe book, signed by the charity’s celebrity patron Lorraine Pascale.
Choosing one winner wasn’t easy but in the end our judge Josh couldn’t resist this Peanut Butter and Salted Caramel Chocolate Cheesecake from the Reluctant Housedad
And thank you to everyone who has taken the time to share their favourite family recipes, helping to raise awareness of this very worthwhile charity, which is working so hard to improve the lives of children and young people across the UK who haven’t had the best starts in life. More information of the work of TACT is available on their website.

 Food is a wonderful talking point, isn’t it? No matter what company I find myself in, as soon as I start talking about food, a proper conversation has started. You don’t even have to be face-to-face. Social media provides so many platforms for foodies to talk and share ideas about their favourite subject.