Star Wars sausage stew

Somehow I completely failed to spot that this week is National Sausage Week here in the UK. Now if anyone should be celebrating the humble sausage, it clearly should be Bangers & Mash. The amount we consume in our house contributes significantly to supporting the British sausage industry, I’m sure.

Thankfully, I had this very tasty sausage dish waiting in the wings to appear on the blog – a perfect winter warmer for all the family on these darker, colder days.

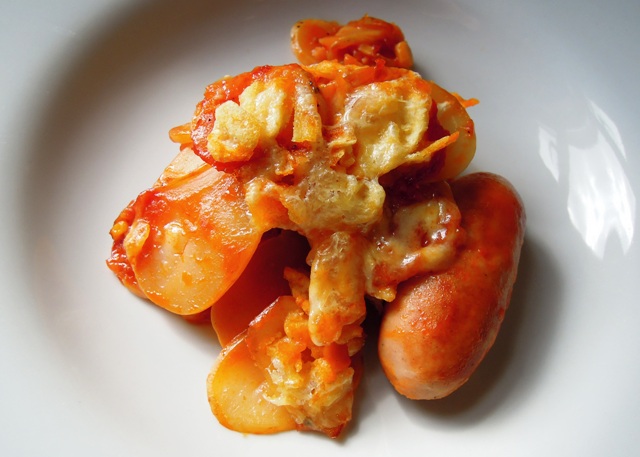
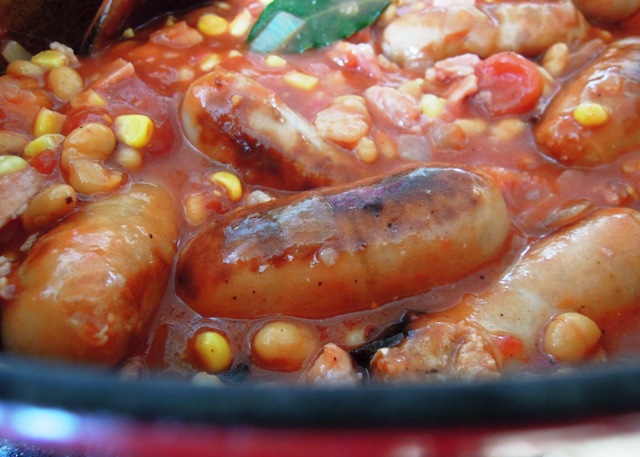
So bumped up the running order a little, I bring you the ‘Star Wars’ sausage stew, a recipe my children (and us grown ups too) adore, which I discovered in my old Blue Peter Book of Gorgeous Grub, circa 1980. The topping of crushed up plain crisps and grated cheese takes me back to my childhood when crisps seemed to appear in hot dishes all the time.

As a child I was a committed fan of the BBC children’s programme Blue Peter, winning a total of four badges over the years in various competitions. I was forever pestering my mum for old boxes, loo roll holders and sticky backed plastic so that I could make the latest Blue Peter creation.

But for some reason I never tried to recreate any of their recipes. It was my dad who recently dug out this cookbook, which, to be totally honest, I can’t remember having as a child as I wasn’t really all that interested in food back then. Oh how things change! So I’m rather enjoying working my way through all the recipes that were submitted by Blue Peter viewers, answering the call from presenters Simon Groom, Chris Wenner and Tina Heath.

According to eight-year-old Elspeth Bruford from Edinburgh who sent in this recipe…

We called it this because it was invented when we wanted a hot meal waiting for us when we came home from seeing the film ‘Star Wars’.

I wonder where Elspeth is now and whether she still makes her Star Wars sausage stew?

Star Wars sausage stew

Serves 4 to 5

1 tbsp vegetable oil
450g sausages (Elspeth cut hers into slices; I left mine whole)
2 onions, chopped
175g bacon, chopped
1 small tin baked beans
1 small tin sweetcorn (I used frozen)
1 large tin chopped tomatoes
1 bay leaf
salt and pepper
2 large potatoes, peeled and thinly sliced
1 packet of plain crisps, crushed
50g Cheddar cheese, grated

Preheat the oven to 150ºC / gas mark 2.

Heat the oil in a large casserole and brown the sausages, then remove to one side. Add the onion and bacon to the casserole and gently brown. Throw the sausages back in, as well as the beans, sweetcorn and tomatoes. Add the bay leaf, season well with salt and pepper and give it all a good mix.

Top with the sliced potatoes and season again. Cover with a lid or foil and cook in the oven for around two and a half hours.

Remove the lid or foil and turn up the heat to 190ºC / gas mark 5 and cook for another half an hour to brown the potatoes.

Finally top with the crushed crisps and cheese and return to the oven until the cheese has melted. Serve immediately.

Spicy Indian-style dips

We love dips in our house. Whether they’re shop-bought or homemade, we always have a supply of dippy things in pots in our fridge – hummus, babaganoush, taramasalata, tzatsiki – perfect with a few breadsticks or carrot chunks for an impromptu snack when the children are peckish.

And we’re rather keen on our Indian food too. I reckon our girls developed a taste for Asian spices when they were in the womb. I craved curries during both pregnancies and in the final weeks, in particular, I consumed a vast quantity of particularly hot curries in a vain attempt to bring  on labour.

So when Warburtons recently got in touch to see if I’d like to test out some recipes created by TV chef Monisha Bharadwaj for a range of Indian-style dips to complement their new baked naan chips, I thought why the heck not?

As well as directing me to Monisha’s selections of recipes on Facebook, Warburtons kindly sent me some packets of their baked naan chips in ‘classic tikka’ and ‘fiery hot’ flavours to try with them.

I decided to test out two of the dip recipes. The two that appealed most were the manuka tamater ki chutney, made with tomatoes, raisins and spices, and a mint and sunflower seed chutney.

I found the mint and sunflower seed chutney a little too flavoursome, verging on pungent. So I mixed in some Greek yoghurt which calmed it down perfectly and made for a very tasty, creamy and refreshing dip. As well as mint, it contains lots of coriander, which I think always work so well together. The recipe also calls for a couple of chillies, but since I was trying this out on the kids I only used one so it wasn’t too hot for them.

The manuka tamater ki chutney was very good, although a tad on the sweet side. It features raisins, so I probably wouldn’t bother with the sugar as well next time. This was the dip the children liked best, although my husband and I preferred the mint and sunflower seed one.

While we rather liked the dips, I have to admit the baked naan chips weren’t really our cup of chai. Our eldest, Miss Mash didn’t think they were spicy enough but Miss Bangers, the four-year-old refused to eat them because they were too spicy. My husband and I could take them or leave them really. I also took a couple of packs into work to share with colleagues, and the response was similar – although during the course of a day they did all get eaten, so they can’t have been that bad!

Have you tried any of the Warburton dip recipes? If so, what did you think? And what do you reckon to the baked naan chips? How do you think they compare to their pitta chips?

Disclosure: I was provided with four complimentary packets of Warburton baked naan chips for the purposes of this review.

Halloween pumpkin cake pops

Cake pops are very cute. After all, who doesn’t love food on a stick? I made some simple ones recently for a school cake sale and they sold out instantly. In fact, the school caretaker got in there first and bought some while we were still setting up.

I’ve seen lots of beautifully decorated cake pops on websites and blogs recently and for some strange reason I’ve felt an overwhelming urge to create some special cake pops for Halloween. Now this just isn’t the kind of thing I do normally. My interest in baking has increased massively over the last couple of years but creating cleverly crafted cakes and daintily decorated delights is way out of my comfort zone.

Admittedly, these little pumpkin pops are not an example of patisserie perfection I’m afraid, but they are a bit of fun and most importantly my children can’t get enough of them.

It took me a couple of attempts to get these Halloween cake pops right, mainly because white chocolate isn’t particularly easy to work with as a cake coating.

The first time it took me ages to get the colouring right. I was adding a drop or two of red liquid food colour, then a drop of yellow, and a bit more red, and a bit more yellow, ad nauseum. Eventually the chocolate just split and went all grainy and horrible because I’d over-worked it. I added a little vegetable oil to loosen it again, which seemed to work but then the coating refused to set properly on the cakes and they ended up looking a complete and utter state.

The second attempt was better. I used white chocolate again but went for a concentrate paste colouring and took lots more care not to overwork it. The end result, as you can see, is OK but I still haven’t ended up with the lovely smooth finish you get with normal chocolate. Next time – if there is a next time – I might try a white cake covering or ‘candy melts’ – it might taste ghastly but does that matter as long as it looks the part?

There are various ways to make the cake pops themselves. I have seen a cake pop machine on the market but that seems a little excessive to me. I bought a special cake pops baking pan, which works fairly well but I don’t think it’s completely necessary. I’ve since found a few pop cake recipes online using ready-made cake; you simply mix with chocolate and roll into balls. No baking necessary.

But if you do fancy going down the baking pan route, here’s what I did…

Halloween pumpkin cake pops

Makes 12

50g plain chocolate
60g butter
80g caster sugar
1½ tbsp cocoa powder
1 egg
50g plain flour
¼ tsp baking powder
pinch of salt
200g white chocolate
12 lollipop sticks
orange food colouring concentrate paste
2 tbsp jam
green ready-made icing
black writing icing

Preheat oven to 180°C / gas mark 4.

Grease the baking pan liberally with vegetable oil and dust with cocoa powder.

Put the plain chocolate and butter in a large mixing bowl and heat gently in a microwave or over a large pan of hot water until melted. Mix in the caster sugar and cocoa, and then stir in the egg. Finally add in the flour, baking powder and salt and combine well.

Spoon the mixture into a twelve-pop baking pan, filling each well so it creates a slight mound over the top. Put the lid on and secure.

Bake for 20 minutes until a toothpick inserted into one of the holes comes out almost clean. Leave to cool for five minutes in the pan before removing and leaving to cool completely.

Melt a couple of the pieces of white chocolate and dip the lollipop sticks in before inserting into the cake pops. Put in the fridge for half an hour to allow the sticks to set into place.

Line a plate or board with greaseproof paper.

Melt the remainder of the white chocolate in a large bowl. Using a skewer, gradually add in a little of the orange colour paste at a time, stirring gently after each addition, until  you get the shade of orange you want.

Dip each cake pop into the orange chocolate using a metal spoon to pour over the chocolate and fully cover each one. Spin the cake to let the excess chocolate drip off. Place on the greaseproof paper and leave in a cool place or in the fridge for a few hours to set.

Heat the jam gently in the microwave and leave to cool a little.

Roll out the green icing and cut out leaf / star shapes. Stick the icing onto the cake pops using a little smear of jam.

Lastly draw on the faces using the black icing – triangles for eyes and noses and zig-zag mouths. Leave again in a cool place to allow everything to set into place. Preferably somewhere up high and out of sight, as when the little ones spot them, they won’t be around for long. Happy Halloween!

Kale, red pepper and potato pithivier

I’d never really bothered with the Great British Bake Off before, but this series I felt compelled to watch it. I’ve spent quite a bit of time on Twitter over the last year, and there had been so much talk about #GBBO I just had to see what all the fuss was about. And of course I was hooked from the first show.

In the final, John, Brendan and James tried their hands, rather successfully, at baking pithivier. Until then I had never even heard of pithivier. It turns out it’s a classic French pastry, sometimes sweet with fillings like frangipane and fruit but in this case savoury.

I rather liked the look of the pithivier so decided to give it a go myself. Mine is a much simplified version of Brendan’s recipe. You could probably go so far as to say it’s a cheat’s version, particularly since it uses ready-made puff pastry. For my filling, I opted for curly kale, red peppers, red onion, garlic and new potatoes, with lots of mature Cheddar cheese.

I was rather pleased with the end result and it went down with the family too. It’s like a big posh pasty. It didn’t have a soggy bottom, so Paul and Mary would have been happy. Although saying that, since I didn’t make my own pastry I guess they wouldn’t have been all that impressed. But I was. It’s lovely served warm and it’s also great cold the next day. And the next. It’s a bit of a monster, and kept us going for a while.

Kale, red pepper and potato pithivier

450g new potatoes
knob of butter
1 tbsp olive oil
1 red onion, peeled and chopped
2 red peppers, chopped
2 cloves of garlic, peeled and crushed
1 tbsp balsamic vinegar
bunch of fresh thyme, picked
230g curly kale, washed and shredded
100g cream cheese
2 eggs
salt and pepper
2 x 500g packets of ready-made puff pastry
180g mature Cheddar cheese, grated

Preheat the oven to 200ºC / gas mark 6

Boil the potatoes in salted water until tender. Drain and set aside to cool. When cool enough to handle, slice the potatoes into half centimetre thick slices. Season with salt and pepper.

Heat the butter and olive oil in a large pan and gently fry the red onion for about five minutes until translucent, then add the red peppers and continue to fry until they are softened. Add the garlic and stir fry for a couple of minutes, before stirring in the balsamic vinegar and thyme. Next throw in the kale, stir well and then cover with a lid. Allow the kale to cook down for a few minutes until al dente and set aside to cool a little.

In a small bowl, combine the cream cheese with one of the eggs and season with salt and pepper to taste. Stir this into the kale and red pepper mixture.

Flour the work surface and roll out one lot of dough until it is around 3mm thick, and cut out a disc 32cm across for the base. Roll out the second amount and this time cut out a disc 35cm across for the top. Place the base onto a baking tray lined with greaseproof paper or a non-stick sheet.

Layer the sliced potatoes on to the base, leaving a 4cm border all around. Next pile on the kale and red pepper mixture on top of the potatoes and finally sprinkle the cheese over the top, using your hands to press the cheese down to form a tidy mound. Brush the pastry border with the remaining egg.

Carefully place the larger disc over the top, pushing down around the mound to seal the pastry and cutting off the excess. Cut around the pastry border to form a sunshine shape and using the back of a knife, decorate the top with a sunbeam pattern and score the base. Be careful not to cut all the way through. Make a small hole in the top to allow steam to escape. Brush it all over with more egg.

Bake in the oven for 25 to 30 minutes until golden brown. Cool for 10 minutes or so on a wire rack and serve at room temperature or leave it to cool completely. You’ll get around 10 slices out of this, so perfect buffet or picnic food.

Afghan-style aubergine and yoghurt

As soon as I came across this recipe for Afghan-style aubergine and yoghurt in a recent edition of Delicious magazine, I knew I had to make it. I adore aubergine dishes and the Middle Eastern flavours in this one simply called out to me.

The recipe comes from Sally Butcher, a British-born cook who married into an Iranian family, and it is taken from Veggiestan: a Vegetable Lover’s Tour of the Middle East. I don’t own this book yet but I plan to get hold of a copy very soon.

It’s an incredible dish. The herbs and spices, lemon, garlic and chilli give it a beautifully fragrant zinginess, which works so well with the creaminess of the Greek yoghurt and the soft, sumptuous texture of the smoky aubergine.

I did worry it might be a little grown up for the children and so I made a version without the chilli for them. Miss Bangers, the four-year-old, did have to be persuaded a little to get through it. But Miss Mash, the seven-year-old, wolfed it down happily.

Afghan-style aubergine and yoghurt (burani bonjon)

3 large aubergines
salt
vegetable oil
1 onion, peeled and chopped
4 green chillies, chopped (optional)
1 tsp ground turmeric
400g tin chopped tomatoes
1 small bunch of fresh coriander, roughly chopped

For the yoghurt

450ml Greek yoghurt
2 tbsp lemon juice
6 garlic cloves, peeled and crushed
handful of fresh mint, chopped, plus extra sprigs for the garnish
salt and pepper

Cut the aubergine into half centimetre slices and sprinkle salt on both sides. Leave for half an hour, then rinse in cold water and dry with kitchen towel.

Heat a little oil in a large frying pan and saute the onion and chillies (if using) until soft. Remove and keep to one side.

Add some more oil to the pan and fry the aubergine in batches until slightly browned on each side. Sprinkle the aubergine with a little turmeric and return the slices to the pan with the chopped tomato, coriander, onion and chillies. Pour in enough water to just cover the ingredients, cover with a lid, turn down the heat and simmer gently for about half an hour. Add a little more liquid if it starts to look too dry.

While this is cooking, prepare the yoghurt. Simply mix the yoghurt and lemon juice in a bowl, stir in the crushed garlic and mint, and season to taste. Place in the fridge.

When the aubergine mixture is ready, spread half the yoghurt across a large serving plate, and then place half the aubergine on top. Cover with more yoghurt, the remaining aubergine and finishing with a last dollop of yoghurt and a sprig or two of mint.

Serve straight away with warm pitta or flatbread. Heavenly.

As this dish features lots of tasty mint and coriander, I’m entering it into October’s Herbs on Saturday blog challenge hosted by Karen at Lavender & Lovage. If you enjoy cooking with herbs, do head over there and take a look at the other recipes submitted as you’re sure to find plenty of new inspiration.

Kiwi and blueberry surprise

I am handing over the Bangers & Mash reigns today to my good friend Trish Tucker-May, who runs an awesome juice bar company called Passion 4 Juice, which you may well have come across at one of this summer’s festivals.

I first met Trish a decade or so ago, when we were both pre-kids. I was in the throes of launching my own PR business and she was just setting up Passion 4 Juice. In fact she was one of my first clients. Trish was a real inspiration. I haven’t met many people with the same level of energy and zest for life as her, and it is quite infectious. So while I’ve never invited someone to do a guest post on here before, with Trish I know you will be in safe hands. And so without further ado, here is the lovely Trish and her extremely clever recipe for Kiwi and Blueberry Surprise

How to make a guilt free and tasty pudding

Hi, I am Trish Tucker-May, an Aussie from Forster. You can’t get much more Aussie than that!

I have a pretty crazy life that some people dream about and others may think is just way too hard and crazy. I spend half the year working at summer festivals in the UK and half the year at festivals in Australia. I love travelling and the great outdoors and am passionate about bringing fresh juice and good health to people.

In 2003 I founded Passion 4 Juice Ltd an award winning juice bar company. I have written a small book about redesigning your life to live your passion and I have also self-published a recipe book called ‘Juice and Smoothie Recipes From Around the World’.  Currently I am studying a Diploma in Nutritional Healing – and loving it! I am married to a professional clown and mum to 4-year-old Jack-Patrick (AKA Jackpot) and 2-year-old Roary.

Trish with Roary, Jackpot and Joe

I became a little concerned this week when I thought back over the last three suppers and realised that perhaps they weren’t as nutritious as they should be for my developing 2 and 4-year-old boys. Okay, lasagne is good wholesome food and so is spaghetti  bolognaise, especially when I sneak in a handful of peas,  grated carrots and whatever other veg I can put my hands on at the time.

I know these easy Italian favourites are perfect for my boys. But given my slight aversion (rather than intolerance) to wheat, dairy and meat, I was left craving something green, fresh, and raw.  It was while I was pondering this dilemma that I came up with a fantastic idea. What if I could make something that satisfied my boy’s desire for sweet gooey pudding while also giving myself a treat packed with nutritional goodness? The Kiwi and Blueberry Surprise was born.

Firstly I put 2½ cups of nuts in the blender.  I mixed what I had which was almonds, brazils and cashews – so that was 2½ cups in total, not of each nut.  I blended until all the ingredients crumbled. Next I added ¾ cup of pitted dates and a pinch of salt.  That was the base done.

Next came the slightly sneaky bit. My son Jackpot is very used to me sneaking all sorts of weird and wonderful ingredients into my super green smoothies in the morning so I had to be careful not to be too obvious or I would get the “Mum it’s a bit too green for me, no thanks” treatment.

I peeled and cut a courgette, placed it in the blender with an avocado, a handful of mung bean sprouts, a handful of cashews,  a splash of yoghurt , a cup of frozen passionfruit puree and a tablespoon of agave syrup. I love making raw food so I have all these ingredients to hand. If you don’t have agave syrup, honey will work just as well.

Blend until smooth and pour into the tin.

Next step is to decorate with whatever you have to hand. In this case I used kiwi and blueberries. The kiwi worked well so I called it Kiwi Blueberry Surprise.  It seemed to go well with the green colour. Now the kids didn’t think it was green because of some crazy green vegetables.

Did I successfully satisfy both camps? We ate over half immediately and the boys were delighted. I was truly satisfied with the knowledge of raw sprouts, courgette and avocado for pudding. The following day my husband was home after working away.  I served it with a question – “Bet you can’t guess what is in this?” He is accustomed to me making weird and wonderful creations out of fruit and veg so he had a head start. He got the avocado right but that was all.

I have since shared this idea with a few contacts on a Facebook juice group. They have taken the idea to inspiring new heights and added variations such as chocolate, strawberries, lemon juice, cacao powder, vanilla bean paste, a handful of cashews, flaked almonds, shredded coconut and cacao nibs. To be honest I think my first attempt needed a little extra something and I couldn’t quite put my finger on it – I think a squeeze of fresh lemon and an extra handful of cashews would have done the trick.

So if you are tempted to try this one at home, be daring and always taste as you go. Make sure it has just the right level of sweet, sour, salty or bitter to suit your taste buds. This is a truly guilt free tasty pudding that satisfies the entire family.

Kiwi and Blueberry Surprise

Base
Blend the following and press into a flan tin and store in the fridge while mixing the filling:

2½ cups mixed nuts, such as almonds, cashews, brazils
¾ cup dates
pinch of salt

Filling
Blend the following and pour onto base:

1 avocado
1 peeled raw courgette
1 handful of raw cashews
1 handful of mung bean sprouts
2 tbsp natural yoghurt
¾ cup frozen passionfruit puree
2 tbsp raw agave syrup or honey

optional extra ingredients to taste
cashews, lemon juice, shredded coconut, raw cacao

Decoration
Your choice of fresh fruit – I used sliced kiwi fruit and blueberries.

So what do you think? If you try this out on your family, we’d love to hear how it went down.

You can find Trish on Twitter and Facebook and her website is www.passion4juice.com.

Courgette and cheese scones

With both of my girls now at school and with me working away from home most of the week, keeping the contents of our lunch boxes vaguely interesting is an ongoing challenge. Normally I go for set staples like rolls, pasta or rice salads, pitta bread and hummus – that kind of thing. From time to time though I do like to bake something a little bit different, but something which isn’t too much of a departure from the norm that the kids leave it untouched.

These courgette and cheese scones fit the bill perfectly. Tasty and moist, they are the ideal finger food and are packed full of goodness. Ideal served cold from a lunch box or warm straight from the oven. And they aren’t too much of a faff to make. A definite winner in my book.

Courgette and cheese scones

Makes 12

225g self raising flour
1 tsp baking powder
45g soft butter
115g Cheddar cheese, grated
1 courgette, grated
1 carrot, grated
2 spring onions, finely chopped
handful of fresh herbs, chopped (I used thyme and oregano)
salt and pepper
2 tbsp creme fraiche
60ml milk

Preheat the oven to 200°C / gas mark 6 and grease a baking sheet with a little butter.

Sieve the flour and baking powder into a large mixing bowl. Rub the butter in the flour until it looks like fine breadcrumbs.

Add the cheese, carrot, courgette, spring onion, herbs, salt and pepper. Combine and form a well in the middle. Pour in the creme fraiche and milk and mix together to create a sticky dough.

Lightly knead the dough on a floured surface and then form into 12 scone shapes and place on the baking sheet.

Bake in the oven for 15 to 20 minutes until golden brown. Cool a little on a wire rack before serving.

These scones can be frozen, or can be kept  in an airtight container for up to five days.

Halloween cupcakes

In my goody bag from the MAD Blog Awards I was intrigued to find a mysterious jar containing, well… exactly what I wasn’t sure. To find out more I had to scan the little QR code on the lid and in an instant I was taken to the new Appliances Online blog, which explained all…

The jar contained all the dry ingredients needed to bake some delicious cakes and take part in their Cakes Win Prizes contest. As you know, I’m a bit of a sucker for a competition, so I just had to enter.

The dry ingredients contained in the jar were:

  • 65g caster sugar
  • 60g light soft brown sugar
  • 125g self raising flour
  • 25g chocolate chips

I simply popped all this in a large mixing bowl and combined with:

  • 1 tsp vanilla extract
  • 2 medium eggs
  • 125g soft butter
  • 2 tbsp milk

And hey presto! There was my cake mixture. This was spooned into a fairy cake tray lined with 12 cases and baked in an oven preheated to 180°C/Gas 4 for about 15 minutes.

Once the cakes were cool, Miss Bangers and Miss Mash helped me to decorate them. Now I know it’s still a little way off, but my girls are already getting into the Halloween mood, so that was the theme for our decorations.

For the white icing, I sifted 150g icing sugar into a small bowl and added a tablespoon of water. This was mixed together, adding a touch more water as necessary, to form a thick smooth paste. We used coloured icing pens to draw on our spooky creations.

A pumpkin by Miss Bangers (the 4-year-old)
A spider by Miss Mash, the 7-year-old
A spider and its web by me, the 37-year-old!

And so I’m linking this post to the competition page on the Appliances Online blog. Do pop over there to check out all the other fantastic creations bloggers have been making with the contents of their jars!

Easy ratatouille

Along with my tasty chicken rice, this easy ratatouille is my go-to meal when I’m stocking the freezer with quick weekday meals for the kids.

Now that I’m working over in Wells four days a week, ratatouille appears regularly on my meal plans. It’s particularly good for those days when I’m not back home til late and my husband has little time to get the girls back from school and fed before taking them off out again to their various clubs and activities.

My girls have been eating ratatouille since they were very little, when I’d mash it up for them a bit. They still love it today, served either on its own with a hunk of bread to mop up the juices, with rice, pasta or a baked potato and sprinkled with cheese, or as a veggie accompaniment to sausages or chops.

This is one of those recipes you can play around with. If you’ve got herbs to hand, throw in some of those. If you don’t like cumin, leave that out. The quantities of aubergine, courgette and pepper vary each time I make it, but this should give you the general idea.

Easy ratatouille

Makes 8-10 servings

2tbsp olive oil
½tsp cumin seeds
1 large onion, peeled and chopped
2 cloves garlic, peeled and crushed
1 red bell pepper, deseeded and chopped
1 yellow bell pepper, deseeded and chopped
3 courgettes, chopped
2 aubergines, chopped
1 bay leaf
2 400g tins of chopped tomatoes
Salt and pepper

Preheat the oven to 200ºC / gas mark 6.

Heat the oil in a large ovenproof casserole dish and fry the cumin seeds for a minute or so.

Add the onions and fry gently until golden, then add the garlic and fry for another minute before throwing in the red and yellow peppers.

Saute the peppers until they have slightly softened and then add the courgettes. Continue to saute for a couple of minutes and then add the aubergine. You may need to add a little more oil to the pan at this stage. Keep stirring the vegetables until they’ve started to colour, and then add the bay leaf, tomatoes and season to taste.

Put the lid on your pan and pop in the oven for 20-30 minutes. If it’s a little too liquid for your liking, remove the lid and cook for another 5 to 10 minutes. Leave to cool before dividing into freezer bags.

Blackberry and cardamom pavlova

I’m spending much less time in the kitchen these days. At the beginning of September I started working in-house four days a week covering someone’s maternity leave, which means evening meals need to be quick and easy as I really don’t want to be slaving over a hot stove for hours when I get home.

So more leisurely, experimental cooking has been relegated to the weekends for now. It’s tricky though, as obviously weekends are also now my main family time. However, this beautiful blackberry and cardamom pavlova was the perfect way to bring family and cooking time together.

We all spent a splendid Sunday afternoon traipsing over the fields near our home in Somerset, hunting for blackberries and sloes (they’re still sat in the fridge waiting to be added to gin) and trying not to get stung as inevitably the plumpest, juiciest berries are always the ones obscured behind a clump of nettles. When Jess and Mia tired of picking blackberries, they ran around pretending to be galloping horses while Jason and I finished the job.

Normally the first thing I make with blackberries would be a blackberry and apple crumble. But since we only had a disappointing six apples off our tree this year I decided to try something new. I’ve been meaning to have a go at making meringue for ages – I know how embarrassing is that, a food blogger who’s never baked a meringue? Particularly because we have an Aga and as all Aga owners will tell you, they are perfect for baking meringues. So the idea of a blackberry pavlova came to mind.

I found a recipe for a blackberry cardamom pavlova from Adventures in Cooking and came up with my own a slightly simplified version. The combination of blackberries and cardamom is absolutely inspired. The spicy, perfumed flavour works incredibly well with the sticky, juicy fruit, cutting through the richness of the cream so the end result doesn’t end up being too heavy. Which of course means it’s absolutely fine to have a second helping.

I was so surprised at just how easy meringues are to make, especially with a little help from Aga Queen, Mary Berry. As with most baking, it’s more about setting aside enough time to do it properly, than about the recipe being all that complicated to make. I baked my meringue the evening before, so all I had to do on Sunday after we’d picked the blackberries was to whip up the cream and make the blackberry sauce.

Blackberry and cardamom pavlova

For the meringue:

3 egg whites
pinch of salt
175g caster sugar
1tsp corn flour
1tsp ground cardamom
½tsp vanilla extract

For the blackberry topping:

450g blackberries
120g sugar
2tbsp honey
juice and zest of half a lemon
½tsp ground cinnamon

For the blackberry and cardamom cream:

300ml whipping cream
60g icing sugar
½tsp ground cardamom
zest of half a lemon
1tbsp blackberry topping (above)
1tsp vanilla extract

Plus another handful of blackberries to garnish

If you don’t have an Aga, preheat the oven to 150ºC / gas mark 2.

In a large bowl, beat the egg whites and salt until stiff. Gradually whisk in the caster sugar a teaspoonful at a time, and finally whisk in the corn flour, ground cardamom and vanilla. Lay a sheet of silicone paper on a baking tray and spread the meringue mixture onto the sheet, forming a circular shape. Build up the sides of the circle to create a well in the middle to hold the cream and fruit later.

If you have an Aga, put the baking tray on the floor of the roasting oven for three to four minutes, until the meringue is ever so slightly coloured. Then move down to the floor of the simmering oven for about an hour until the meringue is firm on the outside but gooey in the middle.

If you’re using a conventional oven, bake for an hour and then turn the oven off. Open the door halfway and allow the meringue to cool to remove to room temperature before removing.

To make the blackberry topping, place the berries, sugar and honey in a saucepan over a medium heat and simmer gently for 15 minutes. Scoop out a large spoonful of blackberries and set aside for later. Continue to simmer gently for about 45 minutes, stirring regularly. Remove from the heat and stir in the lemon juice, zest and cinnamon. Allow to cool before chilling in the fridge.

And then to make the blackberry and cardamom whipped cream, pour the cream into a large bowl and add the icing sugar and cardamom. Whip until it forms soft peaks. Gently fold in the spoonful of blackberry topping set aside earlier, along with the lemon zest and vanilla extract. Chill in the fridge until you are ready to assemble.

Place the meringue on a serving plate and pile the blackberry and cardamom whipped cream in the well. Cover this with the blackberry topping and arrange some fresh blackberries around the edge. Serve at once. Enjoy!

PS Tomorrow I’m off to the MAD Blog Awards ceremony in London. I’m a finalist in the MADs Best Food Blog category and I’m really rather excited. I don’t have a chance of winning as I’m up against some splendid food bloggers who’ve been doing this much longer than me, but I’m just so chuffed at making the finals. If you voted for me – then thank you! And I’ll let you know next week how I got on…