Elderflower cordial

elderflower cordial

We have been drinking rather a lot of homemade elderflower cordial in recent weeks. It’s a wonderful thirst-quencher on hot, sticky days, served diluted with iced water, soda water or lemonade, but more than anything I love the actual process of making it, which is so simple and fills the house with the most incredible and evocative elderflower perfume.

A few people have been asking for the recipe, so I thought I’d better post it quickly before the elderflower season comes to an end.

We’re lucky here in Somerset as we seem to be surrounded by elder trees and the flowers are there for the picking wherever you turn. But you can find elderflowers practically everywhere. As I drive to and from work in Bristol, I find myself spotting those beautiful bunches of white blossoms along the roadsides, down little lanes and in so many gardens and even on building sites, so it really isn’t a difficult flower to forage.

Elderflower Collage

My oldest daughter Jessie likes to help me harvest the elderflowers. She’s getting so tall these days, which is helpful for picking the biggest, whitest blooms – the ones that always seem to be right at the top of the tree.

elderflower lemons

Making elderflower cordial is ridiculously easy and you don’t need a long list of ingredients, although it does require a fair bit of sugar and do make sure you have a muslin cloth to hand for straining before you get started. The straining stage is the bit I like best; I enjoying  using my hands to squeezing as much sugary-syrupy cordial as I can from the bundle of cloth, and at this stage the scent of elderflower is almost overwhelming. To me, it’s the essence of an English summer. I don’t use citric acid in my recipe; instead I make sure I store my cordial in a cool, dark place or in the fridge.
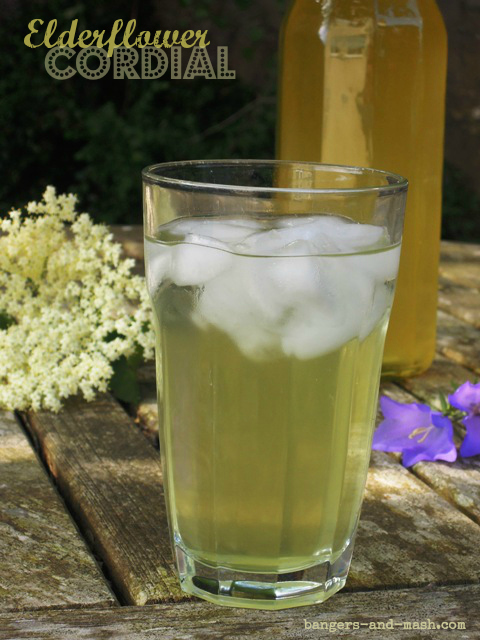
elderflower cordial

Elderflower Cordial

Makes around 2.5 litres

plastic bagful of elderflower heads
3 unwaxed lemons, zested and sliced thinly
1.5kg sugar

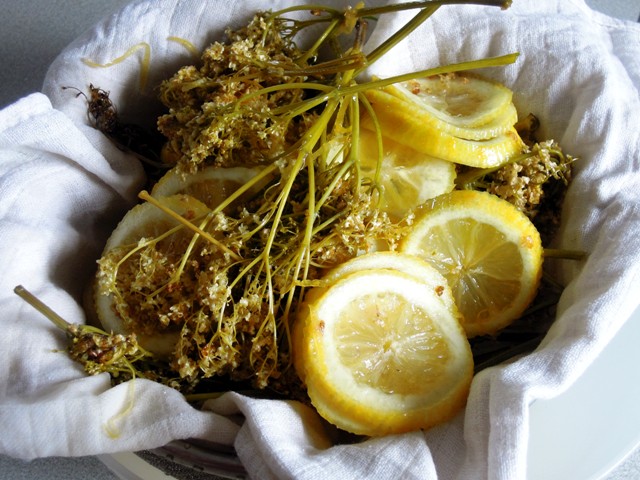
Don’t wash the flowers. Simply shake them out to make sure there aren’t any bugs hiding in there. Place them in a large bowl, together with the lemon zest and slices.

Put the sugar in a large saucepan with 1.2 litres of water and very slowly bring to the boil, stirring occasionally to dissolve the sugar. Leave to cool for five minutes and then pour the sugar syrup over the elderflowers and lemons. Leave to cool, cover with a clean tea towel and leave somewhere safe for about for 24 hours.

Strain the mixture through a sieve lined with a clean muslin and decant into sterilised bottles. Seal and store in a cool, dark place or in the fridge.

Serve  diluted with water, lemonade or soda water. It’s also delicious poured over a fruit salad and or in this glorious elderflower and rhubarb fool. I plan to try making elderflower ice cream in the coming weeks.

family-foodies

Elderflower cordial is the perfect refreshment for a family picnic so I’m entering this recipe into June’s Family Foodies challenge, hosted this month by Lou over at Eat Your Veg where the theme is Barbecues, Picnics and Outdoor Eating, as well as July’s Family Foodies challenge (this time hosted by yours truly) where the theme is Chill Out, Baby!

SimpleinSeason

And since elderflower cordial is both Simple and in Season, I’m entering into the blog event of the same name hosted by Ren Behan.


Chicken satay with peanut sauce and coconut rice

Satay Collage

It’s typical, isn’t it? I finally get around to posting a summer barbecue recipe and all of a sudden the gorgeous weather disappears, the grey clouds gather and  a deluge of rain descends from the heavens. Blinking typical.

What else can you expect when it’s Glastonbury Festival? Even if it weren’t all over Twitter, radio and TV, we’d know it was Glasto time just by the sheer number of helicopters flying over our house taking the VIPs to the festival down the road in Pilton. We always give them a wave as we wonder who might be on board…

But I am ever the optimist and I’m sure the days of balmy sunshine will return to us soon. And this chicken satay is a dish we’ll making again on the barbie.

chicken satay

This was one of my favourite dishes when I went to Malaysia and Singapore as a child to stay with my Mum’s family. I thought the hawker stalls were just so exciting and loved the way the sticky rice came wrapped up in banana leaves. I can’t clam my version is at all authentic I’m afraid, and it isn’t easy to come by banana leaves in the middle of Somerset. It is ruddy tasty though, and I could easily polish off a whole bowlful of that peanut sauce on its own.

The chicken satay is packed full of spice and while it’s fine to mince the marinade ingredients in a food processor, I rather like doing it with a pestle and mortar to work out some of those pent-up tensions. It’s best to marinate the chicken overnight or at least for three to four hours.

Chicken satay with peanut sauce and coconut rice

Serves 4

For the satay chicken

500g chicken breasts, skinned
1 large onion, peeled and coarsely chopped
2 garlic cloves, peeled and crushed
1 lemongrass stalk, trimmed and white part finely chopped
1 tsp ground cumin
1 tsp ground turmeric
1 tbsp ground coriander
salt
pepper
demerara sugar
1 tsp fish sauce
½ chilli, deseeded and chopped
a little sunflower oil for brushing

For the peanut sauce

2 tbsp vegetable oil
½ onion, peeled and finely diced
1 red chilli, finely chopped
1 tbsp crushed garlic
½ tsp ground ginger
5 tbsp crunchy peanut butter
1 tsp tamarind paste
1 tsp dark soy sauce
250ml coconut cream
50ml water

For the chicken satay

Slice the chicken into thin strips and place in a bowl.

Crush together the onion, garlic,  lemongrass and ground spices using a pestle and mortar (or in a food processor) to create a rough paste. Add a little salt, sugar and pepper to taste. Stir in the fish sauce and chilli. Pour the paste onto to the chicken and mix well with your hands to thoroughly coat.

Cover with cling film and leave to marinate in the fridge overnight, or at least three to four hours.

Soak 16 bamboo skewers in water for around 30 minutes to stop them from burning on the barbecue later.

Carefully thread the marinated chicken onto the skewers.

When you are ready to cook, brush a little sunflower oil onto each satay skewer and then gently lay them onto the barbecue grill. (Or of course you can do this under the grill or in a griddle pan.)

Grill the chicken for about five minutes, turning frequently, until it has cooked through.

For the peanut sauce

Heat the oil in a saucepan and gently fry the onion, chilli and garlic for a few minutes until the onions are soft.

Add the ground ginger and peanut butter giving it all a good stir until the peanut butter starts to melt down. It should start to melt. Then add the tamarind paste and soy sauce and stir again. Next goes in the coconut cream and water. Cook and keep stirring for a few more minutes until everything is well incorporated.

Pour the peanut sauce into a bowl and serve warm alongside the chicken and rice.

For the coconut rice

400ml coconut milk
½ tsp ground ginger
salt to taste
1 bay leaf
1 lemongrass stalk
200g long grain rice

Place the coconut milk, ground ginger, salt, bay leaf, lemongrass stalk, and rice in a medium saucepan over a medium heat. Stir together and cover with a lid. Bring to a simmer and reduce heat. Continue to simmer very gently for around 20 minutes, until the rice is tender and has absorbed all the coconut milk. If it dries out before the rice is done, add a little water. When it’s cooked, fish out the bay leaf and lemongrass stalk – you don’t want anyone chowing down on either of those.

chicken satay

Serve the rice by packing it into a small, very lightly oiled bowl and turning it out onto a plate alongside the barbecued chicken satay and individual bowls of peanut sauce. I like to add a simple dressed salad to the plate too. Now that is properly finger-licking good.

spice trail badge square

As the spice mix for the chicken satay features cumin, I am entering it into this month’s Spice Trail challenge, where of course the theme this month is cumin.

family-foodies

I’m also entering it into June’s Family Foodies, hosted this month by Louisa at Eat Your Veg. The theme is Barbecues, Picnics and Outdoor Eating and I think these chicken satay fit the bill perfectly.

Beef and Guinness pie with vanilla and thyme

beef and guinness pie with vanilla and thyme

When Solange at Pebble Soup suggested vanilla as the theme for this month’s Spice Trail, which she is very kindly guest hosting for me, my mind went into overdrive. I simply had to come up with a way to use this gorgeous spice in a savoury dish. And this deeply dark and delicious beef and Guinness pie is what I came up with.

beef and guinness pie with vanilla and thyme

My husband was the inspiration. He thought vanilla might work well in our favourite braised pig cheek recipe. I’m sure that would be heavenly but, as I’ve only recently featured the dish here on the blog, I couldn’t really go with that again. So the idea of pairing vanilla with slow cooked with meat in a rich, warming sauce evolved instead into this sumptuous beef pie.

Vanilla and Guinness are a genius combination. Soft and rich and ever so slightly sweet, but without being cloying. The vanilla flavour is subtle; just enough sweetness to be warm and comforting. Teamed with tender beef and vegetables – I opted for butternut squash and celery to continue the sweet them and some chestnut mushrooms for texture and a touch of earthiness – and topped with buttery puff pastry, this dish is definitely my idea of foodie bliss.

beef and guinness pie with vanilla and thyme

Beef and Guinness pie with vanilla and thyme

1 tbsp vegetable oil
400g braising beef, cut into bite-size pieces
2 tbsp corn flour
1 red onion, peeled and chopped
250g chestnut mushrooms, quartered
2 celery sticks, sliced
1 small butternut squash, peeled and chopped into bite-size pieces
440ml can Guinness
260ml hot beef stock
large handful fresh thyme, picked
1 vanilla pod
salt and pepper
1 egg, beaten
375g ready rolled puff pastry

Preheat the oven to 180°C / gas mark 4.

Heat the oil in a large casserole and fry the beef until browned on all sides. Stir in the corn flour to coat the meat.

Add the onion, mushrooms, celery, butternut squash, Guinness, beef stock and thyme. Split the vanilla pod lengthways and scoop out the seeds with a spoon. Add the seeds to the pan, along with the pod. Season to taste and give it all a good stir.

Bring it to a gentle simmer. Pop the lid on and place in the oven for at least three hours until the meat is beautifully tender.

Remove the stew from the oven and leave to cool.

Turn up the oven to 200°C / gas mark 6.

Transfer the stew to a ovenproof pie dish (around 2 litre). Brush the edges of the pie dish with a little beaten egg and carefully lay the ready rolled puff pastry over the top of the stew. Knock the edges with the back of a knife so they stick to the dish and trim off the excess pastry.

With a sharp knife, cut a little hole in the middle of the pastry to allow the steam to escape and brush the top with beaten egg.

Bake in the oven for 30-40 minutes, until the top is golden brown.

Serve with vegetables and creamy mashed potato to soak up all that meaty vanilla-flavoured gravy.

beef and guinness pie with vanilla and thyme

I am entering this pie into The Spice Trail, which is of course being hosted this month by Solange over at Pebble Soup, and where the spice theme this month is vanilla.

spice trail badge square

And as this pie also contains lots of lovely fresh thyme, I shall also enter it into Cooking with Herbs, hosted by the brilliant Karen at Lavender & Lovage.

cooking with herbs

Spicy chana dal cottage pie

chana dal cottage pie

There are certain dishes I don’t play around with too much. When they’re easy winners with the family, what’s the point of trying to fix something that ain’t broke? Like spaghetti carbonara or bangers and mash. Sometimes simple is best.

Cottage pie had always been one of those kinds of meals for me. Cooked minced beef with onions, maybe a vegetable or two, in gravy and topped with creamy mashed potato. Why would you want to mess with that?

But the problem is I just do have this tendency to play with my food. I was thinking about ways to make cottage pie go further, you see. Since taking part in the Living Below the Line initiative, where we only had £1 a day for food and drink for five days, the cost of food has been on my mind and I keep looking for ways to make things stretch a bit. I always bulk cottage pie out with a few vegetables, so the idea of adding lentils (or in this case chana dal, split and polished chickpeas) seemed the natural next step. Of course, I could have gone completely vegetarian and left out the beef mince but we do rather like meat in our house, and I think it’s useful to have ways to get more meals out of good meat than have to omit it all together.

chana dal

Once I’d decided to add chana dal, it was a natural leap to add some spice, since chana dal is such a popular ingredient in Indian cookery. I added some cumin and mustard seeds to the mince and dal, and then a little turmeric to melted butter before mashing it into the potato. It could so easily have been one of those disastrous experiments but it worked an absolute treat and the whole family seemed to approve. Well, they asked for seconds. Always a good sign.

This is another of those incredibly adaptable dishes. Instead of chana dal, you can use pretty much any kind of lentils or pulses, and throw in whatever vegetables you happen to have in.

chana dal cottage pie

Spicy chana dal cottage pie

This recipe makes two large cottage pies, each yielding 4 to 6 portions. One for supper tonight and another for the freezer – perfect!

200g chana dal
1 tbsp sunflower or vegetable oil
1 large onion, peeled and chopped
½ tsp cumin seeds
½ tsp black mustard seeds
500g minced beef
4 large carrots, peeled and sliced
2 courgettes, halved lengthways and sliced
2 garlic cloves, peeled and crushed
2 x 400g tins chopped tomatoes
200ml beef stock
salt and pepper
1kg potatoes, peeled and halved or quartered depending on size
50g butter
½ tsp turmeric
200ml milk

Soak the chana dal in cold water for at least an hour, and then drain.

Preheat the oven to 200°C/Gas Mark 6.

Heat the oil in a large pan and fry the onion until soft and golden. Add the cumin and mustard seeds and fry until the release their aroma.

Add the minced beef to the pan and cook for about 5 minutes until browned, stirring frequently. Next add in the carrots, courgettes and garlic and give it all a good mix before stirring in the chana dal, tinned tomatoes and stock.

Leave to simmer gently for 20 minutes or so until the liquid has thickened a little and the vegetables are tender. Taste and season.

Bring a large pan of salted water to the boil and cook the potatoes until just tender, drain, and return to the pan.

Gently melt the butter in a small pan and stir in the turmeric. Pour the yellow butter onto the cooked potatoes, pour in the milk, season with salt and pepper and mash well.

Spoon the meat and chana dal filling into two ovenproof dishes, and then cover with the mashed potato. Cook one in the oven for around 25 minutes until the top is golden. Cool the other one before covering with foil and placing in the freezer for a quick easy dinner another night.

chana dal cottage pie

As this is a great way to make a cottage pie go further, I’m entering it into this month’s Family Foodies challenge where the theme is Cheap & Cheerful.

family-foodies

I’m also entering it into the Credit Crunch Munch challenge, the brain child of Fab Food 4 All and Fuss Free Flavours, and this month hosted by Gingey Bites.

Credit-Crunch-Munch-Just-Pic

Wild garlic pesto tear & share bread

Wild Garlic Bread CollageThe lanes near our house have been heavy with the heady scent of wild garlic flowers in the last few days, the warmth of the late spring sunshine increasing their intensity. We’re nearing the end of the wild garlic season, so I’ll be picking one last harvest to make up a big batch of wild garlic pesto. It freezes beautifully and will provide us with a taste of English spring for many months to come.

The pesto is delicious simply stirred through a bowlful of pasta or spread on toasted bread to create bruschetta. It’s also wonderful in this easy tear-and-share bread, a perfect accompaniment to cold meats and cheeses as part of a buffet lunch or a springtime picnic.

wild garlic pesto bread

Wild garlic pesto tear & share bread

Makes 8 bread rolls

400g strong white bread flour
1 tsp salt
1 x 7g sachet fast action dried yeast
250ml water
1 tbsp olive oil
half a jar of wild garlic pesto – see my recipe here

Put the flour, salt and dried yeast into a large mixing bowl and combine.

Make a well in the middle and pour in the water and oil. Gradually work the flour into the liquid to form a soft dough. If it’s too dry, add a drop more water. If it’s too sticky, add some more flour.

Flour the work surface before tipping the dough onto it. Knead the dough for five to ten minutes, until the dough is smooth and elastic.

Return the dough to the mixing bowl, cover loosely with cling film and put in a warm place for about an hour, until the dough has doubled in size.

Grease and flour a 20cm round cake tin.

Uncover the risen dough and punch it back down. Flour the surface again and divide the dough into eight equal portions.

Roll each portion of dough into a rough rectangle, approximately 20cm by 10cm. Spread each rectangle generously with wild garlic pesto and roll up carefully into a tidy spiral. Stand each spiral into the prepared cake tin, spacing them out to allow them room to spread.

Cover loosely with cling film or a clean tea towel and leave to rise again for another 45 minutes to an hour.

Preheat the oven to 200°C/Gas Mark 6 or use the middle of the top oven of an Aga.

When the bread has risen again, place in the oven and bake for 15 to 20 minutes. Place the tin on a wire rack and leave to cool for 10 minutes before turning out. Lovely eaten while still warm, drizzled with a little olive oil.

fsf-spring

As this bread makes use of a sensational spring ingredient, I’m entering it into this month’s Four Season’s Food challenge hosted by Eat Your Veg and Delicieux where the theme is Celebrating Spring.

SimpleinSeason

And as it’s a very seasonal recipe, I’m also entering it into Simple and in Season hosted by Ren Behan.

cooking with herbs

Finally as it features wild herbs, I’m sharing it with Karen at Lavender & Lovage in this month’s Cooking with Herbs challenge.

Old fashioned vanilla ice cream

vanilla ice cream

When the sun is shining it’s hard to imagine the world any other way. When the sun is shining and you’re sat in the garden eating a big bowl of vanilla ice cream, life is good. Especially when it’s homemade vanilla ice cream made the old fashioned way with a proper custard.

I don’t know how long this warm weather is going to last. I don’t generally bother to watch the weather forecasts. But it was gorgeous yesterday and it’s gorgeous again this morning. So we shall make the most of it.

Yesterday we spent practically every minute, once we’d got the dance lessons out of the way in the morning, in our garden. Playing swing ball, cutting the grass, weeding, planting seedlings in the vegetable patch, having a barbecue, washing the car, running through the water sprinkler. Even the chores are enjoyable when the sun shines. Almost felt like we were on holiday in our own home. And when you are on  holiday you eat ice cream. At least I always do, anyway.

I was given my first ever ice cream maker a couple of months ago for my birthday. The children have been thinking up all kinds of weird and wonderful flavours for us to experiment with, but before we move onto those I was keen to master the classic vanilla.

Good  ice cream isn’t difficult to make yourself but it does require patience. I’d always assume that an ice cream maker would mean you simply put everything in a pot and it transforms it into ice cream for you, when actually it’s key function is the churning, the constant stirring while the ice cream freezes to prevent ice crystals forming.

Our first attempt was a disaster. The custard was rushed and it wasn’t lovely and thick before it went into the maker, and so the ice cream just didn’t thicken. So when it came out of the freezer, it was one large ice block that was practically impossible to get into. But the second attempt was just perfect and I spent much longer at the stove, stirring the custard until it was beautifully thick and glossy. The ice cream was softly sweet and creamy, with that oh so comfortingly familiar flavour of delicious vanilla, and I imagine I’ll be making many, many more batches of this particular recipe.

You can of course use vanilla extract for this recipe, but I prefer to use a vanilla pod. You see all those pretty little black seeds in the ice cream, and you can wash the pod afterwards and use it to flavour your sugar. Oh and don’t forget to put the canister from your ice cream machine into the freezer the day.

Vanilla just happens to be the theme this month for The Spice Trail challenge, which this month is being guest hosted by Solange over at Pebble Soup who is doing an incredible job attracting an eclectic collection of wonderful vanilla recipes. Do pop over there to take a look and of course, if you’re cooking with vanilla this month, why not add your recipe? There is a fabulous prize for the winner – a selection of Steenberg organic extracts and essences from Naturally Good Food, including vanilla of course.

vanilla ice cream

Old fashioned vanilla ice cream

Serves 6 to 8

300ml full fat milk
1 vanilla pod
3 large egg yolks
85g caster sugar
300ml double cream

Pour the milk into a heavy-based saucepan. Split the vanilla pod with sharp knife and scrape out the seeds into the milk. Pop in the pods too and give it a good mix.

Place the milk onto a medium heat and bring to the boil. Quickly remove it from the heat, cover and leave to stand for 20 minutes.

In a large bowl, beat the egg yolks well with the sugar and then stir in the milk and vanilla. Remove the vanilla pod and then pour the mixture into the saucepan again.

Cook over a low heat, stirring all the time with a wooden spoon until the custard thickens and covers the back of the spoon. This will take around 10 minutes or so. Don’t let the mixture boil or it will split, and do wait until it has thickened or your ice cream won’t set properly.

Once the custard has thickened, pour it into a clean bowl and leave it to cool. Then whisk the cream into the custard. Cover with cling film and place in the fridge until is completely chilled. I left mine in the fridge overnight.

You then tip the mixture into your ice cream machine and freeze following the instructions provided. Transfer to a plastic container and freeze until required – if you can resist plunging straight in.

Alternatively, if you don’t have an ice cream maker, you can freeze once you’ve whisked in the double cream for around four hours, remembering to give it a good stir once an hour to break up any ice crystals that are forming.

Serve in bowls or in wafer cones. Enjoy!

spice trail badge square

I am entering my vanilla ice cream into The Spice Trail’s  Wow Vanilla! challenge hosted by Solange Berchemin over at Pebble Soup.

Braised oxtail with smoked bacon

oxtail

Other than tinned oxtail soup as a child (which I don’t think really counts), I hadn’t eaten oxtail until just the other week when I got hold of some at my local butcher and decided it was time to try it out on my family.

I’ve been meaning to cooking with it for quite some time but for one reason and another hadn’t got round to it. It’s a wonderfully cheap cut and I’d heard how full flavour and “unctuous” it can be when cooked long and slow – perfect for us as we cook in an Aga.

And I certainly wasn’t disappointed. I turned to that classic Italian cookbook, The Silver Spoon, which I always tend to consult when faced with a new cut of meat, and found a recipe for a slow-cooked oxtail, cooked very simply with soffritto (onion, carrot, celery and garlic), white wine and pancetta, or in my case beef stock and smoked bacon.

The result was truly unctuous. So it might not be the prettiest of plates but it tastes divine. A properly rustic kind of dish which demands eating with fingers to make the most of all that gorgeously sweet meat clinging to the bones, with plenty of cartilage to be gnawed and marrow to be sucked. The vegetables seem to soak up the gooey, marrow-rich sauce making them beautifully soft, and a large helping of creamy mashed potato is just wonderful served on the side.

What did disappoint was how squeamish the children were about getting stuck in. This isn’t normally a problem in our house, where we’re used to sticky fingers and dribbly chins. Perhaps I left a little too much fat on the oxtail or maybe it was simply the idea of eating a beast’s rear appendage, but I was surprised at how much encouragement my kids needed to finish their plates.

Don’t worry, I never give up on the first attempt. This is definitely a dish I’ll be trying on the clan again soon. I loved it so much, it’s now my mission to make my family love it too.

oxtail

Braised oxtail with smoked bacon

850g oxtail, cut into pieces
2 tbsp olive oil
25g butter
3 rashers smoked bacon, chopped
1 onion, finely chopped
3 carrots, finely chopped
2 celery sticks, finely chopped
2 garlic cloves, crushed
500ml hot beef stock
salt and pepper

Remove any excess fat from the oxtail and then soak in cold water for three hours, changing the water a couple of times. Drain and pat dry with kitchen towel.

Preheat the oven to 140°C/gas 1.

Heat the butter and oil in a large ovenproof dish, add the bacon and fry for 5 minutes until coloured.

Add the oxtail pieces and brown all over.

Stir in the onion, carrot, celery and garlic and fry together for a few minutes before pouring in the hot beef stock. Add enough hot water to just cover the ingredients and season to taste.

Bring to a gentle simmer, then cover with a lid and transfer to the oven to cook for three to four hours, until the meat comes easily away from the bone and the juices have thickened.

Serve with plenty of creamy mashed potato to soak up all that delicious sauce. And make sure you have napkins to hand.

family-foodies

Oxtail is a very inexpensive cut of beef and so I am entering this dish into May’s Family Foodies challenge (hosted by myself and Eat Your Veg), where the theme is ‘Cheap and Cheerful’.

Credit-Crunch-Munch-Just-Pic

I’m also entering into Credit Crunch Munch, co-hosted by Camilla at Fab Food 4 All and Helen at Fuss Free Flavours, and this month guest hosted by Gingey Bites.

Queso Fundido

Queso Fundido Collage

Queso Fundido is essentially a Mexican version of a cheese fondue, bringing together wonderfully oozy, gooey cheese with a fabulously spicy and very, very moreish cooked chorizo.

It’s a great dish to serve to a hungry family or perhaps when you have a few friends over for drinks. Serve it in the middle of the table with plenty of tortilla chips and hunks of crusty bread and people will come running, elbowing each other way to load up their next scoopful and laughing as everyone ends up with cheese all down their chins.

You could use a good shop bought chorizo meat for this dish but I made my own, using minced pork from my favourite butcher and the Cool Chile Co’s new Mexican Chorizo Seasoning, which I can highly recommend.

Mexican oaxaca or queso quesadilla would be the traditional cheeses to use in this dish but as I couldn’t get hold of these I experimented with Mozzarella and good old Cheddar, which I thought worked a treat.

queso fundido

Queso Fundido

Serves 4 to 6

200g uncooked Mexican chorizo meat (shop bought or make your own – see below for the Cool Chile Co recipe)
150g Mozzarella cheese, grated
200g Cheddar cheese, grated
2 large tomatoes, chopped
bag of tortilla chips
crusty bread – baguette is perfect

Preheat the oven to gas mark 6 / 200° Celsius.

In a large frying pan, cook the chorizo over a medium heat for about five minutes. Drain off the excess oil and set aside.

Mix the two cheeses together in a cast iron skillet or ceramic ovenproof dish and place in the oven until just melted. This takes around five minutes but keep an eye on it as you don’t want the cheese to burn.

Give the cheese a good mix before topping with the chorizo and chopped tomatoes.

Serve at once with tortilla chips and bread. It will be gone in seconds.

queso fundido

It’s incredibly easy to prepare your own chorizo meat using the seasoning kit from Cool Chile Co.

The contents of the kit include traditional chorizo spices (achieote powder, Mexican oregano, thyme, cinnamon, bay and clove) along with dried ancho, guajillo and chipotle chillies, , and the resulting chorizo is full of rich and beautifully smoky flavours, which I was surprised to find aren’t completely overpowered by all that chilli. It’s actually quite mild in terms of chilli heat, and both my daughters enjoyed it lots and weren’t at all phased by the spiciness.

Mexican Chorizo

This recipe created double the amount of chorizo I needed for my queso fundido so I froze the rest and plan to use with tacos very soon.

1 Cool Chile Co Mexican chorizo seasoning kit
4 garlic cloves, peeled and chopped
50ml cider vinegar
500g minced pork or beef (I used pork)
4 tbsp sunflower or vegetable oil

Roast the chillies from the seasoning kit, and soak in hot water for 15 minutes. Blitz these in a food processor with the rest of the herbs and spices from the kit, as well as the garlic and cider vinegar, to create a dark red puree. Chill in the fridge.

Place the minced meat in a large bowl and add the chilled puree. Mix together thoroughly.

The chorizo meat is now ready to be used in your chosen dish, whether a queso fundido as here, or perhaps fry and crumble over fried or scrambled eggs, or mixed with diced onion and potato for a tortilla topping or taco filling.

queso fundido

I’m entering my queso fundido into this month’s Spice Trail challenge, where the theme for April is Destination Mexico.

spice trail badge square

Disclosure: The Cool Chile Co provided me with a complementary Mexican Chorizo Seasoning kit for review purposes. All views expressed are completely my own and are 100% honest.

Easy aubergine and hummus dips

aubergine and hummus dips

I reckon we’re pretty good in the Bangers & Mash house when it comes to snacking healthily. Just as I sat down to write this post, my girls came in with their usual mid-afternoon demand: “Mummy, we’re hungry! Can we have a snack?” They are now happily munching their way through a bowlful each of dried apricots.

Don’t get me wrong. We’re not food saints by any stretch of the imagination. We enjoy our potato crisps and chocolate biscuits as much as the next family, but these are clearly seen as occasional treats rather than everyday snacks.

As well as dried apricots, the girls also love their dried apples, which we dry ourselves above the Aga – perfect in late summer when our apple tree is heaving. Dried apple is a perfect ingredient for our fruit & nut balls and granola, both of which make ideal snacks. Cherry tomatoes, chunks of cheese and cucumber, and carrot sticks are also snacktime favourites with my girls.

Healthy Snacks Collage

But probably the snack the kids ask for most are dips and breadsticks. We always have a pot of chunky hummus or some other dip, such as this deliciously smoky aubergine puree, on the go in the fridge. I used to spend a fortune on the shop bought varieties, until I realised just how cheap and easy they are to make at home. And so much tastier too.

Both recipes are based on ones I found in Leon cookbooks, but I’ve tweaked them slightly for my family’s tastes, in particular by increasing the amount of garlic involved in the proceedings.

aubergine dip

Aubergine dip

Use yoghurt instead of the tahini to turn this dip into babaganoush.

3 large aubergines
125ml tahini
juice of 3 lemons
2 garlic cloves, peeled and crushed
salt
2 tbsp extra virgin olive oil

Preheat the oven to 220°C / gas mark 7.

Prick the aubergines with a fork and bake in the oven, direct on the rack, for around 20 minutes until the skins have blackened.

Peel off the aubergine skins using a sharp knife while they are still warm.

Whizz up the aubergines in a food processor, together with the tahini, lemon juice and garlic. Taste and season with salt.

Pour into a large bowl to serve, drizzled with olive oil.

easy hummus

Easy hummus

1 x 400g tin of chickpeas, drained
juice of 1 lemon
2 garlic cloves, peeled and crushed
1 tbsp tahini
70ml extra virgin olive oil
salt and pepper
½ tsp paprika (optional)

Simply place the chickpeas, lemon juice, garlic, tahini and olive oil into a food processor and blitz until you reach a good consistency. I like mine fairly chunky but you might prefer yours smoother or looser. If it seems to dry, add a little more olive oil and/or lemon juice.

Season to taste and pour into a bowl to serve. Sprinkle with a little paprika if you like.

Why not serve your dips as part of a mezze?

Easy peasy, lemon squeezy. As my children like to say. Both dips are a good accompaniment to crudités, breadsticks or warm pitta bread, or serve as part of a mezze.

family-foodies-valentine

I’m entering these dips into April’s Family Foodies challenge, hosted this month by Louisa at Eat Your Veg. The theme this month is Healthy Snacks. Do pop over there to take a look through the other recipes entered so far – there are some really good ones this month. In particular, I’ve got my eye on the Easy Peasy Mackerel Pate from Casa Costello, which looks delicious and wonderfully simple to make.


Black bean soup and chilli baked feta

baked feta with black bean soup

Sadly I’ve never been to Mexico but it’s right up there near the top of my bucket list. When I make it there, this is the kind of food I picture myself eating, washed down of course with a bottle of ice cold cerveza.

This black bean soup and chilli baked feta were two of the recipes I discovered through Kitchen Nomad, which unfortunately is no longer operating. I really rather liked this food box scheme, where each month ingredients from another mystery location would arrive on your doorstep along with recipe cards created by a well-known chef.

Thomasina Miers provided the recipes for the Mexican month and these two dishes were our favourites, although my husband and I enjoyed them sin niños as the chilli would undoubtedly have proven a little two much for them both, even with their adventurous palates.

The baked cheese should really feature a Mexican queso fresco but Miers recommends feta as a good alternative for this classic dish. The feta tastes amazing melted into the olive oil and is brought alive by the flavours of garlic, lime, chilli and oregano.

The black bean soup is sumptuously comforting, with a subtle and smoky warmth from the chipotle and ancho chillies, and it tastes extremely good with a dollop of soured cream and some of the chilli baked feta on top. Comer con gusto!

chilli baked feta

Chilli baked feta

Serves 6

500g feta cheese
2 garlic cloves, peeled and finely chopped
half tsp dried oregano
10 sprigs fresh thyme
2 chillies de arbol, chopped
juice and zest of 1 lime
120ml extra virgin olive oil

Preheat the oven to 180 C / gas mark 4.

Drain and slice the feta and place in an earthenware dish large enough to take the cheese in a single layer.

Sprinkle the garlic, herbs and chillies over the top of the feta, together with the lime juice and zest. Then pour over the olive oil.

Bake for 10 to 15 minutes, until the cheese is soft and squishy and smelling heavenly. Serve with crusty bread and black bean soup.

black bean soup

Black bean soup

Serves 6

25g butter
1 tbsp olive oil
half an onion, peeled and finely chopped
1 tsp dried oregano
2 bay leaves
2 plum tomatoes, chopped
3 garlic cloves, peeled and chopped
3 tsp chipotle sauce
500g tin cooked black beans
salt and pepper
1 litre vegetable stock
juice of 1 lime
3 tbsp ancho chillies, crumbled
small bunch of coriander,  chopped
150ml sour cream

Heat the butter and oil in a heavy-bottomed pan and when it starts to foam add the onion and herbs. Sweat gently for 10 minutes until the onion is soft.

Add the tomatoes,  garlic and chipotle sauce and cook gently for 5 minutes before adding the black beans. Cook for a few minutes before adding the stock and lime juice. Then simmer gently for 10 to 15 minutes.

When cooked, whiz it up with a stick blender. Don’t go at it for too long as you want this soup to have a bit of texture.

In a small frying pan, dry roast the ancho chillies for a few minutes until they start to smoke and then remove from the heat.

Pour the soup into six warmed bowls and scatter over a little of your chilli baked feta with some chopped coriander, crumbled ancho chillies and a spoonful of soured cream.

cooking with herbsspice trail badge square

I’m entering these dishes into my Spice Trail challenge, which this month is heading to Mexico in search of delicious delights, and also into Cooking With Herbs hosted by Karen at Lavender & Lovage as they feature fresh coriander and dried oregano.