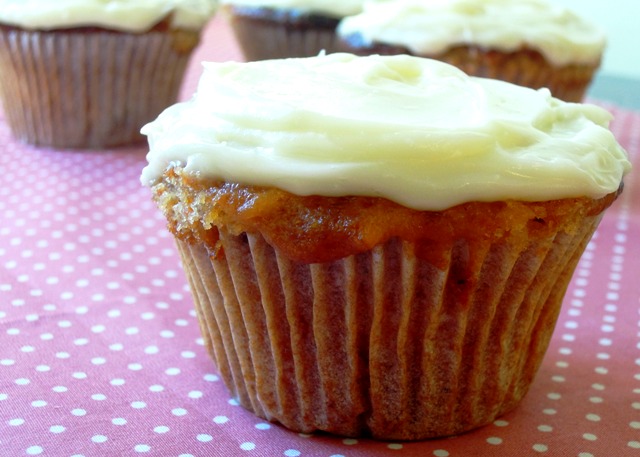
While it might be unlikely you’ve arrived at this page if you dislike parsnips, these cakes actually happen to be perfect for anyone who isn’t a member of the parsnip fan club as you would never guess they contained any if you hadn’t been told first.
Beautifully moist and incredibly moreish, they’re a great way to use up unwanted parsnips, particularly when they become a slightly too frequent inclusion in the veg box this time of year.
Personally, I rather like parsnips. They’re delicious roasted, when they take on that sweet caramelised flavour, with a slightly crunchy, slightly chewy texture. My other half however strongly disagrees and groans if he sees them in the fridge. Despite that he gobbled up these parsnip cakes more than happily.
Without the cream cheese topping, they are very tasty and ideal for the children’s packed lunch boxes or an after school treat. But with the topping, they are elevated to a decadent and indulgent level of scrumminess you’d simply never believe a root vegetable could reach.
Put the butter, sugar and honey in a large pan and melt over a gentle heat, and allow to cool slightly. Mix in the eggs, and then the flour, baking powder and mixed spice. Then stir in the parsnip, carrot and sultanas.
Spoon the mixture into paper muffin cases in a 12-hole muffin tray and bake for 20-25 minutes until golden brown and the top is springy to the touch.
Cool the cakes for five minutes in the tin before turning out onto a wire rack to cool completely.
To make the topping, cut up the butter and then cream together with the cheese. Gradually add the icing sugar and beat in until there are no lumps. Smear generously and lovingly over your cakes.
Best eaten with a fork in polite company. But if you’re like me, you’ll find yourself devouring these late at night, straight from the tin and with such gusto you end up with topping all over your face. Bliss!
With my step-mum Sue in Epping Forest in the 1980s
I clearly remember my Dad telling me one summer holidays when I was staying with him in London that he wanted to introduce me to someone special: his girlfriend, Sue. I was about seven or eight years old. I remember being taken completely by surprise but I couldn’t wait to meet her. Particularly because she had hand-sewn me the most exquisite little doll. When I met her, I thought she was a bit like a princess with her long brown hair and her beautiful dresses. Rather like her doll!
For some reason, it wasn’t until I had my first child that it dawned on me how significant a role Sue had played in my childhood. It’s quite common I think for women not to acknowledge what their mothers have done for them until they have their own children. The same was true for me. I saw both my Mum and Sue in new lights.
Whenever I came to stay in London with my Dad during the school holidays, Sue would always make a huge effort with me. We baked together, she helped me make my own dresses, she taught me to play the recorder, she’d take me into the Chelsea Playground where she worked, and we’d play endless games – picture consequences was a particular favourite of mine.
I was 12-years-old when I came to live permanently with my Dad and Sue in London. My twin sisters were just a year old. For me it was all a big adventure; moving to London, getting a new bedroom, starting a new school and meeting new friends. I really never thought about what a massive impact this must have had on Sue’s life: bringing a near-teenager into your home when your hands are already very much full with two little babies. I can’t imagine many people would put themselves forward for that. I’m not sure if I’ve ever said a proper thank you to Sue for this. So, thank you. I’ll say it properly in person when I next see you!
And all this is why I’m so pleased Sue has entered this cake into TACT’s Care to Cook family recipe challenge. Because Sue knows a thing or two about family and welcoming young people into her home.
Over to Sue for her very special Strawberries and Cream Birthday Cake…
Since I first made this cake one June to celebrate my twin daughters’ birthday – or should that be birthdays? – I’ve made it almost every year. Often we waited for their birthday to have the first strawberries of the year – all the better for the waiting! When they were away at university it was something to have when they returned home.
We may not have it quite so often these days but this year – when Lottie returned from Spain and met up with her sister, Maura in London – we shared it again. Cakes are often part of getting together as a family and seem to signify special times or celebrations often becoming a bit of a family tradition. Cranberry muffins on Christmas morning whilst we open the presents is another one in our house.
But as it’s summer and strawberries are still good here goes.
(The Victoria sandwich recipe here is based on one of Mary Berry’s. My mother gave me a copy of book of her cake recipes and it’s one of the most used in the house – much splattered and stained to prove it!)
Strawberries and Cream Birthday Cake
4 free-range medium eggs
225g caster sugar
225g self-raising flour
2 tsp baking powder
225g baking spread, margarine or soft butter at room temperature (or a combination of the two to make the same amount) plus a little extra to grease the tins
For the filling and topping:
At least one punnet of ripe strawberries – some sliced in half (for between the layers), the rest left whole
300ml whipped double cream
450g strained Greek yogurt and whipped cream (see below)
mint leaves for decoration
Preheat the oven to 180C/Gas 4.
If using tins rather than silicone cake moulds, grease and line two 20cm sandwich tins: use a piece of baking or silicone paper to rub a little baking spread or butter around the inside of the tins until the sides and base are lightly coated. Line the bottom of the tins with a circle of baking or silicone paper; to do this, draw around the base of the tin onto the paper and cut out.
Break the eggs into a large mixing bowl, then add the sugar, flour, baking powder and baking spread.
Mix everything together until well combined. The easiest way to do this is with an electric hand mixer, but you can use a wooden spoon. Put a damp cloth under your bowl when you’re mixing to stop it moving around. Be careful not to over-mix – as soon as everything is blended you should stop. The finished mixture should be of a soft ‘dropping’ consistency – it should fall off a spoon easily.
Divide the mixture evenly between the tins: this doesn’t need to be exact, but you can weigh the filled tins if you want to check. Use a spatula to remove all of the mixture from the bowl and gently smooth the surface of the cakes.
Place the tins on the middle shelf of the oven and bake for 25 minutes. Don’t be tempted to open the door while they’re cooking, but after 20 minutes do look through the door to check them.
The cakes are done when they’re golden-brown and coming away from the edge of the tins. Press them gently to check – they should be springy to the touch. Remove them from the oven and set aside to cool in their tins for five minutes. Then run a palette or rounded butter knife around the inside edge of the tin and carefully turn the cakes out onto a cooling rack.
To take your cakes out of the tins without leaving a wire rack mark on the top, put the clean tea towel over the tin, put your hand onto the tea towel and turn the tin upside-down. The cake should come out onto your hand and the tea towel – then you can turn it from your hand onto the wire rack.
Set aside to cool completely.
Whip the double cream until thick and stiff. At this point I fold some thick, strained Greek yogurt into the cream; it takes away a little of the richness and makes for a lighter cake. I usually use two-parts cream and one-part yogurt but you can decide on what proportions you prefer.
To assemble the cake, place one cake upside down onto a plate and spread with about half of the cream mixture. Then arrange the halved strawberries on top – you want to cover the entire surface. Place the next layer of sponge on top – add a little more of the cream if the top layer won’t stick to the bottom one.
Spread the rest of the cream mixture on top and crown with the whole strawberries to cover. Arrange them so that they look pretty.
I’m feeling strangely patriotic. I’m actually thinking of putting up some Union Jack bunting around the house. Now anyone who knows me will understand how out of character this would be. But I have to admit – I’m being swept along with this Jubilee fever. Or perhaps the sun this week has simply gone to my head?
Everywhere you go, the red, white and blue theme is all pervasive. Every shop window, every catalogue, every advertisement – it all makes you proud to be British, in a kind of embarrassed, rather British sort of way, when we’re not sure we should but we want to go along with it anyway.
I’m not sure how much my children understand what it’s all about. It’s something to do with the Queen. It’s not her birthday but it’s something similar. Whatever the reason, it’s a good excuse for a party and what kid is going to knock that?
Jessie’s bunting for her school Jubilee party
Most food blogs I’ve visited recently are getting into the full Jubilee spirit, sharing amazing and clever culinary creations for impressing the neighbours at the street party. So I began to think maybe I should be doing something too. In fact, it’s been the last thing I’ve been thinking about as I drop off to sleep for the last few nights now.
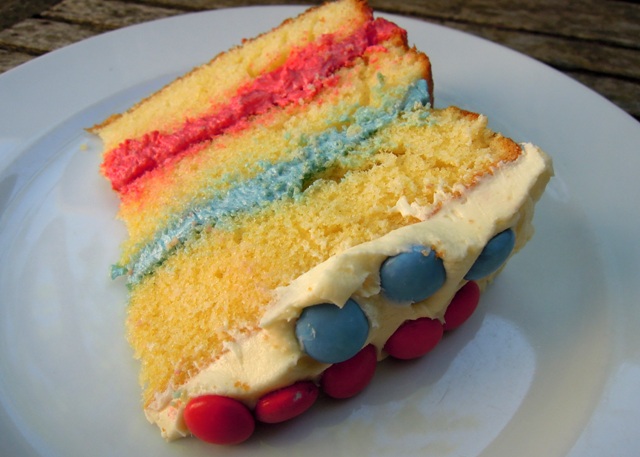
As you know, I’m not a particularly talented baker, so I’ve come up with a easy party cake to suit my limited baking skills, which still delivers the ‘wow’ factor for a juvenile audience. It’s not sophisticated, it’s not refined. It’s quite simply a big, white cake with red and blue running right through it. And it’s sweet and gooey and moreish with a tonne of Smarties on the top.
My daughter Jessie walked into the kitchen just as I finished decorating it, and her reaction was “Wow!” which was exactly the response I was after. From a child anyway. My husband on the other hand was rather less complimentary about my efforts. But I hadn’t made it for him so I didn’t care. Much.
It’s three tiers of simple Victoria sponge (based on Nigella Lawson’s recipe), smothered in red, white and blue buttercream, and embossed with red and blue Smarties in a crude Union Jack design. Great for Jubilee parties, especially the kind involving lots of young children.
Queen’s Jubilee Party Cake
For the Victoria sponge
330g soft butter
330g caster sugar
juice of half a lemon
6 eggs
300g self-raising flour
40g corn flour
1½ tsp baking powder
6 tbsp milk
For the buttercream icing
280g soft butter
560g icing sugar
3-4 tbsp milk
red and blue food colouring
Plus
Lots of red and blue Smarties to decorate (I needed three ‘share’ bags to get enough reds and blues)
Preheat the oven to 180ºC/gas mark 4.
This couldn’t be easier. Put all the Victoria sponge ingredients except for the milk into a food processor and whiz until you have a smooth mixture. Then add the milk a spoonful at a time, whizzing to combine each time, until you have a good dropping consistency.
Grab your three 20cm sandwich tins. If they’re not non-stick, grease and line them, but if they are, job done. Pour in the cake batter across the three tins equally. Bake in the oven for 20-25 minutes until the cakes are golden and springy to the touch, and a skewer inserted into the middle comes out clean.
Leave to cool on a wire rack for 10 minutes, then remove the cakes from the tins and leave on the rack to cool completely.
To make the buttercream icing: beat the butter until soft in a large bowl. Add 70g of icing sugar and beat until smooth. Add another 70g and beat again. And again add the remaining 140g of icing sugar and beat well until smooth.
Finally add the milk and beat again to loosen the mixture. Put half the mixture into a separate bowl and set aside.
Split the remaining buttercream into two more bowls. Add red food colouring a few drops at a time to one lot until you get a colour you’re happy with the tone. Repeat with the other bowl with the blue food colouring.
If you’re cakes are well-risen and peaked, you’ll need to use a sharp knife to shave them a little until they’re nice and flat. Enjoy the sponge shavings as a chef’s perk, as Nigella would say.
Put your first cake layer on a large plate, and carefully smother with the red icing almost to the edge but not quite. Place the next sponge layer on top and repeat again with the blue icing. Then add the next layer of cake and smother with a generous topping of the plain coloured buttercream icing.
Decorate the top of your cake with your red and blue Smarties. I attempted a Union Jack style motif but go with whatever takes your fancy – concentric circles, spirals, stripes, random patterns – go crazy!
And just in case you’re reading this, a very happy Diamond Jubilee your majesty!
We’ve got another cake sale coming up soon at my daughter’s primary school. These are definitely one of the PTA’s most successful ways to raise funds. You should see the number of homemade cakes the parents bring in. It’s very impressive.
I have a couple of standards I usually bake, which I know always get snapped up. The first is the banana chocolate cupcake, which I’ve featured here before. And the other is the scrumptious apple crumble muffin, the recipe for which I’ve taken from Linda Collister’s excellent book ‘Baking with Kids’.
I like to think of both these cakes as being vaguely healthy since they contain fruit. Obviously they also contain lots of butter and sugar too, so I don’t think you can really claim they’re a substitute for one of your child’s five-a-day!
The apple crumble muffin is a big hit in our house. The perfect combination of cake and pudding.
And as they contain apple, I’m entering this muffin into February’s In Season Challenge over at Make It Bake It, where the theme this month is any recipe containing apples.
To make the topping, cut the butter into small pieces and put in a mixing bowl with the other ingredients. Work them together until it looks like crumble mixture.
For the cake mixture, sieve the flour and baking powder into a mixing bowl and mix in the sugar. Stir in the zest from the lemon and make a well. Pour the melted butter, beaten eggs and milk into the well, and mix gently.
Spoon the mixture into paper muffin cases in a 12-hole muffin tray. Core and roughly chop the apples and scatter on top of the muffin mixture, then sprinkle over the topping.
Bake for 30 minutes until golden brown. Enjoy with a cup of tea or a glass of milk!
I promised myself some time off over the Christmas break from blogging and tweeting and the like, but my six-year-old has persuaded me to come online to show you their drawing of the Christmas cake I made this year.
This was my first-ever attempt at a Christmas cake. I baked it back in November and then dutifully ‘fed’ it whisky every week before icing it a few days before Christmas. We’ve all been very impressed with the result, even if the icing looks a little on the haphazard side! Despite all that whisky, it’s still very light, more like a stollen than the rich fruit cake you might be expecting.