The Valentine scribble cake

Valentine Scribble Cake Collage

When I want to give my children a treat, I bake them a big chocolate cake.

When I want to show my children how much I love them, I’ll leave them in charge of decorating said chocolate cake.

valentine scribble cake

Et voila! Here you have our Scribble Valentine Cake! Mia came up with the name.

My daughters don’t think Valentine’s Day should be just for their mummy and daddy. Surely it’s a celebration for the whole family; we all love each other, don’t we? Especially when it usually means there are gifts of chocolates involved.

So this year in the run up to V Day, we decided to make a rather large family chocolate cake.

Yes, I know the end result is garish and gaudy but Mia had a blast being given (almost) free rein to decorate it, and all of us were more than happy to eat it.

scribble cake

It is a simple chocolate sponge sandwich, filled with strawberry jam and whipped cream. We then covered it with a white chocolate icing, which was supposed to be coloured a tasteful shade of pink but ended up a very vibrant red. I’d like to blame the children, but to be honest it was my hand that slipped as the food colouring went in.

Mia then went to town creating her own Jackson Pollock style artwork, dribbling first melted plain and then white chocolate on top of the cake, and of course all over herself and the floor at the same time. For the final piece de resistance, Mia added some lovely Thornton’s Valentine’s chocolate truffle cups to spell out I heart you on top. We also had a bag of Thornton’s strawberry jelly hearts but Mia decided against using those as well at it might be slightly OTT. You see, she can be quite a discerning child really. Jess and Mia gobbled up the jelly hearts once they finished licking the bowl out, natch.

valentine scribble cake

If you’d like to attempt creating your own chocolate action art masterpiece with your little ones, here’s how we made ours. It’s a slight variation on the tried and tested chocolate cake I make for most special occasions in our house.

Valentine scribble cake

3 tbsp cocoa powder
200g caster sugar
200g soft butter
3 eggs
200g self-raising flour, sifted
1 tsp baking powder
4 tbsp strawberry jam
200ml double cream

For the icing

100g butter
100g white chocolate, plus another 25g for drizzling
100g icing sugar
2 tbsp double cream
red food colouring
25g plain chocolate
plus any other decorations you care to throw on top

Preheat the oven to 180°C/gas mark 4. Grease and line the base of two 20cm cake tins with baking parchment.

In a cup mix the cocoa with 4 tablespoons of boiling water until smooth.

In a large bowl, beat the sugar and butter until light and fluffy. Take some time with this; keep beating for a good five minutes. Add the cocoa mixture, eggs, flour and baking powder and mix well.

Split the mixture between the two cake tins and bake for 20 to 25 minutes in the oven. The cakes are ready when an inserted skewer comes out clean. Allow to cool before removing the cakes from the tins.

To make the icing, place the butter, white chocolate, icing sugar and double cream into a bowl and place over gently simmering water in a pan. Stir until it’s all melted and blended together. Add a few drops of red food colouring – just one or two if you want a pretty shade of pink, or a good glug if you fancy a slightly more vivid hue like ours. If the white chocolate goes a little lumpy or grainy, as it can do sometimes (white chocolate isn’t particularly easy to work with when it’s melted), you can try stirring in a touch more double cream and/or passing the icing through a sieve into another bowl. Allow the icing to cool a little.

Whip the double cream until it forms soft peaks.

Remove the baking parchment from both cakes. Place one a wire rack, over kitchen towel or newspaper to catch the icing drips later. Firstly spread the cake with jam and then with whipped cream. Place the second sponge on top and press down.

Pour the red icing over the top and allow to set slightly. In separate bowls, melt the white chocolate and plain chocolate and then, using a teaspoon, drizzle over the cake in an ‘artistic’ manner. Finally, decorate with any other sweeties or chocolates you fancy.

valentine scribble cake

As this cake is definitely one to make for and with those you love, particularly those of the younger/smaller variety, I am entering it into February’s Family Foodies challenge hosted by Eat Your Veg and myself, and where the theme this month is LOVE.

family-foodies-valentine

Disclosure: Thorntons provided me with complimentary chocolate truffle cups and strawberry jelly hearts for review purposes.

Amaretto Christmas cake for Stir Up Sunday


Tomorrow is Stir Up Sunday and this is the Christmas cake recipe I will be baking. I made it last year and, even though I’m not generally the biggest fan of rich fruit cakes, I thought it was absolutely delicious and so it has to be made again.

It’s essentially Guardian columnist Felicity Cloake’s recipe from her How to cook the perfect… series, but instead of using whisky I flavour my cake with amaretto, that deliciously perfumed, sweet-tasting almond-flavoured liqueur. It’s the drink I most associate with Christmas. My husband and I buy a bottle for the festive season every year, and we just about make it last until twelfth night.

Stir up Sunday traditionally falls on the last Sunday before Advent, which this year is 24 November. The name is thought to come from a prayer in the Book of Common Prayer, which is always read in church this Sunday:

Stir up, we beseech thee, O Lord, the wills of thy faithful people; that they, plenteously bringing forth the fruit of good works, may of thee be plenteously rewarded; through Jesus Christ our Lord. Amen.

Since the prayer readies Christians for the start of Advent, this day has also become synonymous with the start of other Christmas preparations, including the mixing of the Christmas pudding. With just over four weeks to go until the big day, it’s also the perfect time to bake the Christmas cake, giving sufficient time for ‘feeding’ with your alcohol of choice – be it rum, brandy, whisky or, in my case, amaretto.

Last year I let the children help me decorate the top of the cake with figures made from coloured icing sugar. We ended up with a penguin and a snowman but I have absolutely no recollection as to what the third character was meant to be! I didn’t have the heart to leave it off the cake as my youngest was just so proud of it.

decorations Collage

Amaretto Christmas cake

250g currants
250g sultanas
100g dried figs, chopped
100g glacé cherries, halved
100g mixed peel
125ml amaretto, plus extra to feed
125g soft butter
125g demerara sugar
4 eggs, beaten
130g plain flour
½ tsp baking powder
1 tsp mixed spice
pinch of salt
50g ground almonds
grated zest of 1 lemon
50g blanched almonds, roughly chopped
25g crystallised ginger, chopped

Start by soaking the fruit in the alcohol. Place the dried fruit and mixed peel in a bowl, cover with the amaretto, and leave to soak overnight.

Preheat the oven to 140C / gas mark 1. Grease and line a 20cm cake tin with baking parchment.

In a large mixing bowl, cream the butter and sugar together until pale and fluffy. Gradually add the eggs, beating well after each addition.

Sift the flour and baking powder into another bowl and then stir in the mixed spice, ground almonds and salt. Fold this into the butter and sugar mixture. Give the soaked fruits a good stir and add these, along with any remaining amaretto, the lemon zest, chopped almonds and ginger. Stir well.

Pour the mixture into the tin and smooth the surface. I appreciated Felicity’s tip of scooping out a small hollow in the middle of the mixture to prevent it doming during baking.

Bake for about an hour, before covering with foil and baking for another half an hour or so. The cake is ready when a skewer inserted into the middle comes out clean. Leave to cool in the tin.

With a skewer, poke some holes deep into the cake, and generously brush the surface with more amaretto. Remove the cake from the tin and with the baking parchment still in place, wrap in greaseproof paper and store in an airtight tin.

Feed again with amaretto every week  until it’s time to ice the cake just before Christmas. I cheat at this stage and use a layer of shop-bought marzipan, followed by a layer of shop-bought royal icing. But if you’d like to make your own icing, I can recommend Delia Smith’s recipe. Sorry – I’ve never made my own marzipan, so wouldn’t know where to point you for that!

amaretto christmas cake

This cake has become one of our family Christmas traditions. What are yours?

Tea-Time-Treats-Logo-new-2013-300x300

I’m entering this cake into Tea Time Treats, hosted by Karen at Lavender & Lovage and Kate at What Kate Baked as it contains heaps of dried fruit which just happens to be this month’s theme.

Cooking with apples

Apple Collage

Katie’s Sausage & Apple Toad in the Hole, Michelle’s Apple Cake and my Nana’s Eve’s Pudding

Our apple season here has been and gone, but for a good couple of months there was quite a frenzy of apple cooking and apple eating in the Bangers & Mash household.

We have a lovely Discovery apple tree in our garden, which gives us a good crop of pretty red apples fairly early in the season. We can normally start picking them from around mid August. Well, most years. Last year we only had six apples from the tree but it was a terrible year for apple growers all over the UK. This year we had a splendid harvest.

apples

Discovery is a wonderfully sweet and crisp apple. The skin is so red it leeches into the white flesh turning it pink. And when you juice them, the apple juice is the most gorgeous shade of pinky-red.

The only problem is Discovery apples don’t store well, so I do find that late summer and early autumn become our apple-obsessed months, with practically every meal or snack featuring apple in some form or another. We’ve been baking, chutneying, pureeing, drying, juicing, freezing and crumbling! But as soon as they’re gone, I miss them terribly.

So when an invitation came from Waitrose to try some of their English apples, it couldn’t have come at a our better time.

Waitrose runs a Grow & Sell campaign with schools, encouraging seven to eleven year olds across the UK to grow their own produce and sell it to Waitrose customers. They are now taking this a step further and encouraging families to grow their own apples at home. So along with my apples I was also delighted to receive a Scrumptious apple tree to plant out in the garden alongside our Discovery tree, which will extend our apple season next year considerably.

Scrumptious is perfect for smaller gardens as you don’t actually need another tree nearby as a pollinating partner to produce a bumper crop of apples. The sweet eating apples are ready to pick in September and the tree is also happy in a large pot so long as it is kept well fed and watered.

With my bumper bag of Coxes apples from Waitrose I decided to try out some recipes from their website, where I found some rather tempting dishes from top food bloggers.

toad in the hole

This Sausage and Apple Toad in the Hole from Katie at Feeding Boys caught my eye straightaway. You probably won’t be surprised to hear that toad in the hole is a bit of a favourite in our house. I’ve never thought to include apple before and it was a big hit with all my family. We made ours with Waitrose pork and herb chipolatas and it’s certainly a dish I’ll be making again.

apple cake

I also baked this yummy Apple Cake from Michelle at Utterly Scrummy. It’s a delicious cake to serve slightly warm with yoghurt or ice cream, or I think it would work equally well as a pudding with lashings of homemade custard. My daughters also appreciated it cold as an after-school snack.

eve's pudding

Eve’s Pudding is always very popular with my clan and so I used the rest of the apples to rustle one up. It’s a recipe my Nana Barbara gave me and it’s a proper, old-fashioned, comforting sort of a pud – what I call a ‘hug in a bowl’ – with sweet, juicy pieces of cooked apple enveloped in a soft, fluffy sponge. Just the kind of pudding I crave when the weather turns nippy. What’s even better is it’s so easy to make.

My Nana’s Eve’s Pudding

450g eating apples, peeled and cored
60g demerara sugar
grated rind of 1 lemon
1 tbsp water
85g butter
85g caster sugar
1 egg, beaten
115g self-raising flour

Preheat the oven to 170°C / gas mark 4.

Slice the apples thinly into a greased ovenproof dish. Sprinkle over the demerara sugar, grated lemon rind and water.

In a large bowl, cream the butter and sugar together until pale and fluffy. Add the egg a little at a time, beating well after each addition.

Fold in the flour with a metal spoon and carefully spread the mixture over the apples.

Bake for 40-45 minutes until the apples are tender and the sponge mixture cooked. If you’re using an Aga, bake in the bottom of the roasting oven with the cold plate in the middle of the oven for 15 minutes, and then move to the bottom oven for 25-30 minutes.

Serve warm with cream or ice cream.

What are your favourite recipes to cook with apples?

Disclosure: Waitrose provided me with a complimentary apple tree and £10 shopping voucher for this post. All opinions are totally my own.

A vintage tea party, a royal wedding and a coffee, cardamom and walnut cake

vintage tea party

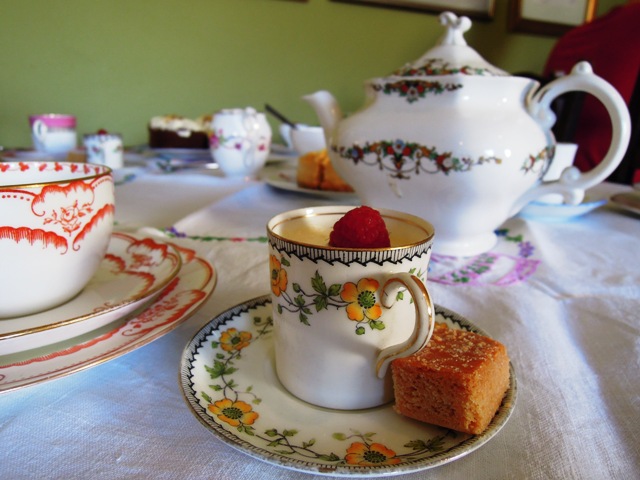
Is there anything nicer than tea and cake? In my book, it’s difficult to find a more pleasant way to while away an afternoon, especially when the tea is served in beautiful vintage china and the assortment of cakes on offer rivals the finest French patisserie.

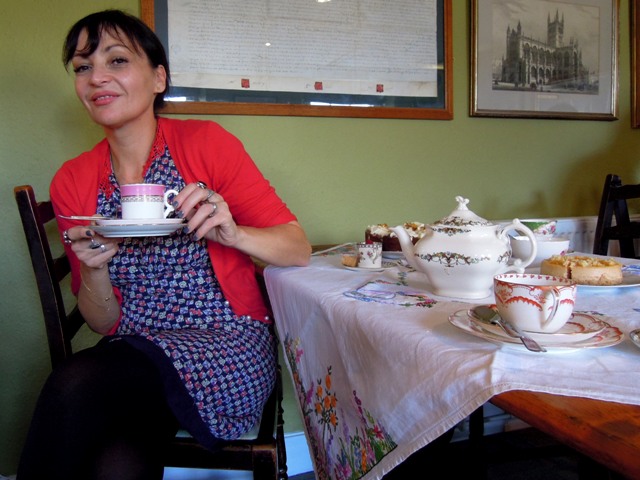
As you can probably tell, one of my personal highlights of the Wells Food Festival earlier this month was the wonderful vintage tea party at the Fountain Inn. I adore vintage but it can be a tricky look to get right and there’s a fine line between vintage chic and bring-and-buy shabby. So this was the perfect opportunity to get a few tips from the experts.

All the charming china at the tea party was on loan from Sara Kirkby, who runs a vintage crockery hire business called Elsie Florence based in Wincanton, Somerset.

vintage tea party

With a degree in fashion and textiles, Sara attributes her appreciation of all things vintage to her grandmother. “As a child, I would use my bedroom wall as a fashion mood board,” Sara tells me. “My granny was my soul mate and my love of vintage and the start of my huge china collection comes from her.”

After college, Sara worked as a surface print designer and then a design consultant in fashion and interiors, working in both London and Hong Kong. Following the birth of their son and daughter, Sara and husband Steve bought an old town house (one could say vintage) in Somerset, which was in need of lots of work.

“With an original double shop front it was then that I started Elsie Florence, named after my granny,” Sara explains. (There’s a fantastic photo, by the way, of her grandmother on a motorbike on Sara’s website.) “I use the windows for styling vintage china displays and have a store room one side and a show room on the other.”

What is it about vintage that makes it so popular, I wonder?

“For me there is something magical about vintage,” says Sara. “It stirs emotions and always captures one’s eye. It makes people reminisce. Latterly vintage has become so popular because of fashion trends. Wedding budgets are different for everyone and the trend now seems to be smaller weddings but the detail is the key which the vintage theme provides. Vintage afternoon tea suits this trend and always impresses guests and appeals to all generations. Quite often each guest will have a tea cup and saucer as a place name or a favour to take home. What is there not to love?”

And Sara’s advice for anyone trying to create their own vintage look?

“With vintage styling I think you must have an eye. You can get it so wrong and it can end up like a jumble sale. Less is more in some cases and mixing vintage pattern with plain white can allow the eye to appreciate the delicate patterns. I have spent years sourcing vintage china and I will only buy a piece I adore. This is now a collection of over 600 teacups!”

The Wells tea party was hosted by former model and fashion designer, turned vintage guru, Pearl Lowe. Like Sara, Pearl has been in love with vintage from an early age. “I’ve always loved pretty things,” she tells me. “I don’t like the minimalist look. For me things have to be beautiful and decorative. That’s why my house is absolutely brimful of beautiful things. My husband tells me ‘That’s enough!’ but I can’t stop!”

pearl lowe

“History was always my favourite subject at school,” Pearl continues, “and I’ve adored old houses and old clothes since I can remember. My grandfather sold antiques and my mother did up old houses, so perhaps it is in my DNA.”

Pearl is currently setting up her house for a vintage Christmas-themed photo shoot for the Sunday Telegraph’s Style magazine. “It’s incredible how quickly you can transform a room with just a few simple additions.

“You can pick up boxes of beautiful old crockery for next to nothing at auction rooms,” Pearl advises. “The auction rooms in Frome is fantastic. And then with a pretty vintage lace tablecloth, some scented candles, a few jam jar posies of garden flowers and fairy lights strewn around the place – you’ll find you’ve created a gorgeous vintage look in next to no time.”

Coffee Walnut & Cardamom Cake Collage

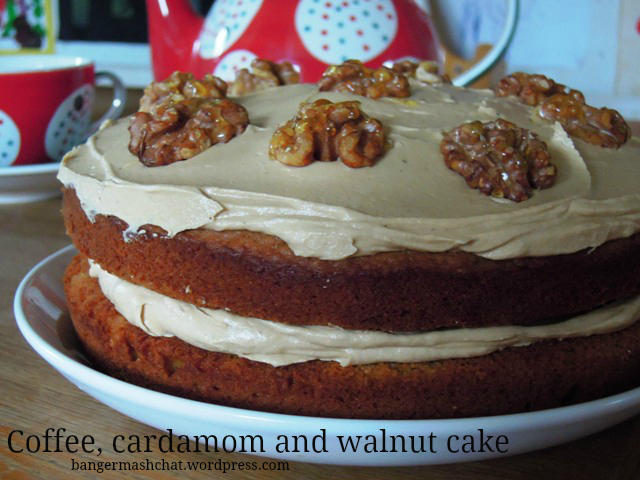
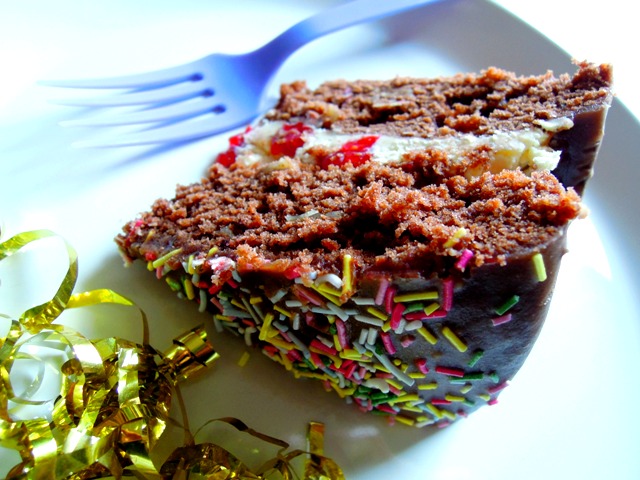
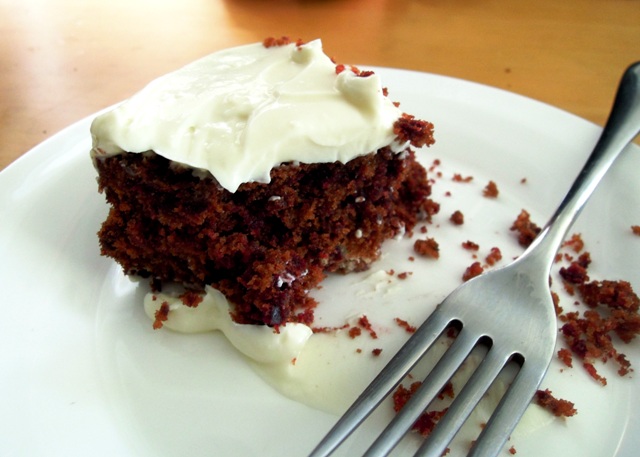
If you do plan to throw a vintage tea party yourself, I think I might have the perfect cake for you to serve your guests. It’s the coffee, cardamom and walnut cake I baked for the cake competition at the Wells Food Festival. The recipe is from professional cake baker Fiona Cairns and all the entrants in the Taste category were tasked with baking this same recipe. Sadly, I didn’t win – it was the first baking contest I’d ever entered, so I honestly wasn’t expecting to – but nonetheless it’s a simply delicious teatime cake; the cardamom raises the classic coffee and walnut combination to a whole other level.

The winner of the Taste category was Helen Roberts and even without tasting it, you could easily see hers was a cut above the rest.

cake competition

When I asked her for the secret of her success was, she reckoned it was down to the caramelising of the walnuts. You’ve got to let the caramel turn really dark golden brown apparently and Helen says she used a sugar thermometer to make sure she got hers to precisely the right temperature before drizzling onto the walnuts. Now I know for next time.

And according to Fiona Cairns, originator of the recipe and judge of the cake competition, it was also down to the balance of flavours. I must admit I didn’t taste my cake batter at all while I was baking, placing my trust entirely in the quantities specified in the recipe. In hindsight, perhaps I should have added a little more coffee and a little less cardamom. But do you know what? Fiona also said all the entries were delicious, and considering I’m not really that experienced a baker, that’s good enough for me! So if you do fancy trying out the recipe for yourself, you’ll find it at the end of this post.

As well as judging the cake competition, Fiona Cairns was also the guest speaker at the vintage tea party, sharing her experiences as creator of the royal wedding cake for the Duke and Duchess of Cambridge.

fiona cairns

It was fascinating to hear Fiona’s story. Trained as an illustrator, Fiona then went on to train as a pastry chef in a Michelin-starred restaurant for three years. She started her cake making business from her kitchen table 25 years ago. “Baking wasn’t trendy back then,” Fiona recalls. “There weren’t cupcakes everywhere, and no-one had heard of the Great British Bake Off. How things have changed!”

Fiona set up the business with her husband. “He was the one who spotted the business potential for my cake making,” explains Fiona. “I couldn’t have done it on my own. I’m just not a business-minded person; creative types quite often aren’t.”

Today there are more than a 100 people working in Fiona Cairns’ bakery and from the very early days, she has been supplying high-end stores such as Harrods, Fortnum & Mason and The Conran Shop. “I always aim for the top,” Fiona smiles.

Despite making plenty of cake for celebrities over the years, Fiona isn’t really known for making wedding cake. She says this is precisely the reason she was chosen to make the royal wedding cake for the Duke and Duchess of Cambridge.

“We received plenty of calls asking if we were in the running, but we really had no idea we might be,” says Fiona. “It was such a surprise to get the call in February (bearing in mind the wedding was in April) from Clarence House to inform us we were being considered. And at this point we were invited for tea with Kate. I was so nervous going into Clarence House, I actually managed to walk right past Prince William without even noticing him!”

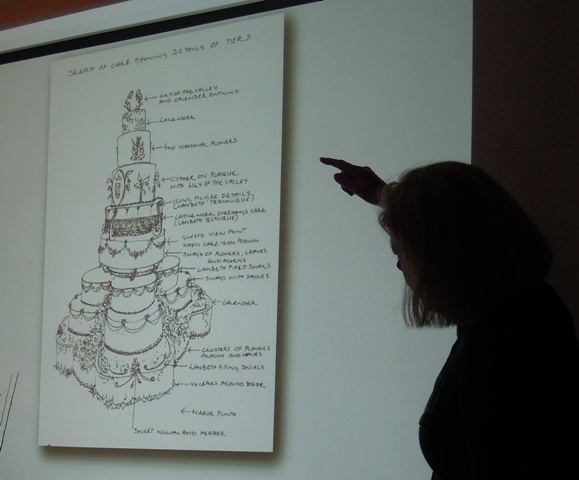
Fiona says that Kate was very clear on her wishes for her cake; she wanted the whole wedding to tell a story. The language of flowers was to feature throughout the cake decoration, and the Duchess chose 17 flowers to be included, such as the four national flowers (the English rose, the Welsh daffodil, Scottish thistle and Irish shamrock). Lily of the valley symbolising sweetness and humility was also to feature on the cake, and echoed in Kate’s bouquet and in Westminster Abbey. There would also be acorns, taken from the Middleton crest.

“I was told the cake was to be simple but elegant,” says Fiona. “And the Duchess was very clear that there was to be no glitter!” Fiona was also given a piece of lace to take away with her to see if she could transpose designs from it onto the cake. It was only later she learned this was actually a piece of lace from Kate’ wedding dress.

wells food festival

Four days later, Fiona received the official call to say she had been selected to make the royal wedding cake, and from that point her life was pretty much turned upside down. “There were lots of visits to London and we had to make up so many excuses, as we weren’t allowed to tell anyone what we doing. Everything to do with the wedding was top secret!” Fiona and her team had to work on the cake in a secret room for seven weeks.

Word got out to the media about a month before the big day that Fiona was creating the royal wedding cake and so Clarence House had to make an official announcement. “The world’s media absolutely swarmed on us,” remembers Fiona. “Of course there was lots of interest from the British press, but I think we got most attention from the US and Brazil. It was crazy and we had to take on a PR agency to field all the calls.”

wells food festival

Building the cake the day before in the Picture Gallery was one of the most stressful days of Fiona’s life. “This was the first time the actual cake had been put together and we had spare bits of everything with us, just in case. When the photographer climbed up a ladder to take the official photograph of the cake, I was so scared he was going to topple over and fall right into it! Once the cake was complete, it was just so difficult having to walk away from it.”

It wasn’t until the royal pastry chef Kathryn Boyden sent word to Fiona that the Duke and Duchess had seen the cake and told her it was “beyond all their expectations” that she could finally relax and enjoy the wedding with her husband.

Fiona’s life and business has been transformed since then. She’s gone on to publish books and host TV cookery programmes, created a Jubilee celebration cake for Harrods’ window, make the cupcakes for Heston Blumenthal’s Jubilee picnic, and this year her company will be baking more than 24,000 Christmas cakes!

It was a real delight to meet Fiona at the Wells Food Festival, and equally lovely to sit with her mother during the vintage tea party, who is clearly so proud of what her daughter has achieved. And I’m very grateful to Fiona for providing me with her top baking tips, which have transformed my approach to baking!

If you’d like to try Fiona’s coffee, cardamom and walnut cake recipe, here it is…

coffee cardamom and walnut cake

Coffee, cardamom and walnut cake

For the cake

175g unsalted butter, really soft, in pieces, plus more for the tins
50g walnuts, roughly chopped
15 cardamom pods
175g caster sugar
1 tbsp instant coffee, dissolved in 1 tbsp boiling water, cooled
3 large eggs, lightly beaten
50g ground almonds
125g self-raising flour, sifted

For the caramelised walnuts

50g walnut halves
100g caster sugar

For the buttercream

5 cardamom pods
150g unsalted butter, softened, in pieces
250g icing sugar, sifted
1 tsp vanilla extract
2 tsp Camp coffee essence (or 1 tbsp instant coffee, dissolved in 1 tbsp of boiling water and cooled)
1 tsp double cream

Preheat oven to 180°C/gas mark 4. Butter two 20cm round sandwich tins and line the bases with baking parchment.

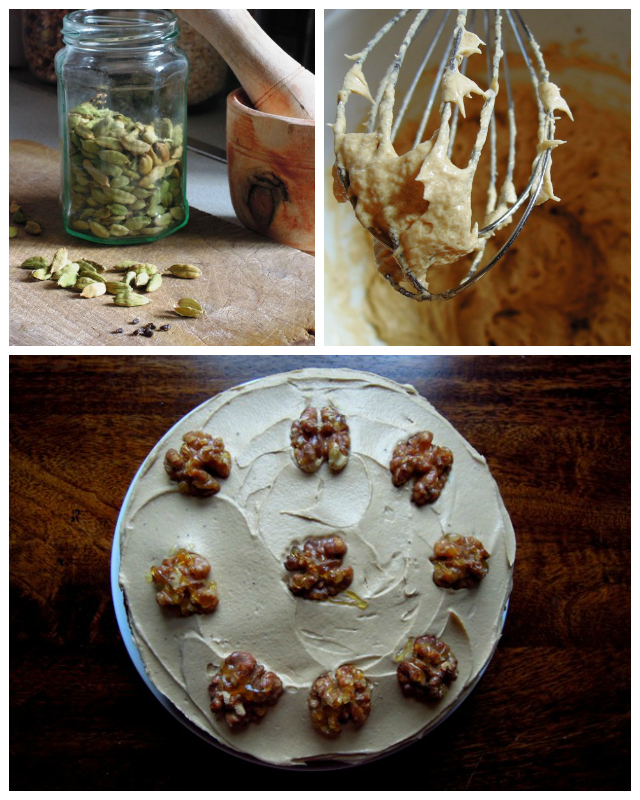
Keeping them separate, place the nuts both for the cake and the caramelised nuts on baking tray and roast for six minutes. Watch carefully, as they can turn from beautifully toasted to bitter and singed quite rapidly. Set aside to cool.

Lay the walnut halves you have toasted and cooled for the caramelised walnuts on a baking tray lined with baking parchment.

Have a sink or washing up bowl of cold water to hand. You are about to make a caramel, so take great care: hot caramel can be dangerous.

Put the sugar and 100ml of cold water in a saucepan and dissolve the sugar over a gentle heat, stirring with a metal spoon. Once it has all dissolved, increase the heat to a boil, stop stirring and occasionally brush down the sides of the pan with a pastry brush dipped in cold water to prevent crystals forming. Boil until the mixture turns a beautiful caramel gold and has thickened. Immediately plunge the base of the pan into the cold water to stop the cooking. Then using a teaspoon, drizzle the caramel over the walnuts on the tray. (You’ll need to be speedy here; I found the caramel thickened very quickly.) Leave to set.

De-seed all 20 cardamom pods for the cake and buttercream. Grind the seeds to a powder in a mortar and pestle and sift to remove husks. Keep one-quarter aside for the buttercream.

In a food mixer (or a bowl with a hand-held electric whisk), cream together the butter, sugar and coffee until very light and fluffy. Take a good five minutes, which is longer than you might expect.

Gradually add the eggs, then the almonds and cardamom for the cake. Gently fold in the flour and chopped nuts; don’t over-mix, but fold until they are just combined.

Divide the batter between the tins, smooth the surfaces and bake in the pre-heated oven for 20-25 minutes, or until a skewer comes out clean.

Leave the cakes in their tins for a couple of minutes, then turn out onto a wire rack and remove the baking parchment. Leave to cool.

To make the buttercream, in a food mixer (or in a bowl with a hand-held electric whisk), beat the butter and icing sugar for a good five minutes – again this is longer than you might expect, but it leads to a far fluffier, buttercream.

Add the vanilla, cardamom, coffee and cream and beat until smooth. Spread over both cake, then place one on top of the other. You can spread the buttercream over the sides of the cake too, if you like. Decorate with the caramelised walnuts and shards of the caramel.

Recipe from SEASONAL BAKING by Fiona Cairns, published by Weidenfeld & Nicolson

Wells Food Festival and how to bake the perfect Victoria sponge

Victoria Sandwich

I was all prepared to title this blog post How not to bake a cake. Then something bizarre happened. I actually followed a recipe. Properly. To the letter. I organised all the ingredients in advance, took the butter and the eggs out of the fridge the night before, sifted the flour from a height, didn’t over-mix the batter. And guess what? My Victoria sponge was the lightest, fluffiest, most perfect cake I’ve ever eaten. Or at least, baked myself.

This amazing recipe comes from cake-maker extraordinaire Fiona Cairns, possibly best known as the creator of the royal wedding cake for the Duke and Duchess of Cambridge. So she knows what she’s doing. Fiona will be coming to Somerset to judge the cake baking competition at the Wells Food Festival on Sunday 20 October. I’m featuring a series of posts on the blog in the run up to the food festival and to help promote the cake competition, I thought it would be a nice idea to share some of Fiona’s cake baking tips.

Why I was surprised that by actually following these tips myself I could turn out a decent cake I’m not really sure, but I was. I think over the years I’d convinced myself that baking just doesn’t come naturally to me. I bake like I cook, you see. I take a recipe and play around with it, or cut corners. Now that’s fine if you’re cooking a casserole or a curry, but not a sponge cake, loaf of bread or batch of biscuits. Sometimes I get lucky but, more often than not, they’re a disaster. So my number one tip for baking the perfect cake has to be, first and foremost, stick to the recipe.

Victoria Sandwich

Now over to Fiona for her baking tips.*

Always read the recipe

Always read right to the end and only then assemble all the ingredients and equipment you need. This makes life easier, less stressful and more enjoyable.

Temperature of mixing bowls and ingredients

A warm kitchen, equipment and ingredients make a great cake. So, when baking a cake, stand your mixing bowl and beater or whisk in a bowl of warm water, then dry thoroughly before you start. Conversely, cooler ingredients and temperatures result in perfect biscuits. Hence, marble and cold hands are good for biscuit making. Is this why Scottish shortbreads are famous? Try to think ahead and remove eggs and butter from the refrigerator the night before. But, if the urge to bake suddenly strikes, stand the eggs in a bowl of warm water, and blitz the butter in the microwave.

Scales and measurements

Baking is an exact science. I’m afraid you can’t sling in an extra spoonful of this or that for good measure; you must weigh everything out precisely. A good set of digital scales is invaluable.

Tins

There is a huge variety on the market; buy the best you can. Really good-quality tins will last many years, conduct heat well and won’t warp. Non-stick, loose-bottomed or springform tins make baking so much easier. Try to use the size of tin specified. If you don’t have the correct size, err on the side of a slightly larger tin (the cake will be shallower) and reduce the baking time by 5-10 minutes.

Light as air

When sifting flour, lift the sieve up high; this allows air to coat the particles of flour as they float down.

Don’t hang around…

Once a cake’s in the tin, put it in the oven immediately as, when moist, the raising agents start to work. (A dense fruit cake batter isn’t so sensitive.)

…but be patient!

Don’t be tempted to open the oven door to peep at your cake too often. Leave this until the final 5-10 minutes. If you keep opening the door at the start, you will affect the rise and texture of the cake.

When is it ready?

Insert a thin skewer into the very centre of your cake. If it emerges clean, the cake is cooked. Long-baked fruit cakes may need extra attention: cut a piece of foil to fit the surface. Pierce a hole in the centre and open it up. This lets out steam while protecting the surface from drying out or scorching.

* Tips taken from Fiona Cairns’ Bake & Decorate.

Victoria Sponge Collage

Baking a beautiful cake and serving it up to my family filled me with a deeply wonderful feeling of joy. I can really see why people become obsessed with baking as a way of bringing pleasure to others. The next cake I bake will probably be a complete disaster and my new-born confidence will disappear without a trace, but for the time being I’m wallowing in the feeling of having turned a corner on my way to becoming a domestic goddess.

Here is Fiona Cairns’ recipe for this classic teatime cake:

Victoria sponge

Serves 8

For the cake

175g unsalted butter, softened, plus more for the tin
175g self-raising flour
1 tsp baking powder
3 eggs, lightly beaten
175g golden caster sugar
1 tsp vanilla extract

For the filling

150ml double cream
4 tbsp raspberry or strawberry jam
icing sugar, to dust

Preheat the oven to 180°C/gas mark 4.

Butter two 20cm sandwich tins, then line the bases with baking parchment.

For the batter, you can either use an electric mixer with a beater attachment or a food processor, or a bowl and an electric whisk.

Sift the flour and baking powder into the bowl, then add the butter (in knobs), the eggs, sugar and vanilla. Beat together until thoroughly blended. Take care not to over-mix so  you will have a light sponge. Pour the batter into the tins and level the tops.

Bake for 20-25 minutes, until the cake springs back to the touch or a skewer inserted into the middle comes out clean.

Remove from the oven and leave for a couple of minutes, then run a knife around the rims to loosen the cakes from the tins and turn out onto a wire rack. Peel off the paper and leave until completely cold.

Lightly whip the cream until it forms soft peaks. Fill with jam and cream and sandwich together, so the cream forms the uppermost layer. Be sure to sandwich the flat bases together. Dust the top with icing sugar.

Victoria Sandwich

Following my success with the Victoria sandwich, I might even be tempted to enter the cake-baking competition at the Wells Food Festival myself. There are two categories: best taste and best decoration. Entries in the best taste category must all follow Fiona Cairns’ recipe for coffee, cardamom and walnut cake, which sounds like my kind of cake. If you’re interested in entering, you’ll need to email info@wellsfoodfestival.co.uk for the recipe and entry instructions. More details are on the Wells Food Festival website.

Judging by Fiona Cairns will take place during the morning of Sunday 20 October and she’ll announce the winners at Pickwicks cafe in Wells at 2pm. All entrants will get the chance to meet Fiona. The winner of each category will win a pair of tickets to the vintage tea party hosted by Pearl Lowe at the Fountain Inn and Fiona’s talk  about the making of the royal wedding cake, as well as a copy of one of Fiona books.

wells-food-festival-logo

As this Victoria sponge is ideal for a spot of weekend baking, when you can take a little more time over things in the kitchen, it’s a perfect recipe to enter into this month’s Family Foodies challenge for which the theme is Weekend Slowies. Family Foodies is a new monthly food blog challenge hosted by Lou at Eat Your Veg, and she has very kindly invited yours truly to co-host with her. Do pop over there to take a look at the other Weekend Slowies and perhaps you’ll be tempted to enter a dish yourself?

family-foodies

Rhubarb cinnamon cake

rhubarb cinnamon cake

We had people over lunch on Sunday, including one friend who has diabetes. Apparently she loves puddings and is always naughty and ends up eating sugary things she shouldn’t. So I resolved to come up with a pudding suitable for diabetics. The other criteria was that it required lots of rhubarb. Ever since I mentioned at work that I’m featuring rhubarb recipes on the blog, everyone is bringing in their homegrown rhubarb for me, which is wonderful but the freezer is beginning to feel the strain.

There are lots of ideas for diabetic-friendly desserts on the Diabetes UK website. I came across an apple cinnamon cake, that I liked the sound of. It uses a sugar alternative called Splenda and wondered if it might work with rhubarb instead. My husband was not enthusiastic when I told him about the fake sugar cake, and so I decided to make two versions, one with Splenda and one with normal sugar to test whether there was any perceivable difference.

When it came to serving the cakes after our Sunday lunch (roast pork accompanied by, yes of course, a rhubarb compote), I started to wonder why I hadn’t opted for an easy, tried-and-tested pudding. But thankfully the cakes turned out well, although for some reason despite cooking them at the same time and rotating them in the oven, the two cakes were completely different colours. The Splenda cake was a lovely golden colour, while the normal sugar version was a deep brown.

And both cakes got the thumbs up. No-one could taste any significant difference between the two, including Marge, our diabetic friend, who ironically decided to have a big slice of both! It’s a very moist, squishy cake, and served warm it’s really much more of a pudding than a cake, especially when you have it with creme fraiche or ice cream as we did.

Have you baked with Splenda or some other sugar alternative? How have you found it?

rhubarb cinnamon cake with Splenda

Rhubarb Cinnamon Cake

a little oil for greasing the tin
100g plain flour
8 heaped tbsp Splenda granulated sweetener or ordinary caster sugar
1 level tsp ground cinnamon
6g baking powder
3 eggs, beaten
3 tbsp skimmed milk
2 tbsp lemon juice
75g low fat spread, melted
250g rhubarb, chopped into 3cm chunks

Preheat the oven to 200°C / Gas Mark 6. Grease a cake tin (around 23cm) with a little oil

Sift the flour into a large bowl and mix in Splenda or caster sugar, baking powder and cinnamon.

Make a well in the middle and whisk in the eggs and milk, followed by the melted low fat spread.

Gently fold in the rhubarb.

Pour the mixture into the tin and bake in the oven for 30 to 35 minutes until golden or brown (depending on what sugar you use it seems) and a skewer inserted into the middle comes out clean.

Turn out onto to cooling rack and leave to cool just a touch before serving.

recipes for life

As these cakes feature rhubarb, lemon and spice I’m entering them into this month’s Recipes for Life challenge for the charity SWALLOW, which you may recall is hosted by me!

SimpleinSeason

And as rhubarb is such the seasonal fruit of the moment, I’m also entering it into Ren Behan’s Simple and in Season blog event, where you are guaranteed to find a whole host of delicious seasonal delights.

Round Up: March’s Recipes for Life Challenge

Beetroot, carrots and cheese. Those were the three ingredients selected by the cookery club at SWALLOW for this month’s Recipes for Life challenge. And they did indeed present quite a challenge.

But I should have known I could rely on you food bloggers to deliver the goods. We received a surprisingly diverse range of recipes this month, showing just how versatile these humble ingredients can be…

Sarah from The Garden Deli got the ball rolling with this sumptuous Carrot and Beetroot Soup with Cheesy Croutons. Featuring garlic and cumin, this beautiful soup is a proper winter warmer and I love the croutons for dunking topped with one of my favourite cheeses, Wensleydale.

I experimented with some Beetroot and Carrot Pancakes for my first entry and, while they tasted pretty good – particularly with the herby mascarpone on the side – I was a bit disappointed the pancakes didn’t turn out pink like the batter!

Last month’s challenge winner, Chez Foti came up with this fantastic Roasted Roots and an Easy Roasted Roots Pizza. Louisa’s dish brings together sensational seasonal roasted root vegetables on top of a quick and easy wholemeal scone pizza base, not forgetting lots of lovely mozzarella. Yum!

Helen from The Crazy Kitchen really did go crazy with not one, not two, but three entries for Recipes for Life. Anyone who was stumped by the three set ingredients this month – look and learn! First up were these incredible Baked Cheesy Meatballs with Beetroot Sauce. Now don’t they look good? And a crafty way to sneak vegetables into unsuspecting children…

Another fiendishly clever way of disguising veggies comes in this gorgeous Two-of-your-five-a-day Chocolate Cake – the second entry from Helen at The Crazy Kitchen. “It’s sooooo good!” was the verdict of Helen’s 10-year-old, beetroot-hating daughter! Say no more!


There’s been a lot of talk on Twitter and food blogs recently about the 5:2 diet. So much so, my husband and I are both giving it a go. This Beetroot, Carrot and Cottage Cheese Salad, the final entry from The Crazy Kitchen’s Helen would definitely make a delicious lunch for a 5:2 fasting day and I plan to give it a try very soon.

I love the look of this Roasted Vegetable and Goat’s Cheese Risotto from Under The Blue Gum Tree. It sounds so simple to make but you just know it’s going to be absolutely packed full of flavour, with the gorgeous creaminess of the goat’s cheese a perfect partner for the earthiness of the root vegetables.

I wish I could bring you pictures of this Beetroot, Carrot and Goat’s Cheese Tatin from Martin at The Tempest Arms as it sounds simply divine and should look stunning. But I promise to make it very, very soon and I will post photos when I do.

Meeting the lovely Choclette from Chocolate Log Blog was one of my highlights from the Bristol Blog Summit earlier this month, which also gave me the perfect opportunity to persuade her to enter Recipes for Life. She promised she’d try, and I was very pleased to see she was true to her word with these ingenious Beetroot, Carrot and Goat’s Cheese Muffins. As with all Choclette’s recipes, there’s some chocolate in there, as well as a little kick from a touch of cayenne pepper. I look forward to trying them out.

This is a dish we eat quite a lot in our house, so I just had to enter it – my Beetroot, Carrot and Feta Cheese Salad. It’s ever so simple and ever so tasty, and a great way to create a summery-feeling salad with winter vegetables.

The final entry came in at the very last minute but I was so glad to see it – a Carrot and Beetroot Cake with a Cream Cheese Topping from Lucy at The Bell Inn. Again I sadly don’t have photos of this one but when you read the recipe you just know it’s going to taste good and I absolutely adore beetroot and carrot in cakes. Another one to try very soon.

But of course, what you’re waiting to hear is who did the SWALLOW cookery club choose as this month’s winner? Well, Lucy at The Bell Inn came a very close second with her Carrot and Beetroot Cake but first place goes to… Helen from the Crazy Kitchen for her scrumptious Baked Cheesy Meatballs with Beetroot Sauce. The group said they particularly liked the sound of the oozy cheese in the middle of the meatballs. Me too!

So a huge congratulations to Helen for her well deserved win – a small prize will be arriving in the mail very soon. Thank you so much to everyone who entered their wonderful recipes this month, and watch this space for the next set of three ingredients for April’s Recipes for Life challenge.

Bye bye baby: a birthday party and chocolate cake for my five-year-old

My youngest turned five today. While of course I’m brimming with maternal joy and have loved sharing every moment of her anticipation in the run up and bubbling over of excitement on the day, my emotions are also tinged with a touch of sadness. It feels like my little baby is growing up too fast. When she was four I could just about get away with thinking of her as big toddler. But now she’s five, she’s a proper little girl. Bye bye baby.

We celebrated Mia’s birthday on Saturday with a party. It was a small do at the house with a handful of school friends from her reception class; quite an old-fashioned party really, without any party entertainers, bouncy castles or spectacular cake sculptures.

The highlights of our party were simple delights: playing with balloons, a messy chocolate cake covered in hundreds and thousands, fizzy flying saucers, old school games like pass-the-parcel and musical bumps, getting gluey making Easter bonnets, telling fart and poo and bottom jokes while gobbling chipolatas and party rings, and playing a new game we invented called pin-the-nose-on-the-Mia. Turning five is lots of fun!

The chocolate birthday cake is very easy to make, especially if, like me, you’re not a natural-born baker. It’s the kind of cake that actually looks better if it’s not too perfect. Fill it with whipped cream and your child’s favourite soft fruit – we went with raspberries. Pour over the icing and cover liberally with sprinkles, Buttons, Smarties or whatever your little one’s favourite happens to be – this also happens to be the perfect way to disguise any imperfections.

The end result is a celebration cake fit for a five-year-old.  It’s a tried-and-tested party cake recipe from one of Jamie Oliver’s early cookbooks, The Return of the Naked Chef. I first made it when my oldest daughter turned one, and have been baking it ever since.

Chocolate birthday cake

3 tbsp cocoa powder
200g caster sugar
200g soft butter
3 eggs
200g self-raising flour, sifted
1 tsp baking powder
2 tbsp flaked almonds
200ml double cream
1 tbsp icing sugar
2 large handfuls raspberries (or any soft fruit of your choice)

For the chocolate icing

100g butter
100g cooking chocolate
100g icing sugar
3 tbsp milk

Decorations – hundreds and thousands, Smarties, Buttons or the like

Preheat the oven to 180°C/gas mark 4. Grease and line the base of two 20cm cake tins with baking parchment.

In a cup mix the cocoa with 4 tablespoons of boiling water until smooth.

In a large bowl, beat the sugar and butter until light and fluffy. Add the cocoa mixture, eggs, flour and baking powder and mix well. Fold in the almonds.

Split the mixture between the two cake tins and bake for 20 to 25 minutes in the oven. The cakes are ready when an inserted skewer comes out clean. Allow to cool before removing the cakes from the tins.

To make the chocolate icing, place the butter, chocolate, icing sugar and milk into a bowl and place over gently simmering water in a pan. Stir until it’s all melted and blended together. Allow to cool a little.

Whip the double cream until it forms soft peaks and sweeten with icing sugar.

Remove the baking parchment from both cakes. Place one a wire rack, over kitchen towel or newspaper, and spread the whipped cream over the top, almost to the edge. Scatter the raspberries on top.

Place the second sponge on top and press down. Drizzle the chocolate icing over the top – you’ll be glad of the kitchen towel or newspaper at this point as the chocolate drips and gloops everywhere. Decorate with your chosen treats. Leave the icing to set before adding the candles and serving to your young birthday girl or boy and their party guests.

Spicy chocolate and beetroot cake

We’re getting lots of beetroot in our weekly veg box at the moment. And that is a very good thing as I have come to rather like beetroot in recent years. Whereas once I’d automatically roast them in the oven and serve alongside a roast joint, I’ve discovered just how versatile the humble beetroot can be. It’s wonderful raw in winter slaws or sweet and sour salads, partners well with a tangy goat’s cheese in a simple tart, and it’s incredible juiced with carrot and lots of ginger.

Beetroot is also fantastic in cakes and has a natural affinity with chocolate. These brownies for example always go down well with my children and are so incredibly moist and gooey. So when I saw an Abel and Cole recipe for a beetroot and chocolate cake which also used fresh ginger and ground cardamom, I knew I had to give it a go at the earliest opportunity.

At the weekend we all went to London to stay with my Dad and Step Mum, or as they’re known to the kids, Grandad Chris and Nana Sue. Since Nana Sue had treated us to her heavenly clementine polenta cake the last time they came to stay with us in Somerset, I felt it only polite to return the favour by taking some tasty homemade offering. And of course it had to be this chocolate, beetroot and ginger concoction.

After a lovely Sunday morning brunch in Highgate, followed by a walk up Parliament Hill to look out over the hazy London skyline, a couple of games of What’s the Time Mister Wolf? and some tree-climbing and green-parakeet-spotting, a cup of coffee and a slice of cake was very much required. While my Dad looked a little dubious at first, the chocolate, beetroot and ginger cake seemed to go down with all, children and adults alike – even Dad, with the whole family making lots of positive mmmmming noises as they got stuck in.

As well as using fresh ginger in the cake itself, the Abel and Cole version also adds ginger to the mascarpone topping, along with orange zest. I opted to leave these out, and I’m glad I did as I think a calmer, creamy topping acted as a perfect foil for the spicy cake.

Spicy chocolate and beetroot cake

150g cooked beetroot
150g dark chocolate
1 tbsp fresh ginger, grated
6 cardamom pods, seeds extracted and ground to a powder
125g plain flour
1½ tsp baking powder
pinch of salt
3 eggs
200g soft butter
150g caster sugar
100g mascarpone cheese
200g cream cheese
75g icing sugar

Preheat the oven to 180°C/gas mark 4.

Puree the cooked beetroot in a food processor. Pop into a bowl along with the dark chocolate, broken into pieces, and heat gently in a microwave for a minute or two until the chocolate has melted.

Combine the chocolate and beetroot well, then mix in the grated ginger and cardamom powder. Set aside to cool.

In a large bowl, mix together the flour, baking powder and salt.

Separate the eggs. Beat the yolks with the butter and caster sugar until pale and creamy. Whisk the whites until they form stiff peaks.

Gently fold the egg yolk and butter mixture into the flour. Then gently fold in the egg whites, a spoonful at a time. Finally stir in the beetroot and chocolate mixture.

Grease an 23cm cake tin with butter and dust with flour. Pour the cake mix into the tin. Bake for 40 to 50 minutes until a skewer inserted into the middle comes out clean. You want it be a little soft and gooey in the middle. Leave to cool on a wire tray before removing from the tin.

To make the topping, simply put the mascarpone and cream cheese into a large bowl and sieve in the icing sugar. Mix together well. When the cake is cool, use a palette knife to spread over the mascarpone topping. Dig in!

As this cake features both chocolate and ginger, I’m entering it into February’s We Should Cocoa, a blog challenge created by Chocolate Teapot and Chocolate Log Blog, and hosted this month by Blue Kitchen Bakes.

Banana, apricot and chocolate bread

I don’t know a single child who would turn down a slice of banana bread and my daughters are no exception. And for us parents, giving our little ones a slice of homemade banana bread when they get home from school feels just so, well, wholesome.

This is a lovely take on the standard banana bread; the addition of apricots keeps it extra moist, while the chunks of chocolate are a gooey treat. My recipe is loosely based on one I found for banana loaf in Baking with Kids by Linda Collister. It is indeed a great cake to bake with your children, who will no doubt enjoy mashing the banana, beating the eggs and licking the bowl at the end.

Banana, apricot and chocolate bread

100g butter
250g plain flour
1 tsp baking powder
pinch of salt
75g demerara sugar
75g caster sugar
2 eggs, lightly beaten
3 ripe bananas, mashed with a fork
75g plain chocolate, chopped
100g dried apricot, chopped

Preheat the oven to 180°C/gas mark 4.

Grease a 900g loaf tin with a little butter and line with greaseproof paper.

Gently melt the butter over a low heat and set to one side to cool slightly.

Sieve the flour, baking powder and salt into a mixing bowl, add the sugars and combine. Make a well in the middle.

Pour the melted butter and eggs into the well, and add the mashed banana, chocolate and apricot. Mix everything together thoroughly.

Spoon the mixture into your prepared tin and bake for 50 to 55 minutes. When it’s ready, the top should be a lovely golden brown and a skewer inserted into the centre comes out clean.

Allow the banana bread to cool completely on a wire rack before removing from the tin and peeling off the paper.

If you liked this, you might also like…

Parsnip and carrot cakes
Maple syrup and banana cupcakes
Chocolate orange cupcakes