The poor old cabbage. It’s got itself a bit of a bad name, hasn’t it? Probably all those memories of terrible school dinners, when it was boiled for hours and hours before being inflicted on us poor suffering children.
It’s completely undeserved of course. Savoy cabbage in particular is a wonderful vegetable and is at its best during the cold winter months. It is quite different from the white or green cabbage and, in my opinion, is far tastier.
The beauty of savoy cabbage is that it doesn’t need dressing up in fancy recipes to make it interesting. For an easy side dish, steam some chopped savoy for a few minutes and then serve with a knob of butter, salt and pepper.
Or how about this simple sausage and cabbage bake? It might not sound at first like a culinary delight and, no it’s not the prettiest dish, but trust me. Once you’ve tried it, you’ll make it again and again.
It’s based on a recipe by Tamasin Day-Lewis, who in turn got the recipe from Jane Grigson. They serve theirs with mashed potato but I’ve added sliced potato to my version to create a fantastic one-pot supper, perfect at the end of a hectic day of work and school.
Please buy the best quality sausages you can afford for this dish, ones with a good high meat content. Cheap sausages just aren’t worth bothering with.
Sausage and cabbage bake
Butter
1 large savoy cabbage, cored and shredded
8 potatoes, peeled and thinly sliced
8 fat pork sausages
Salt and pepper
Preheat the oven to 180°C/gas 4.
Lightly butter a large overproof dish – one that has a lid.
Bring a large panful of salted water to the boil and cook the cabbage and potatoes quickly for five minutes until just tender. Drain and run under cold water to stop any further cooking.
Slit the sausage skins lengthways with a sharp knife and squeeze out the sausage meat. My youngest daughter likes to help me with this job.
Place a layer of cabbage and potatoes at the bottom of the ovenproof dish and season with salt and pepper. Cover this with a layer of sausagemeat. Repeat to use all the meat and vegetables, ending with a layer of cabbage and potato.
Fleck the top with butter. Cover with greaseproof paper and then the lid.
Bake for 40-45 minutes, until the vegetables are tender and the top is browned and crispy.
A real winter warmer if ever there was one!
I am entering my sausage and cabbage bake into the In Season Challenge, set by Carol over at Make It, Bake It. Her challenge this month is to come up with a recipe featuring savoy cabbage, so of course this seemed to me the perfect dish.
If you’ve got a favourite savoy cabbage recipe, you should enter the challenge too. But there isn’t long – the deadline is 5 February 2012.
I came across this delicious dish at one of our local pubs this Christmas, the excellent Holcombe Inn, and decided then I would have to recreate it at home.
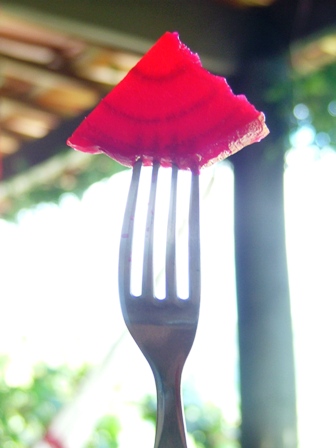
It’s a lovely way to use beetroot, which is in plentiful supply at the moment, and is very good served with roast meats. My children really like beetroot, perhaps because it’s quite sweet.
Slice the beetroot and potatoes as thinly as you can. It’s best to use a mandolin if you have one.
This is a perfect dish for the Aga as it needs to be cooked slowly in a low oven.
Beetroot and potato dauphinoise
Serves 2
3 large potatoes, peeled and thinly sliced
2 large beetroot, peeled and thinly sliced
Salt and pepper
Handful fresh thyme, picked
4 cloves garlic, crushed
150 ml double cream, perhaps a little more
Butter
Preheat the oven to 160°C/Gas Mark 2.
Put the sliced potato and beetroot in a bowl and season with salt and pepper. Add the thyme, garlic and cream and combine so that the vegetables are well covered.
Place in a small gratin dish and roughly arrange the potato and beetroot so the slices lie flat. I like to have a layer of potato and then a layer of beetroot and so on. Pack down well.
The cream should almost come to the top of the vegetables. If not, add a little more.
Fleck the top of the vegetables with a little butter and cover with foil.
Bake for around 1½ hours, until the potato and beetroot are tender. Increase the oven temperature to 220°C/Gas Mark 7, remove the foil and return the dish to the oven for another 10-15 minutes until the top has crisped up.
It might have taken a day to prepare, but our Chinese new year meal was fantastic
I’m very happy to say it’s been a good week for meals in our house. Lots of old favourites and some new experiments too.
Highs
The outstanding highlight of our culinary week has to be the Chinese new year feaston Saturday.
Food is a great way to bring families together, and for me this was true despite my family being scattered across the world.
I’d sent out a plea to aunts and cousins and not only recipes came back, but a whole host of wonderful food memories.
It was quite special to know that both my cousin in Sweden and I were preparing the same soup for our families, and still eating leftovers several days later!
Jerusalem artichokes with bacon, leeks and sage
Another highlight were the Jerusalem artichokes for supper on Tuesday.
I cooked them with bacon, leeks and sage using a Riverford recipeand served them simply with big hunks of buttered bread. Truly gorgeous and very satisfying.
On Friday night we had a family favourite: beef stew and parsley dumplings, a perfect winter warmer, which went down well with my husband after an exhausting game of squash.
Lows
I’m feeling quite smug in being able to say there were no kitchen disasters this week. The only downside to our week’s eating was the morning-after windiness following the delicious artichokes!
It doesn’t really constitute a low but I wasn’t totally happy with my pizza muffins for the children’s lunch boxes. I think that recipe will need a little work before I publish it.
Monday 23 January Lunch: healthy green soup and sandwiches
Dinner: spaghetti bolognese
Thursday 26 January Lunch: cheese and pickle rolls
Dinner (kids): minestrone soup F (adults): stuffed chicken breasts with beetroot and potato dauphinoise
I could never live permanently in a hot country. OK, so I have been known to moan about the cold weather from time to time. But if it were always hot, we’d never be able to eat warming winter grub like sticky sponge puddings, hearty meat pies or rich, slow-cooked casseroles. We need the seasons in order to eat well I reckon.
Stew and dumplings, a proper winter warmer
This beef stew with rib-sticking parsley dumplings is one of my favourite winter warmers. It’s a proper old-fashioned kind of meal, like your gran would make.
I like to include sweet potatoes in the stew to give it a lovely sweet, creamy flavour, but the real beauty of stews and casseroles is that you can use whatever root vegetables you happen to have in. It’s cooked nice and slowly so the meat and the vegetables are gorgeously tender. If your children aren’t big fans of veggies, this is a great recipe for sneaking a few past them.
Beef stew and parsley dumplings
Serves 4
1 tbsp olive oil
1 onion, chopped
500g stewing steak, diced
2 carrots, sliced
1 parsnip, diced
1 sweet potato, diced
2 cloves garlic, crushed
1 tbsp corn flour
25o ml hot beef stock
2 400g tins chopped tomatoes
small bunch rosemary, finely chopped
salt and pepper to taste
For the dumplings
110g self-raising flour
salt and pepper
1 tbsp fresh flat leaf parsley, chopped
50g shredded suet
Preheat the oven to 150°C/Gas Mark 2.
In a large casserole heat the oil and fry the onion until golden. Add the beef quickly and fry until browned.
Next add the root vegetables and garlic and cook together for another few minutes. Sprinkle over the corn flour and mix in to cover the meat and vegetables.
Pour in the beef stock, tomatoes and add the rosemary and a little salt and pepper to taste – depending on how well seasoned your stock is. Bring to a gentle simmer, then cover and put in the oven for around four hours.
When the stew is almost finished cooking, make up the dumplings. Mix the flour, a pinch of salt and pepper and parsley in a bowl. Add the suet and quickly combine but don’t rub in. Mix in cold water, a little at a time, until you can pull the ingredients together to make a stiff dough that leaves the bowl cleanly. Shape into eight dumplings.
When the stew is ready, that is when the meat is tender and falls apart easily, place the dumplings carefully on top of the stew and spoon over some of the liquid. Cover again and put back in the oven, increasing the temperature to 220°C/Gas Mark 7, for about 20 minutes until the dumplings are cooked through.
This year I got it into my head that I was going to cook my family a proper feast to celebrate Chinese New Year and welcome in the year of the dragon.
I don’t normally celebrate Chinese New Year, despite being part Chinese. My mother grew up on the Malaysian island of Penang and is half Chinese and half Dutch. So you see I’m only a little bit Chinese. But mum has always talked about Penang as home, so I do feel a strong connection and I adore the food.
There’s been lots of talk about Chinese New Year amongst the foodie Twitter and blogging community, which really spurred me on. Trouble is I don’t have the first clue how to cook Chinese food.
And so I called in help from the Chinese members of my family who happen to be scattered around the world. Facebook is a fantastic tool for this kind of thing. I asked them what should I cook for a Malaysian Chinese feast and, more importantly, how do I do it?
Kian chai – I think!
The menu and recipes below come from my Aunty Lorene in the US, Aunty Kim in Canada, cousin Edhish in Sweden, cousin Jezalina in Australia and mother Cheryl in Spain.
All agreed I had to cook Kian Chai Teng, a soup made from Chinese salted vegetables, pork ribs and sour plums, served with chopped chilli and steamed white rice. I’m not 100% sure I got the right vegetables in the Chinese supermarket, although the lady who worked there insisted they were the thing to use.So I’m not sure if I made an authentic Kian Chai Teng, but it sure tasted good. The children gobbled it down enthusiastically and enjoyed picking the beautifully tender meat from the bones.
Penang Char Kway Teow
Next was Char Kway Teow, a Penang fried noodle dish. You should use shrimps and squid but as my husband can’t eat seafood I swapped these for chicken and Chinese sausage. Again not totally authentic but absolutely gorgeous nonetheless.
My mum suggested Chinese spare ribs and gave me her Aunty Seck’s recipe and I also came up with my own recipe for Chinese roast chicken drumsticks. Plus a big bowl of pak choi steamed with ginger.
It was a fine, fine feast. As is my tendency, I cooked way too much food, so we ate the leftovers for Sunday lunch. The spare ribs in particular tasted even better second time around.
I have to say a heartfelt thank you to my relatives for their advice and supportive words. One day it would be wonderful if we could all get together to celebrate new year somehow. Oh, and of course, gung hay fat choy everyone!
Kian Chai Teng – soup with pork ribs and salted vegetables
In a large pan, gently fry the onion in the oil until golden.
Place the pork ribs, garlic and ginger into the pan and enough water to cover. Bring to the boil, then add the soy sauce and rice wine. Turn down the heat so that the soup is on a very low simmer and cook for at least an hour, until the meat is starting to fall off the bone.
Taste your salted vegetables. If they are very salty, you may need to give them a thorough rinse so they don’t make your soup too salty.
Add the potatoes and salted vegetables. Put the lid back on and simmer for another 30-40 minutes.
Serve the soup with a saucer of soy sauce and cut chilli and a plate of steamed white rice.
My Char Kway Teow
Serves 6-8
2 tbsp dark soy sauce 3 tbsp light soy sauce 2 tbsp water 4 tbsp peanut or vegetable oil 4 cloves garlic, crushed 2 chicken breasts, chopped into small pieces 1 lap cheong (Chinese pork sausage), cut diagonally into thin slices 500g flat rice noodles 2 eggs (duck eggs if you can get them – I used hen eggs) 4 large handfuls bean sprouts salt and white pepper
In a small bowl, mix the dark and light soy sauces with the water, and put to one side.
Heat the oil in a wok on a high heat and stir fry the garlic for a few seconds before adding the chicken. Cook until the chicken turns white, then add the sausage and stir fry for another minute.
Add the noodles and sprinkle with the soy sauce mixture, and add salt and pepper to taste. Gently stir fry for three to four minutes.
Make a space in the middle of the work and break the eggs into the hole with a little pinch of salt. Roughly scramble the eggs and then combine with the noodles. Stir fry for another five minutes.
Finally add the bean sprouts, fry for another minute and then serve.
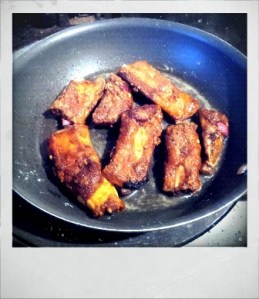
Spare ribs
Chinese spare ribs
Serves 4
550g pork spare ribs 4 cloves garlic, crushed ½ tsp light soy sauce ½ tsp dark soy sauce ½ tsp Shaoxing (Chinese rice wine) Salt and pepper 1 tbsp tomato sauce 1 tbsp Worcester sauce ½ tbsp sesame oil ½ tbsp sugar 3 tbsp tapioca flour 3 tbsp vegetable oil
Preheat the oven to 200°C/Gas Mark 6.
In a small bowl mix together the garlic, soy sauces, rice wine, salt and pepper. Pour over the spare ribs, make sure thorougly coated and leave to marinade for at least an hour.
Prepare the sauce. In another bowl, combine the tomato sauce, Worcester sauce, sesame oil, sugar and 3 tbsp water.
Coat the spare ribs in tapioca flour and fry in hot oil over a medium heat for around five minutes. You may need to do this in batches. Remove, drain on absorbent paper and place on a baking tray. Roast in the oven for 10 minutes.
Heat the sauce until it thickens. Take the ribs out of the oven, place in a serving dish and pour over the sauce.
My Chinese chicken
4 chicken drumsticks 4 chicken thighs
For the marinade:
2 tbsp runny honey 4cm ginger, peeled and finely chopped 2 garlic cloves, crushed 2 tsp Chinese five spice 2 tsp light soy sauce 1 tbsp red currant jelly 1 tbsp sesame oil
Preheat the oven to 200°C/Gas Mark 6.
Slash the drumsticks with a sharp knife and place in a bowl with the thighs.
Mix together all of the marinade ingredients and pour over the chicken, making sure they are well coated. Leave to marinade for at least two hours or overnight.
Put the chicken pieces on a roasting tray with a few spoonfuls of the marinade and place in the oven for 40-45 minutes, turning occasionally and spooning over more marinade if it looks like it is drying out.
Also great served cold as part of a picnic or in a packed lunch.
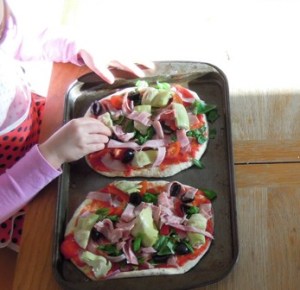
Pizza has to be one of the best things to cook with children, and homemade pizzas always taste so much better than the ready-made variety. Children, well mine anyway, seem more inclined to eat something if they’ve been involved in the making of it.
OK, so it might turn into a slightly messy affair. I used to come close to panic attacks when I first started cooking with the kids and ingredients would go flying everywhere.
But I’ve learned to just go with the flow; it can all be cleaned up afterwards.
It really is worth it to get your children used to helping make meals and forming a positive relationship with food.
I much prefer to make my own dough but I am not too proud to admit to cheating now and again. I generally keep some shop-bought pizza bases in the freezer too; perfect for when little friends stay for tea unexpectedly. My children think it’s great to make pizzas with their friends and having some frozen bases on standby means we can always rustle some up at a few moments’ notice.
If you have a little more time though (pizza dough takes an hour to rise), I would strongly recommend making your own dough from scratch. It is so incredibly easy and I’ll never get over the magical feeling of seeing the dough increase to double its size. It’s like a science experiment in the kitchen.
What ingredients you put on top of your pizza is very much down to personal taste and, of course, what your children like to eat. If you make a little pizza each, everyone can choose their own favourite toppings.
And don’t forget, cold pizza is great the following day in a packed lunch, so always a good idea to make a bit extra.
We like a lot of topping in our house!
Homemade pizza
Makes four pizzas
For the dough:
400g strong white bread flour
1 tsp salt
1 7g sachet fast action dried yeast
1 tsp dried oregano
250ml luke warm water
1 tbsp olive oil
Passata, about half a jar
Our favourite toppings:
Cherry tomatoes, halved
Small red, green or yellow pepper, chopped small
Fresh basil, torn
Pitted black olives
Ham or salami, chopped
Capers
Artichoke hearts, quartered
Mozzarella (a couple of balls, around 250g each, should be enough for four pizzas)
To make the dough, put the flour, salt, dried yeast and oregano into a large mixing bowl and mix well.
Make a well in the middle and pour in the lukewarm water and oil. Gradually work the flour into the liquid, making a soft dough. If it’s too dry, add a drop more water. If it’s too sticky, add a little more flour.
Flour your surface before tipping the dough onto it. Knead the dough by stretching it away from you, then pulling back into a ball. Do this for five minutes or so, until the dough is smooth and elastic.
Return the dough to the mixing bowl, cover loosely with cling film and put in a warm place for about an hour, until the dough has doubled in size.
Preheat the oven to 200°C/Gas Mark 6.
Uncover the risen dough and punch it back down. Flour the surface again and divide the dough into four balls. Stretch or roll out each ball until you have a thin circle about 22cm across. Place the pizzas onto slightly oiled baking sheets.
Pour a couple of tablespoons of passata onto each pizza, smooth out with the back of the spoon, and then let the artist in you run free while you apply your choice of toppings, leaving the mozzarella until the end.
Bake your pizzas for 15-20 minutes and leave to cool for a couple of minutes before devouring.
I’ve been making this meal for my children since the oldest was about a year old. It’s incredibly easy to make and is good for getting little ones used to different textures.
When they’re very little, you’ll need to chop up the chicken and vegetables quite small, but as they get older you can leave the ingredients more chunky.
It’s a firm favourite with both my kids and I often cook up a big pot and freeze portions for easy midweek meals. They’re now six and three and their eyes still light up when I tell them they’re having it for tea.
Feel free to play around with the vegetables you include. I often swap the courgette for peas or sweetcorn. I also used to use mushrooms until the oldest decided one day they were the devil’s food!
Tasty chicken rice
200g basmati rice
2 tbsp sunflower oil
1 onion, chopped
1 green or red pepper, chopped
1 courgette, diced
2 garlic cloves, crushed
1 tbsp chopped parsley
1 skinless chicken breast, chopped
450ml passata
100ml chicken or vegetable stock
salt and pepper
Cook the rice following the instructions on the packet.
Heat the oil in a large pan and gently fry the onion, pepper and courgette for about five minutes. Add the garlic and parsley, fry for another minute or so before adding the chicken.
Cook until the chicken turns white, then add the passata and stock. Simmer gently for 15 minutes.
Drain the rice and combine with the chicken sauce. Taste and add seasoning if needed.
I’m entering this dish into the Family Foodies challenge which Louisa at Eat Your Veg and I take turns to host. It’s Louisa’s turn this month and the theme is The Under Twos.
Everyone has their own way of making macaroni cheese. It’s the kind of dish that lends itself to variation.
Here I offer up my version, which has smoked bacon in the Cheddar cheese sauce and is topped with sliced tomatoes, garlic breadcrumbs, rosemary and parmesan.
I use penne instead of macaroni because I prefer my pasta on the chunkier side. And I usually make extra and freeze a couple of portions for quick, midweek suppers.
Macaroni cheese
Serves 4 – 6
350g penne pasta
100g butter
80g plain flour
850ml milk
100g mature Cheddar cheese, grated
salt and pepper
5 rashers smoked back bacon, chopped
knob of butter
4 medium tomatoes
75g white breadcrumbs
2 cloves garlic, crushed
small bunch fresh rosemary, finely chopped
50g parmesan cheese, grated
Preheat the oven to 200°C/Gas Mark 6.
Cook the penne in boiling, salted water according to the instructions on the packet.
Make up the cheese sauce by placing the butter, flour and milk in a saucepan and whisking over a medium heat until it thickens. Stir in the cheese and season with salt and pepper. Fry the bacon pieces in a little butter and when crispy, stir into the sauce.
Mix the drained pasta with the cheese sauce and pour into a large ovenproof dish. Slice the tomatoes and lay over the pasta.
In a bowl combine the breadcrumbs, garlic, rosemary and parmesan and then sprinkle over the pasta and tomatoes.
Bake in the oven for 20-25 minutes until the sauce is bubbling and the breadcrumb topping is golden and crispy.
My adventures cooking mutton continued this week as I made a lovely dish the Italians call spezzatino con prugne. Or at least that is what it’s called in The Silver Spoonwhere I discovered the recipe.
Regular readers of this blog will know I’ve been experimenting with mutton over the last few weeks and I’ve discovered it really is a splendid meat. I am now a firm champion of the Mutton Renaissancecampaign. So far I’ve cooked Irish stewandmutton curry, both of which were quite delicious.
When I came across the mutton with prunes recipe it appealed to me straightaway. Mutton has a deep rich flavour that I felt would work with something sticky and fruity like prunes.
However while I was cooking it, I have to admit I did have second thoughts. The brown mess in the pan wasn’t looking as attractive as the photo in the book. But my doubts were unjustified. It might not be the prettiest dish in the world, but it sure is good to eat.
It’s another very simple recipe, calling for only a few ingredients. There’s something reassuringly old-fashioned about it.
And as with all these mutton recipes, the meat could be replaced with lamb.
Mutton with Prunes
Serves 4
200g prunes, stoned
300ml dry white wine
600g diced mutton (remove as much fat as you can)
1 onion, thinly sliced
1 garlic clove
50g butter
2 tbsp passata, maybe a little more
salt and pepper
Place the prunes in a bowl, cover with the wine and set to one side.
Put the mutton in a pan, add cold water to cover and bring to simmering point. Add the onion and garlic, cover and simmer over a medium heat (or in a warm oven) for about one hour. Season and then drain well, reserving the cooking liquid.
Melt the butter in another pan, add the passata and mutton, and cook over a high heat for a couple of minutes. Lower the heat, drain the prunes and add them to the pan.
Simmer for around 20 minutes, adding more cooking liquid if the meat starts drying out. I ended up adding most of the liquid, plus a little more passata.
Serve with rice or mashed potatoes and a green salad.
Knock knock! Who’s there? Irish stew. Irish stew who? Irish stew in the name of the law!
Apologies. I had an overwhelming desire to share one of my favourite childhood jokes from the classic Ha Ha Bonk Book. Whenever Irish stew is mentioned, I hear the joke in my head. Right, so now I’ve got that out of my system, on with the food…
I was recently inspired to experiment with mutton after reading a couple of newspaper articles. So after stocking up the freezer with various cuts, my first foray into cooking this delicious but much-maligned meat saw me creating a wonderfully aromatic mutton curry.
Next I wanted to try something a little more traditional. And what could be a more traditional use for mutton than Ireland’s national dish, Irish Stew?
I found the recipe below in the rather wonderful The Silver Spooncookbook. I know, I know. Slightly strange to turn to the Italians for an Irish dish, but I love the fact you can look up any ingredient in The Silver Spoon and you’ll find what to do with it.
What immediately struck me was just how simple this recipe is. Apparently purists use only mutton, potatoes, onions and water, and perhaps a few herbs. It was hard to resist the temptation to add just a little something, even if it were just a couple of carrots. But resist I did, and good job too as it really doesn’t need anything else.
Despite the mutton having quite a strong flavour (it’s almost gamey), the whole family really liked this dish and so I will be cooking it again.
If you can’t get hold of mutton, try using lamb instead.
Irish Stew
Serves 4
800g mutton, cut into cubes
800g potatoes, thinly sliced
3 onions, thinly sliced
1 tbsp chopped thyme
2 tbsp chopped flat leaf parsley
1 bay leaf
salt and pepper
In a large casserole arrange alternate layers of mutton, potatoes and onions, seasoning each layer with salt, pepper and herbs as you go. Add the bay leaf and pour in just enough water to cover.
Bring to the boil over a high heat. Cover, lower the heat and simmer for 1¼ hours until tender. (Or, like me, leave in the bottom oven of the Aga for an afternoon.)
And that’s it. Couldn’t be easier. Enjoy with a big hunk of buttered bread.

 The beauty of savoy cabbage is that it doesn’t need dressing up in fancy recipes to make it interesting. For an easy side dish, steam some chopped savoy for a few minutes and then serve with a knob of butter, salt and pepper.