Vegan pumpkin spice cookies

The kids are out and about, hopefully not terrifying the neighbours too much with their Halloween antics, so I’m home alone – answering the door to a steady flow of creepy (and quite cute) trick or treaters.

I think I got the better deal. It’s a chilly night and has just started to drizzle, while I’m sat here, warm and cosy with a big mug of tea and a couple of these delicious pumpkin spice cookies. My oldest baked them today to take over to her Halloween sleepover. Her friend’s mum is vegan and she was keen to make them dairy-free so everyone could enjoy them. I’m sure they will!

Vegan pumpkin spice cookies

Makes around 15

175g plain flour
1 tsp ground cloves
1 tsp ground cinnamon
1 tsp ground ginger
1 tsp ground nutmeg
1 tsp baking powder
60g vegan spread or margarine
90g demerara sugar
1 tbsp vegetable oil
2 tbsp golden syrup (plus a little more for fixing the icing in place)
250g orange ready to roll icing
coloured writing icing (we used black, green and red)
icing sugar (for dusting)

Sieve the flour into a large bowl and stir in the spices and baking powder.

Add the margarine in small chunks and rub it into the flour mixture with your fingers until it looks like breadcrumbs. Then stir in the demerara sugar.

In another bowk, mix the oil and golden syrup together. Gradually stir this into the rest of the mixture, then use your hands to bring it all together to form a dough. Knead until smooth.

Wrap the dough in cling film and place in the fridge for 15 minutes.

Preheat oven to 170ºC / gas mark 3. Grease and line a couple of baking trays with greaseproof paper.

Flour your surface, and then roll out the dough to about 5mm thick. Use a sharp knife to carefully cut out pumpkin shapes.

Transfer to the lined baking trays and bake for 10 to 12 minutes, or until lightly golden-brown. After a few minutes, transfer to a cooling rack and leave to cool completely before decorating.

Dust your surface and rolling pin with a little icing sugar, and roll out the orange icing until it’s as thin as you can get it. Cut out pumpkin shapes, slightly smaller than the cookies. Fix into place by brushing with a little golden syrup. Draw on your pumpkin faces and little green stalks with the coloured writing icing, and leave to dry for half an hour or so.

Easy tagliatelle and summer berry tarts

Recently we’ve been eating rather a lot of tagliatelle. Tagliatelle with sweetcorn, peas and bacon. Sometimes twice a week, and maybe again at the weekend. Oh, and fruit tarts too. Lots and lots of fruit tarts. That’s what happens when one of your kids makes it through to the finals of a young chef competition. You have to get in an awful lot of practice. Continue reading “Easy tagliatelle and summer berry tarts”

Making sushi like child’s play

Making my own sushi has been on my list of things to try for years now, but I’m not known for my tidy, careful ways in the kitchen and I always assumed my clumsy fat fingers would be something of a hindrance in the delicate art of sushi.

So when the team at Yutaka got in touch to see if my kids might be up for having a go at rolling their own sushi, I had to volunteer them. If Yutaka reckon children can make sushi, then surely I can have a go too? Continue reading “Making sushi like child’s play”

Cool recipes to cook with kids: the Family Foodies round-up

cool recipes to cook with kids

Last month on Family Foodies we invited food bloggers to share their ideas for fun, tasty recipes to cook with kids and you rose to the challenge brilliantly. If you’re looking for new ways to encourage your children to get active in the kitchen, this recipe round-up is just what you need… Continue reading “Cool recipes to cook with kids: the Family Foodies round-up”

Bangin’ books: Chop Sizzle Wow, plus my girls cook penne with meatballs

PENNE WITH MEATBALLS

This tasty and very satisfying pasta dish is brought to you courtesy of Chop Sizzle Wow; a new cookbook bringing together 50 quick and easy classic Italian recipes from the bible of Italian home cooking, The Silver Spoon, in a fun and engaging cartoon format.

chop sizzle wow front

I was sent a review copy, and as the press release said it is perfect for cooks young and old, I decided to put the children to work testing out one of the recipes.

Our chosen recipe was rigatoni with meatballs. Except we didn’t have any rigatoni, nor did the corner shop, so we went with penne instead. Jess and Mia loved the cartoon concept of the book and found the recipe fairly easy to follow, but they definitely needed some adult assistance from time to time; such as when they couldn’t get the meatballs to fry and brown without them disintegrating. At this point I stepped in and cooked up the meatballs in a separate frying pan.

But all in all the dish was a resounding success and the end result was very good. I think it’s one the kids will want to cook again. Oh, and they also have their eye on several recipes in the desserts section, such as the Chocolate Delight and the Stuffed Peaches.

The recipes in Chop Sizzle Wow are brilliantly simple and very easy to follow, although you probably do need a little kitchen nouse to fill in some of the gaps.

The book is divided into five sections: appetizers, pasta, main courses, deserts and baking, and extra stuff. There’s also a witty introduction giving an overview on how Italians cook and eat.

The illustrations by Brazilian illustrator and artist Adriano Rampazzo (a recent graduate of London’s Central St Martin’s art college) are fantastic and I’m sure this book will appeal to comic book fans, as well as those looking for an easy introduction to Italian cookery. I think it would make a great Christmas present for students returning to their uni digs after the holidays.

PENNE WITH MEATBALLS 2

If you’d like to try those tasty meatballs yourself, here’s the recipe…

Pasta with meatballs

300g minced meat (our pack was 400g and we used all of it)
Half a clove of garlic (we used a full one – who saves half a clove?)
1 onion
1 carrot
1 celery stick
1 sprig parsley (we decided this wasn’t enough, and used a small bunch)
1 sprig rosemary
1 egg
350g rigatoni (we used penne)
plain flour for dusting
3 tbsp olive oil
400ml passata
25g grated Parmesan

Serves 4

Thinly slice the onion.

Chop the garlic.

Chop the carrots and celery.

Chop the parsley.

Chop the rosemary.

Lightly beat the egg.

Mix the meat, parsley and garlic. Then season and mix in the egg. Shape into small balls. Dust with flour.

Heat the olive oil in a frying pan on a low heat.

Cook the onion, carrot, celery and rosemary for five minutes on a low heat.

Increase the heat to medium and add the meatballs. Cook until lightly browned all over. (This is where I had to jump in and rescue the meatballs because they were falling apart. I fried them in a separate pan and then added them back to the vegetables.)

Season and add the passata. Simmer for 40 minutes, stirring occasionally.

Bring a large pan of salted water to the boil and cook the pasta for 10 minutes, or according to packet instructions.

Drain the pasta, then add to the meatballs. Gently stir together and serve, topped with pasta.

Delizioso!

Chop Sizzle Wow is available from the Phaidon online store and costs £12.95.

family-foodies

As this dish is a perfect one for older children to make themselves, I am entering it into the Family  Foodies challenge, which I host with Eat Your Veg, where the theme for October is Cooking With Kids.

Disclosure: I was sent a complimentary copy of Chop Sizzle Wow from Phaidon Press for review purposes. No money exchanged hands and all opinions expressed are my own.

Halloween ghost cake pops

Halloween ghost cake pops text

My last Halloween offering definitely wasn’t going to win any awards in the most attractive bake category (despite how much fun the kids had creating them), but these little spooky cake pops are much, much cuter.

My daughter Jessie and I made these for her school bake sale and from all accounts they were a big hit. The girls say they’d all sold out before they even made it into the school hall.

Halloween ghost cake pops2

Cake pops are always a hit with children but I avoid making them too often. They’re not at all difficult, just a little long-winded and involved. So if you plan to have a go at these, do make sure you leave yourself plenty of time.

The good people at Dr Oetker kindly sent me a big bag of ingredients in order to make this cake pops recipe, developed by Juliet Sear who is part of their Even Better Baking Team. The recipe is below and for more practical hints and tips, you can watch the video tutorial over on YouTube.

The cake at the centre of these wee little ghosties is a delicious chocolate fudge brownie, which this recipe has you making from scratch. If you want to make life a little easier, you could always use a shop-bought chocolate cake – just make sure it’s a nicely moist and squidgy one. The brownie balls are covered in a layer of white chocolate, before being dressed in their ghostly regal icing robes.

Halloween ghost cake pops

Makes 20 cake pops

For the cake balls
120g Dr Oetker 72% Cocoa Extra Dark Fine Cooks Chocolate
150g soft unsalted butter at room temp
200g Light Muscovado Sugar
3 medium free range eggs, lightly beaten
2 tsp Dr Oetker Madagascan Vanilla extract
125g Plain Flour

For the cake pops
2 X 100g bags of Dr Oetker White Chocolate Chips melted for sticking the balls onto the sticks & coating the cake pops
20 cake pop sticks

To decorate the ghosts
1 pack of Dr Oetker White Regal Ice
icing sugar for rolling out
Dr Oetker White Designer Icing for sticking the regal ice to the cake pops
Dr Oetker Jet Black Gel Food Colour

Preheat the oven to 140°C / gas mark 1).

Grease and line an 18cm (7 inch) square cake tin.

To make the fudge brownie mix, melt the extra dark chocolate in a microwave on medium power for 30 seconds at a time, stirring each time until melted, or in a heatproof bowl on a gentle heat over a bain marie. Leave to cool.

Beat the butter and sugar together until pale and fluffy.

Gradually add the eggs a little at a time, mixing until combined.

Add the cooled chocolate stirring continuously. Add the vanilla extract and stir. Gradually fold in the flour until just combined. Take care not to over beat.

Pour the mix into your cake tin and bake for around 40 mins. Check it with a sharp knife or metal skewer. You want this to be slightly under baked, so the knife should come out with a nice paste stuck to the knife.

Leave the cake to cool, then turn out into a bowl and crumble with your hands to a fine, fudgy crumb.

To make the cake balls, take a handful of fudge cake mix and squeeze together tightly – you are aiming for little balls about the size of a large walnut, approximately 30g each. If the mixture is dry, the addition of a little melted chocolate or vanilla butter cream will help the mixture stick.

Melt the white chocolate chips in the same way as the dark chocolate earlier.

Dip the end of a stick into the melted white chocolate and push the stick into a ball, about half way in. Hold the ball to stop it splitting open when the stick goes in. Continue with all the balls.

Once all the cake pops are ready, pop them into the freezer for 30 mins, so the balls are firm enough to hold when dipping in the coating. Keep the melted white chocolate in a warm place to stop it from setting.

When the cake balls are firm, plunge each one into the white chocolate until completely covered. Tap the cake pop gently on the side of the bowl to shake off the excess.

To decorate the ghosts, roll out half the white regal icing into a large rectangle using plenty of icing sugar and a large plastic rolling pin. Roll fairly thinly – 2 to 3mm thick. Squeeze a little Designer Icing onto the tops of the cake pops or brush with some melted white chocolate to keep the icing sheet in place.

Using a cake cutter or small bowl, cut out circles of regal icing and place on each of the pops, smoothing down with your fingers to create the white sheet effect.

Decorate each one with a ghostly expression using the black gel food colour and a fine brush.

Halloween ghost cake pop


These spooky cake pops are perfect for making with little ones and so I’m entering them into this month’s Family Foodies ‘Cooking With Kids’ challenge, a month bloggers event hosted by Eat Your Veg and me, Bangers & Mash.

family-foodies

Disclosure: I received complimentary ingredients from Dr Oetker in order to try out this recipe. No money exchanged hands and all opinions expressed are my own.

Green goo iced buns for Halloween

Green Goo Halloween Iced Buns3smalltext

I always say this, but when I cook with my children, I have to be in just the right mood. A laid-back, chilled-out, hey-it’s-fine-to-wreck-the-kitchen kind of mood. Because cooking should be fun, right? For all of us, kids and parents alike. Which also means I won’t be too precious about what the end result actually looks like.

Green Goo Halloween Iced Buns4

Take these Halloween iced buns for example. Who in their right mind wants to eat something smothered in black icing? Well, my daughters it would seem. Especially when covered in hundreds-and-thousands and oozing with green jam – or green snot as my two like to call it. Delightful pair. Continue reading “Green goo iced buns for Halloween”

Cooking with kids: October’s Family Foodies challenge

cooking with kids Collage

We’re already into October and I’m pleased to say it’s my turn to host the Family Foodies challenge. This month our theme is Cooking with Kids and we’re looking for your recipes and ideas to encourage little ones to get active in the kitchen.

Children are never too young to help out with the cooking – although I use the term ‘help out’ quite loosely here! Since my girls were little babies, I’ve been getting them to ‘help’ me prepare meals; from playing with pasta shapes or rolling dough sat in their high chairs to banging pots and pans on the kitchen floor as I did pretty much the same thing on the stove top. Even before they could walk, simply watching and playing alongside me has meant they were learning about where food comes from and how it is made.

PizzaCollageAs my daughters have got older, so they’ve grown more and more independent in the kitchen. When they were toddlers, their role was to put the toppings on the pizza. Next they’d be allowed to chop the ham and grate the cheese. And now, aged nine and six, they pretty much make the pizzas from scratch, from preparing the dough to popping their finished creations in the oven.

And as often as possible I encourage the girls to plan and cook their own meal for all the family. We start by leafing through children’s cookbooks to choose a main course and a pudding, before writing a shopping list and then helping me buy the ingredients. Spaghetti Bolognese and chocolate cake tend to be popular choices. I can just about let our oldest Jess get on with it alone now, although I tend to hang around in the kitchen in case she needs a hand, while I act as Mia’s ‘kitchen slave’ so that she’s in charge and I only do what she instructs me to do – within reason!

family-foodies

I can’t wait to hear how you involve your children or grandchildren or nieces and nephews in the kitchen. What are your favourite recipes to make with children? And do you have any tips for making sure the whole thing doesn’t turn into complete and utter mayhem? Post your recipes in the usual way and link up to this challenge by the end of the month or feel free to dig out posts from your blog archives and link those up too.

gingerbread houseWin a gingerbread house cutter set!

Our prize this month is this brilliant Lakeland cutter set to make your very own gingerbread house. With Christmas just around the corner, this could come in very handy.

The set includes a gingerbread recipe and 12 cutters to stamp out walls, roof, tree, a snowman and his gingerbread friends. You then simply mix some icing sugar to ‘cement’ the house together, before decorating with all your favourite sweeties and a dusting of icing sugar snow.

Family Foodie entry guidelines

  • You may submit any recipe on your blog that fits this month’s theme, new or from the archive, and there is a limit of three entries per blogger. You’re also welcome to submit the post to other challenges too. If the recipe is not your own, please give the appropriate credit.
  • Send your recipe URL to me at vanesther-at-reescommunications-dot-co-dot-uk, including your own email address and the title of your recipe or post. The closing date this month is Friday 31 October 2014.
  • Display the Family Foodies badge (above) on your recipe post, with a link back to both Eat Your Veg and Bangers & Mash, as well as details of this month’s challenge.
  • If you’re on Twitter, then please tweet your post to myself @BangerMashChat and Lou @Eat_Your_Veg and include the hashtag #FamilyFoodies. We’ll retweet all that we see.
  • You may enter from anywhere in the blogosphere, but prizes can only be posted to UK addresses.
  • At the end of the month a guest judge will choose a winning recipe. The winner will be announced in a monthly round-up of all the entries. Winners will get to display a Family Foodie Winner annotated badge on their blog if they wish and their recipe will go through to the Family Foodies Hall of Fame on each of our sites.
  • All entries will be added to the Family Foodies Pinterest Group Board.

Any questions, do drop me an email at the address above.

Thanks so much to everyone that entered the August/September challenge hosted by Louisa at Eat Your Veg, where the theme was The Under Twos. Louisa will be announcing the winner of the M&S Tiny Taste Buds goodies very soon.

For the low down on other foodie challenges, competitions and giveaways, head over to The Food Blog Diary.

October’s entries

  1. Chocolate Hummus from Recipes From A Pantry
  2. Holy Eggs! from The Hedge Combers
  3. Indian Rice pudding with Fluffy Indian Bread from Home Cook Food
  4. Chilli Cheese Sandwich with Chinese Tomato Soup from Home Cook Food
  5. One Minute Microwave Masala Omelette from Home Cook Food
  6. First Day at School Chocolate Cake from Tinned Tomatoes
  7. Oaty Ginger Chocolate Biscuits from Chocolate Log Blog
  8. Chocolate Popcorn Triangles from Farmersgirl Kitchen
  9. Green Goo Iced Buns for Halloween from Bangers & Mash
  10. Halloween Cake Pop Spiders from Gluten Free Alchemist
  11. Halloween Ghost Cake Pops from Bangers & Mash
  12. Nobbly-bobbly Spiced Chocolate Biscoff Fruit & Nut Crispy Cake Bites from Family-Friends-Food
  13. Bread Tarts from Eat Your Veg
  14. Pasta with Meatballs from Bangers & Mash

Love heart double chocolate cupcakes

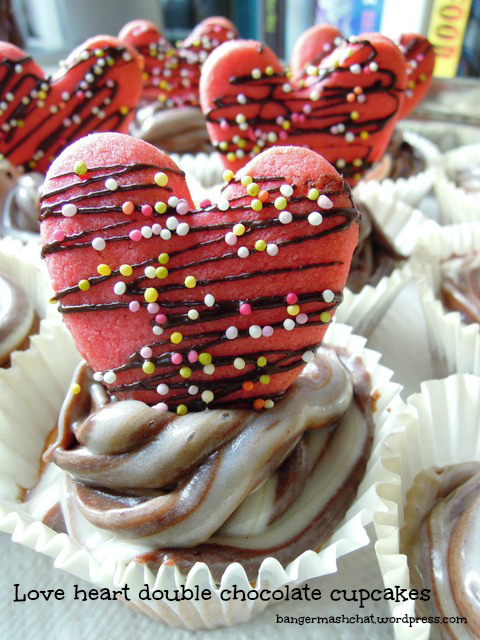
There’s been a bit of a baking frenzy in our house recently. There was a PTA cake sale at my daughters’ school last week and we decided to get all creative with these love heart cupcakes with a double chocolate and cream cheese topping. Jess hates buttercream so cream cheese is a good alternative.

Sometimes I just can’t be bothered to bake for the cake sale and at the last minute we’ll resort to buying plain fairy cakes or biscuits, which the kids will decorate with gaudy-coloured icing and a few sprinkles. But other times I go the whole hog. And this was one of those times. I was definitely spurred on by my earlier success with a classic Victoria sponge and also by a big bag of chocolate goodies from the kind people at Dr Oetker. My youngest daughter Mia, who is a self-confessed chocoholic, couldn’t believe her luck when she opened up the parcel.

chocolate

Dr Oetker are running a competition, challenging UK bakers to come up with their most creative chocolate cupcake and I thought I might try my chances. One lucky baker will win the fantastic prize of a trip for two to New York City, the home of the cupcake. The closing date is 17 October 2013 if you fancy having a go too. Pop over to their Facebook page for more details on how to take part. Having seen the other hugely impressive entries, I don’t think I have even the slightest smidgen of a chance of winning anything but it’s the taking part that counts, as they say.

Love heart cupcakes collage

The cupcakes were a big hit at the school cake sale. Admittedly they’re a bit more of a faff than I’d usually go in for when it comes to decorating cupcakes but it was worth it to see the children’s faces when they spied them. And if you fancy a pretty-looking sweet treat, the love heart cookies on their own seem to go down rather well with the little ones.

love heart cookies

Love heart cookies

Makes around 40 cookies – so you’ll have plenty left over to enjoy later

250g butter, softened
140g caster sugar
1 egg yolk
2 tsp vanilla extract
a drop or two of red food colouring
300g plain flour
pinch of salt
25g dark chocolate
hundreds and thousands

Preheat the oven to 180°C/gas mark 4.

In a large bowl, beat together the butter, sugar, egg yolk and vanilla extract. Add a couple of drops of red food colouring and combine well.

Sift in the flour and salt and mix thoroughly to form a dough. You’ll need to get your hands in at this point.

Roll out the dough between two sheets of baking parchment until it is roughly half a centimetre thick.

Use a small heart-shaped cutter to cut out your cookies, or work freehand using a sharp knife.

Line a baking tray with more baking parchment and carefully lift the cookies onto the tray, spacing them apart a little.

Bake in the oven for 10 to 12 minutes until just firm to the touch. Remove from the tray and leave to cool completely on a wire rack.

Place the dark chocolate in a small bowl and melt in a microwave. Using a teaspoon, drizzle chocolate onto each love heart cookie and then sprinkle on some hundreds and thousands.

Chocolate chip cupcakes

Makes 12 – six chocolate cupcakes with white chocolate chips and six plain cupcakes with dark chocolate chips

125g butter, softened
125g caster sugar
2 eggs
125g self-raising flour
½ tsp vanilla extract
2 tbsp milk
2 tsp cocoa powder, mixed with a few drops of water into a paste
25g white chocolate chips
25g dark chocolate chips

Preheat the oven to 200°C/gas mark 6.

Put the butter, caster sugar, eggs, flour and vanilla extract into a food processor and whizz until smooth. Add the milk and mix again.

Split the mixture equally between two separate bowls. Into the first add the cocoa paste and mix in carefully. Then add the white chocolate chips and stir until well dispersed through the mixture. Into the second bowl of plain mixture add the dark chocolate chips and again stir in.

Line a 12-bun muffin tin with 12 muffin cases.

Spoon the mixture into the paper cases and bake in the oven for 15 to 20 minutes until the cupcakes are springy to the touch and just golden on top.

Remove the cakes from the tin and leave to cool completely on a wire rack.

Double chocolate and cream cheese marbled topping

100g cream cheese
200g icing sugar
75g white chocolate
75g dark chocolate

Scoop the cream cheese into a large bowl and sieve in the icing sugar. Beat together until thoroughly combined. Place half the mixture into a second bowl.

Place the white chocolate and dark chocolate into two separate bowls and melt in the microwave. Add the white chocolate to one bowl of topping mixture and the dark chocolate to the other. Combine well.

Place alternate spoonfuls of white chocolate and dark chocolate topping into a piping bag until it is full. Swirl a generous amount onto each of the cupcakes.

And finally, top with one of  your pretty love heart cookies.

Love heart double chocolate cupcakes

Disclosure: Dr Oetker provided me with a complimentary selection of cooking chocolate and cake decorations for this post. No money exchanged hands and all opinions are totally my own.

In the parcel I received 72% Extra Dark Fine Cooks’ Chocolate, 26% White Fine Cooks’ Chocolate, Dark Chocolate Chips, White Chocolate Chips, and Hundreds and Thousands, all of which I used in this recipe.

Baking bread with the kids

bread

Why is it that as soon as the school holidays start, the rain comes? Hopefully today’s downpour was just a temporary blimp but it’s always good to have some rainy day activities up your sleeve, just in case.

My children always love a bit of baking. I usually love it too, although I do have to be in just the right mood to cope with the mess that generally ensues. We try not to stick to ‘kiddy’ things like fairy cakes and smiley faced pizzas and I find bread making is a perfect activity for children. There’s the magic in waiting for the dough to rise and the fun of fashioning the bread rolls into just about any shape imaginable from plaits and hearts to hedgehogs, butterflies and caterpillars.

Bread Collage

This is what we ended up doing when my friend Sarah came over for the day with her children Jack and Molly. Not only is it such good fun to make, you then get to tuck into the wonderfully warm bread for your tea, spread thickly with lots of butter and jam. Children always really enjoy eating food they have made themselves, don’t they?

Bread Collage2

Easy bread rolls

Makes enough to feed four hungry children

400g strong white bread flour
1 tsp salt
7g sachet fast action dried yeast
250ml luke warm water
1 tbsp olive oil
Seeds, nuts and dried fruit for decoration
Oil for greasing

Put the flour, salt and dried yeast in a mixing bowl and combine well.

Make a well in the mixture and pour in the water and olive oil. Gradually work the flour into the oil and water to make a soft dough. If the mixture is dry, add a little more water. If it is sticky, add a little more flour.

Sprinkle a little flour onto your work surface. Knead the dough for five to ten minutes by stretching it away from you and then pulling it back into a ball. Keep going until the dough feels elastic and smooth.

Return the dough to the mixing bowl and cover with cling film or a clean tea towel. Leave in a warm place for around an hour until the dough has roughly doubled in size.

Preheat the oven to 200°C/Gas Mark 6.

Punch the dough to release the air and divide the dough between your children, and let the creativity begin. My daughter Jessie likes to make little hedgehogs using scissors to clip the spikes and pistachio nuts for eyes. Mia has a thing for caterpillars, placing lots of little balls of dough in a line. It helps to brush the bread with a little oil to keep seeds and nuts in place. Put their creations on a baking tray greased with a little oil.

Bake in the oven for 10 to 15 minutes, depending on size, until they are golden brown. Allow to cool a little on a wire rack before devouring with butter and jam. Delicious!

bread

bread

What do you like to bake with your children?

kids-in-the-kitchen-banner